
当我们能够将类型安全性扩展到堆栈的所有部分时,TypeScript真的大放异彩。在本文中,我们将研究如何将类型安全应用于全栈Angular和NestJS应用程序的每个部分,包括数据库访问。我们将看到如何通过使用Nx单回购在整个堆栈中共享类型。
2020年对TypeScript来说是伟大的一年。使用量激增,开发人员开始喜欢类型安全的好处,该语言在许多不同的环境中被采用。
虽然TypeScript对于主要使用React、Vue、Svelte和其他软件的开发人员来说可能是相当新的,但对于Angular开发人员来说,它已经存在了相当长的一段时间。Angular(2+版本)最初于2015年编写,并使用TypeScript完成。Angular团队早期就在类型安全上下了赌注,鼓励开发人员也用TypeScript编写Angular应用程序,尽管用JavaScript编写它们是一种选择。
许多Angular开发人员最初都很抗拒。TypeScript在2015年还不是很成熟,学习曲线也很陡峭。由于环境的不兼容性和错误,速度减慢是很常见的。周围经常有很多挫折感。
快进到2021年,Angular开发人员使用TypeScript取得了巨大成功。多年来,团队从类型安全中受益匪浅。
虽然Angular应用程序的类型安全并不是什么新鲜事,但对于跨整个堆栈工作的Angular开发人员来说,这并不常见。像NestJS这样的框架使得在Node环境中使用TypeScript变得很容易,但有一点仍然缺乏,那就是数据库。现在有几种工具可以实现类型安全的数据库访问,Prisma就是其中之一。
在本文中,我们将研究如何使用Prisma生成的类型将类型安全应用于Angular和Nest电子商务应用程序的所有部分。我们将在Nx单回购中工作,这样我们就可以轻松地在整个堆栈中导入类型。让我们开始吧!
Check out the code for the project on GitHub.
Create an Nx Workspace
One of the easiest ways to share types between a front end and backend project is to house everything under a monorepo. Nx Dev Tools (created by Nrwl) makes working with monorepos simple. Nx stipulates a set of conventions that, when followed, allow for simplicity when maintaining multiple applications under a single repository.
Let's start by creating an Nx workspace for our project. We'll use the create-nx-workspace command to do so.
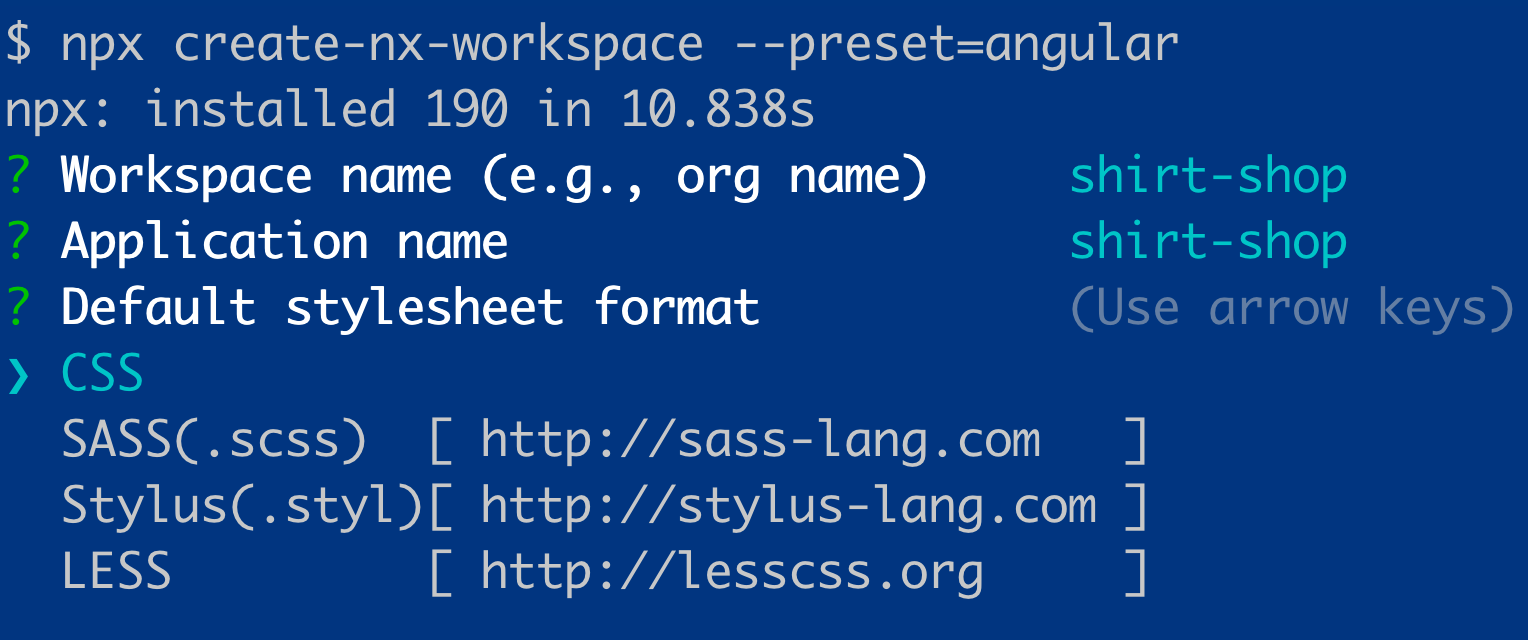
In a terminal window, create a workspace with a preset of angular.
npx create-nx-workspace --preset=angular
An interactive prompt takes us through the setup process. Select a name for the workspace and application and then continue through the prompts.
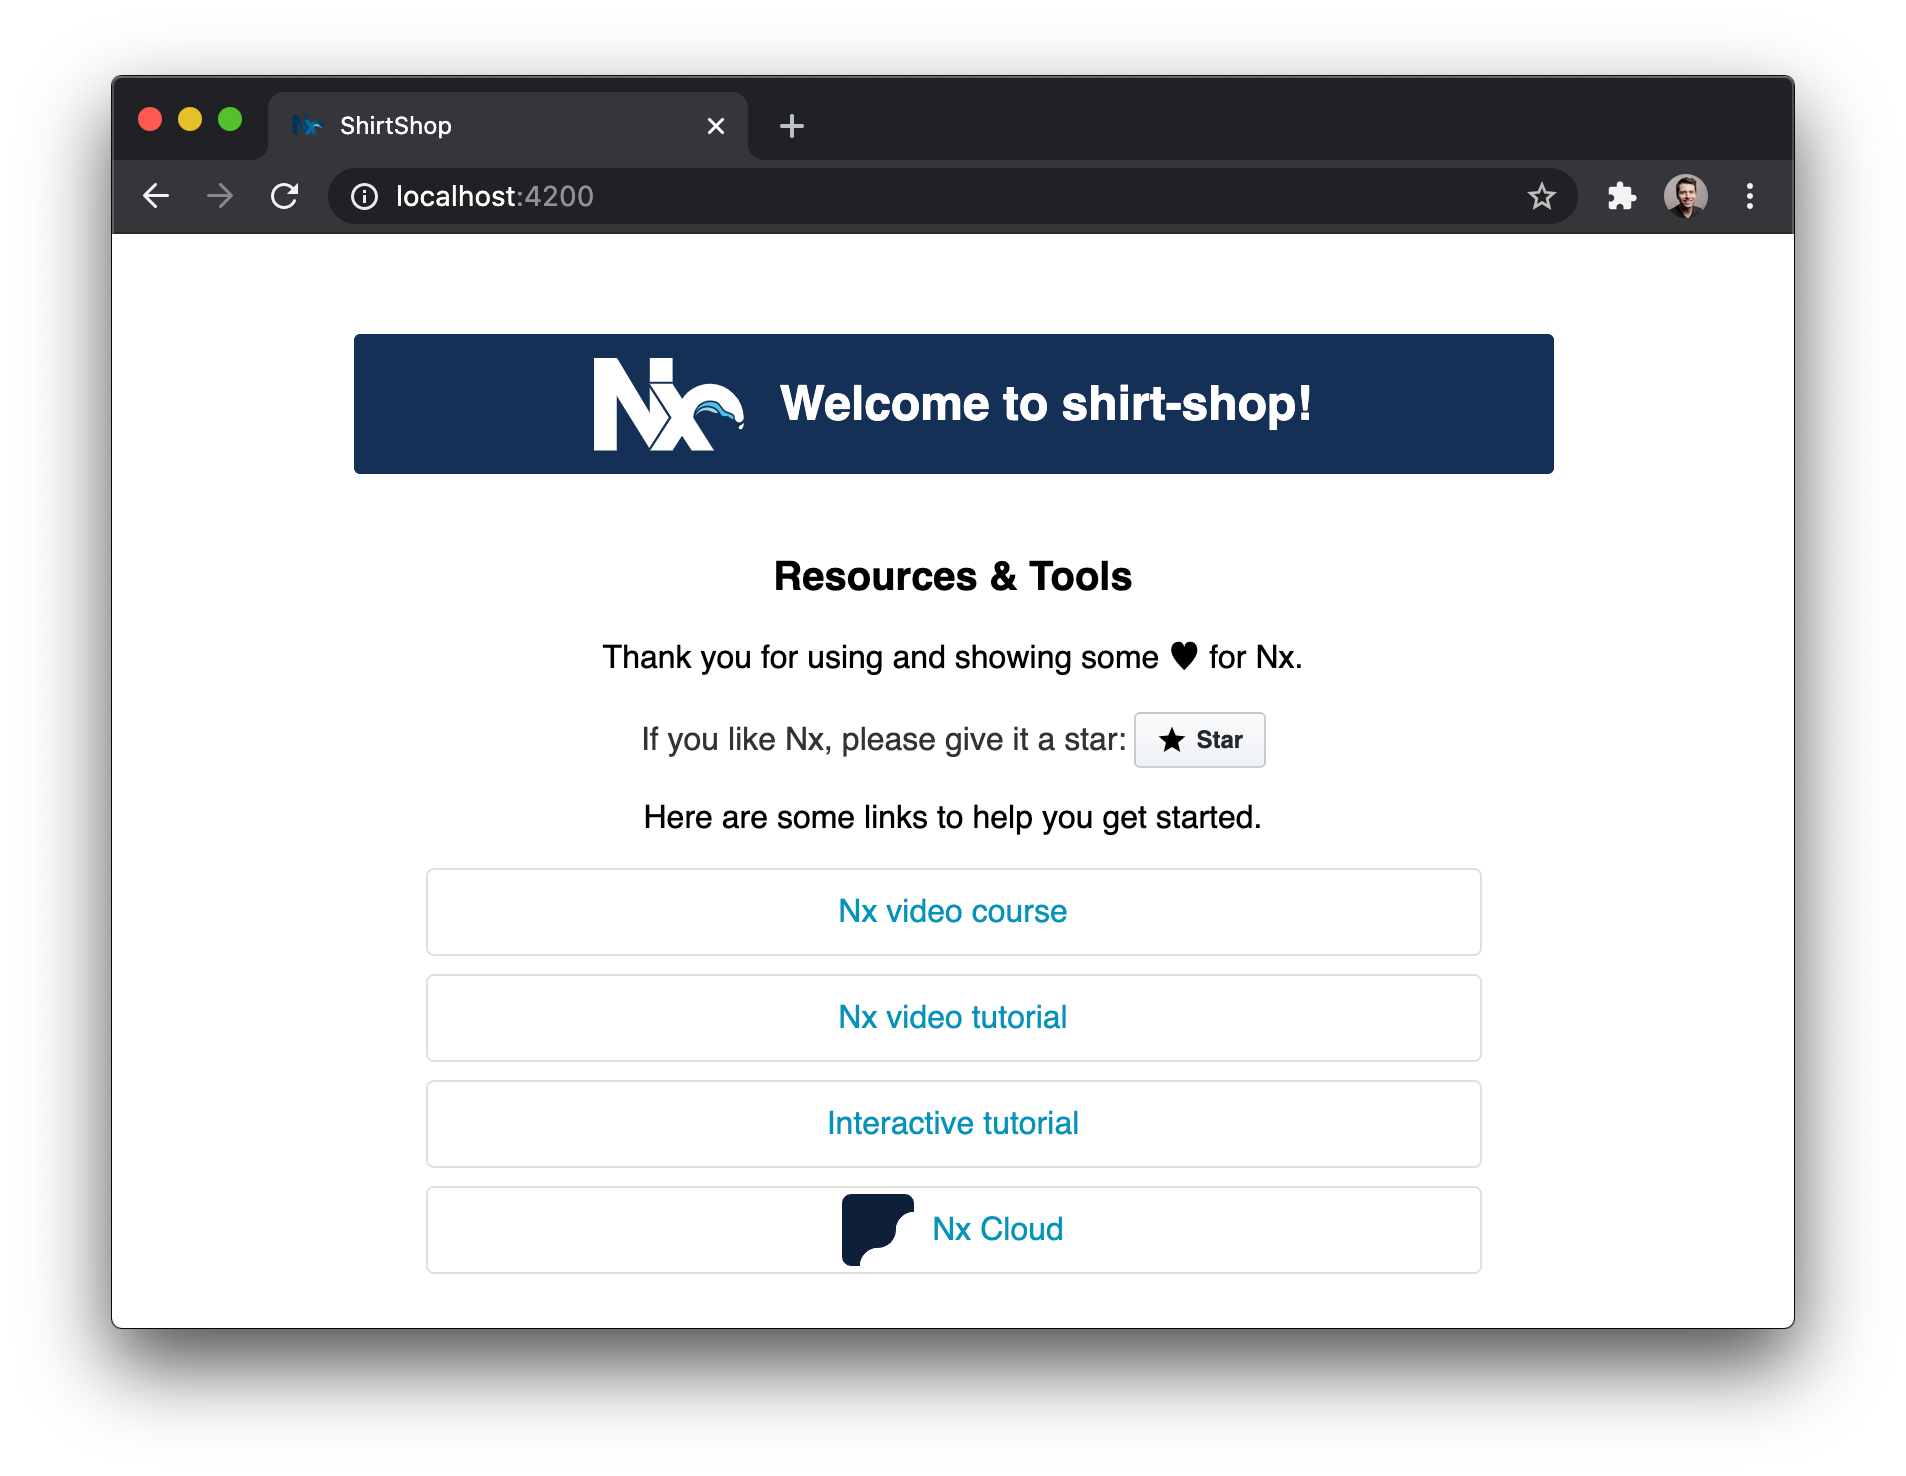
Once Nx finishes wiring up the workspace, open it up and try running the Angular application.
npm start
This command will tell Nx to serve the Angular application that was created as the workspace initialized. After it compiles, open up localhost:4200 to make sure everything is working.
Add a NestJS Application
Our front end is ready to go but we haven't yet included a project for the backend. Let's add a NestJS project to the workspace.
To add our NestJS project, we first need to install the official NestJS plugin for Nx. In a new terminal window, grab the @nrwl/nx package from npm.
npm install -D @nrwl/nest
After installation, use the plugin to generate a NestJS project within the workspace. Since we'll only have one backend project for this example, let's just name it "api".
nx generate @nrwl/nest:application api
Once the generator finishes, we can see a new folder called api under the apps directory. This is where our NestJS app lives.
The default NestJS installation comes with a single endpoint which returns a "hello world" message. Let's start the API and make sure we can access the endpoint. To start the API, target the nx serve command directly at the NestJS app.
nx serve api
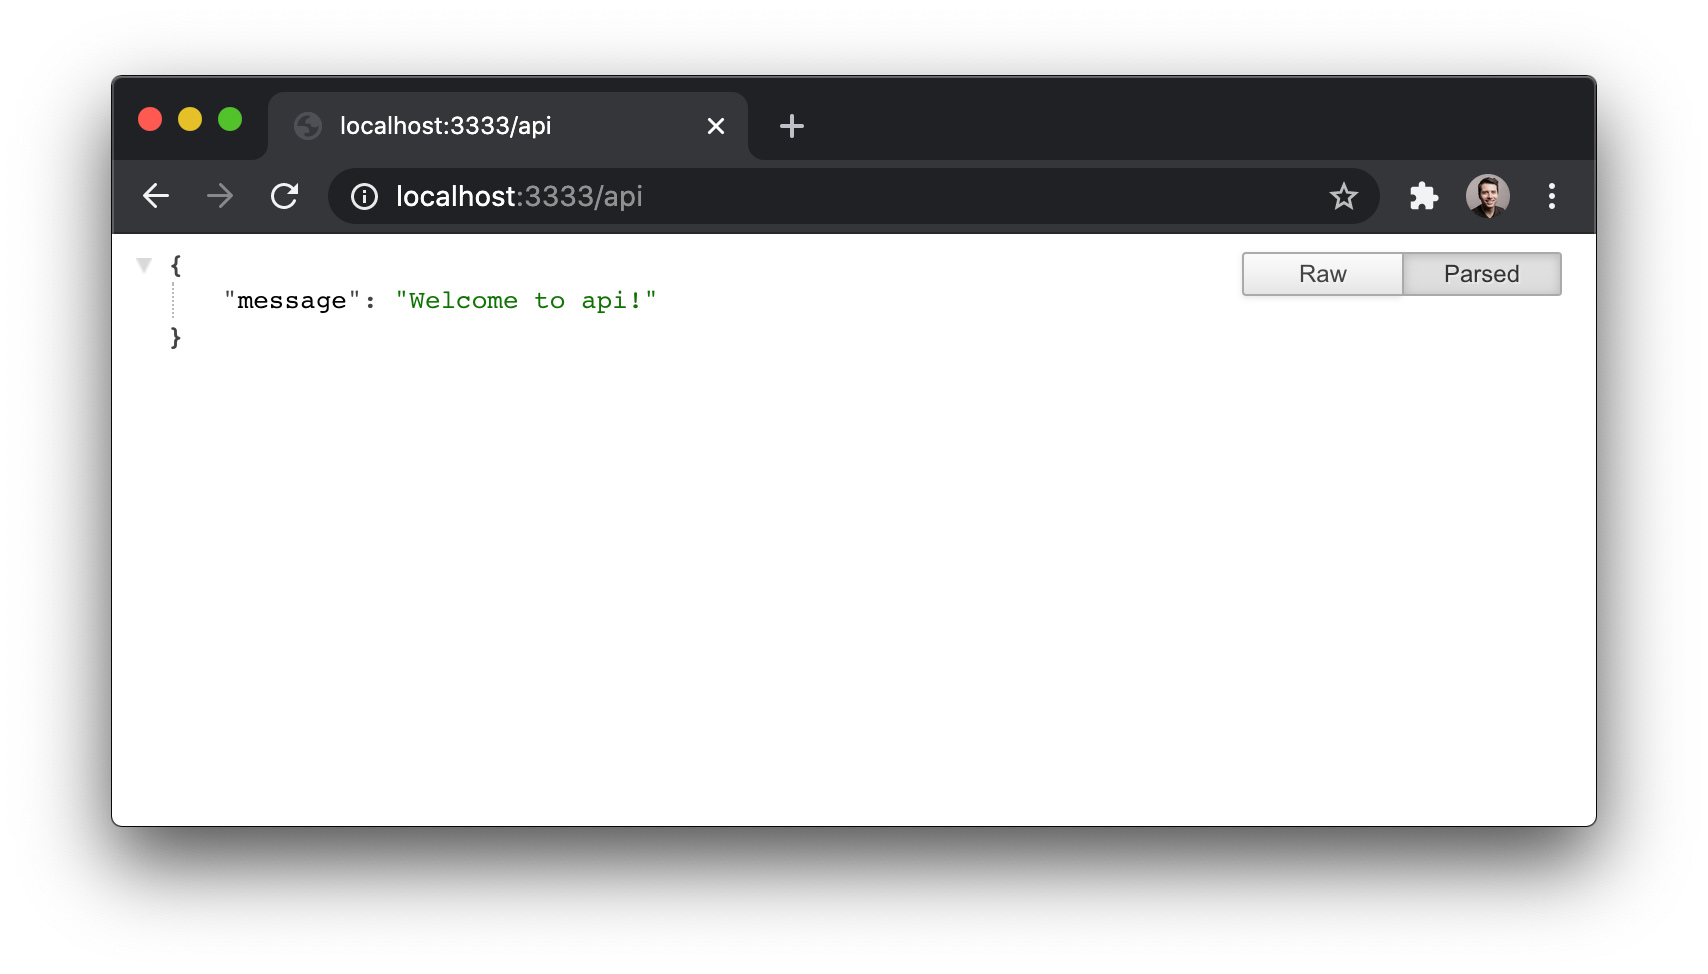
Once the API is up and running, go to http://localhost:3333/api in the browser and make sure you can see the "hello world" message.
Install Prisma and Set Up a Database
Now that we've got our front end and backend projects in place, let's set up Prisma so we can start writing some code!
We need to install two packages to work with Prisma: the Prisma Client (as a regular dependency) and the Prisma CLI (as a dev dependency).
npm install @prisma/clientnpm install -D @prisma/cli
The Prisma Client is what gives us ORM-style type-safe database access in our code. The Prisma CLI is what gives us a set of commands to initialize Prisma, create database migrations, and more.
With those packages installed, let's initialize Prisma.
npx prisma init
After running this command, a prisma directory is created at the workspace root. Inside is a single file called schema.prisma.
This file uses the Prisma Schema Language and is the place where we define the shape of our database. We use it to describe the tables for our databases and their columns, the relationships between tables, and more.
When we create a Prisma model, we need to select a provider for our datasource. The default schema.prisma file comes with a datasource called db which uses PostgreSQL as the provider.
Instead of using Postgres, let's use SQLite so we can keep things simple. Switch up the db datasource so that uses SQLite. Point the url parameter to a file called dev.db within the filesystem.
datasource db {
  provider = "sqlite"
  url      = "file:./dev.db"
}
Note: We don't need to create the dev.db file ourselves. Its creation will be taken care of for us in a later step.
Let's now set up a simple model for our shop. To get ourselves started, let's work with a single table called Product. To do so, create a new model in the schema file and give it some fields.
model Product {
  id          String @id @default(cuid())
  name        String
  description String
  image       String
  price       Int
  sku         String
}
The id field is marked as the primary key via the @id directive. We're also setting its default value to be a collision-resistant unique ID. The other fields and fairly straight-forward in their purpose.
With the model in place, let's run our first migration so that the filesystem database file gets created and populated with our Product table.
npx prisma migrate dev --preview-feature
An interactive prompt will ask for the name of the migration. Call it whatever you like, something like init works fine.
After the migration completes, a dev.db file is created in the prisma directory, along with a migrations directory. It's within the migrations directory that all of the SQL that's used to perform our database migrations is stored. Since these files are raw SQL, we have the opportunity to adjust them before they operate on our databases. Read the migrate docs to find out more about how you can customize the migration behavior.
View the Database with Prisma Studio and Seed Some Data
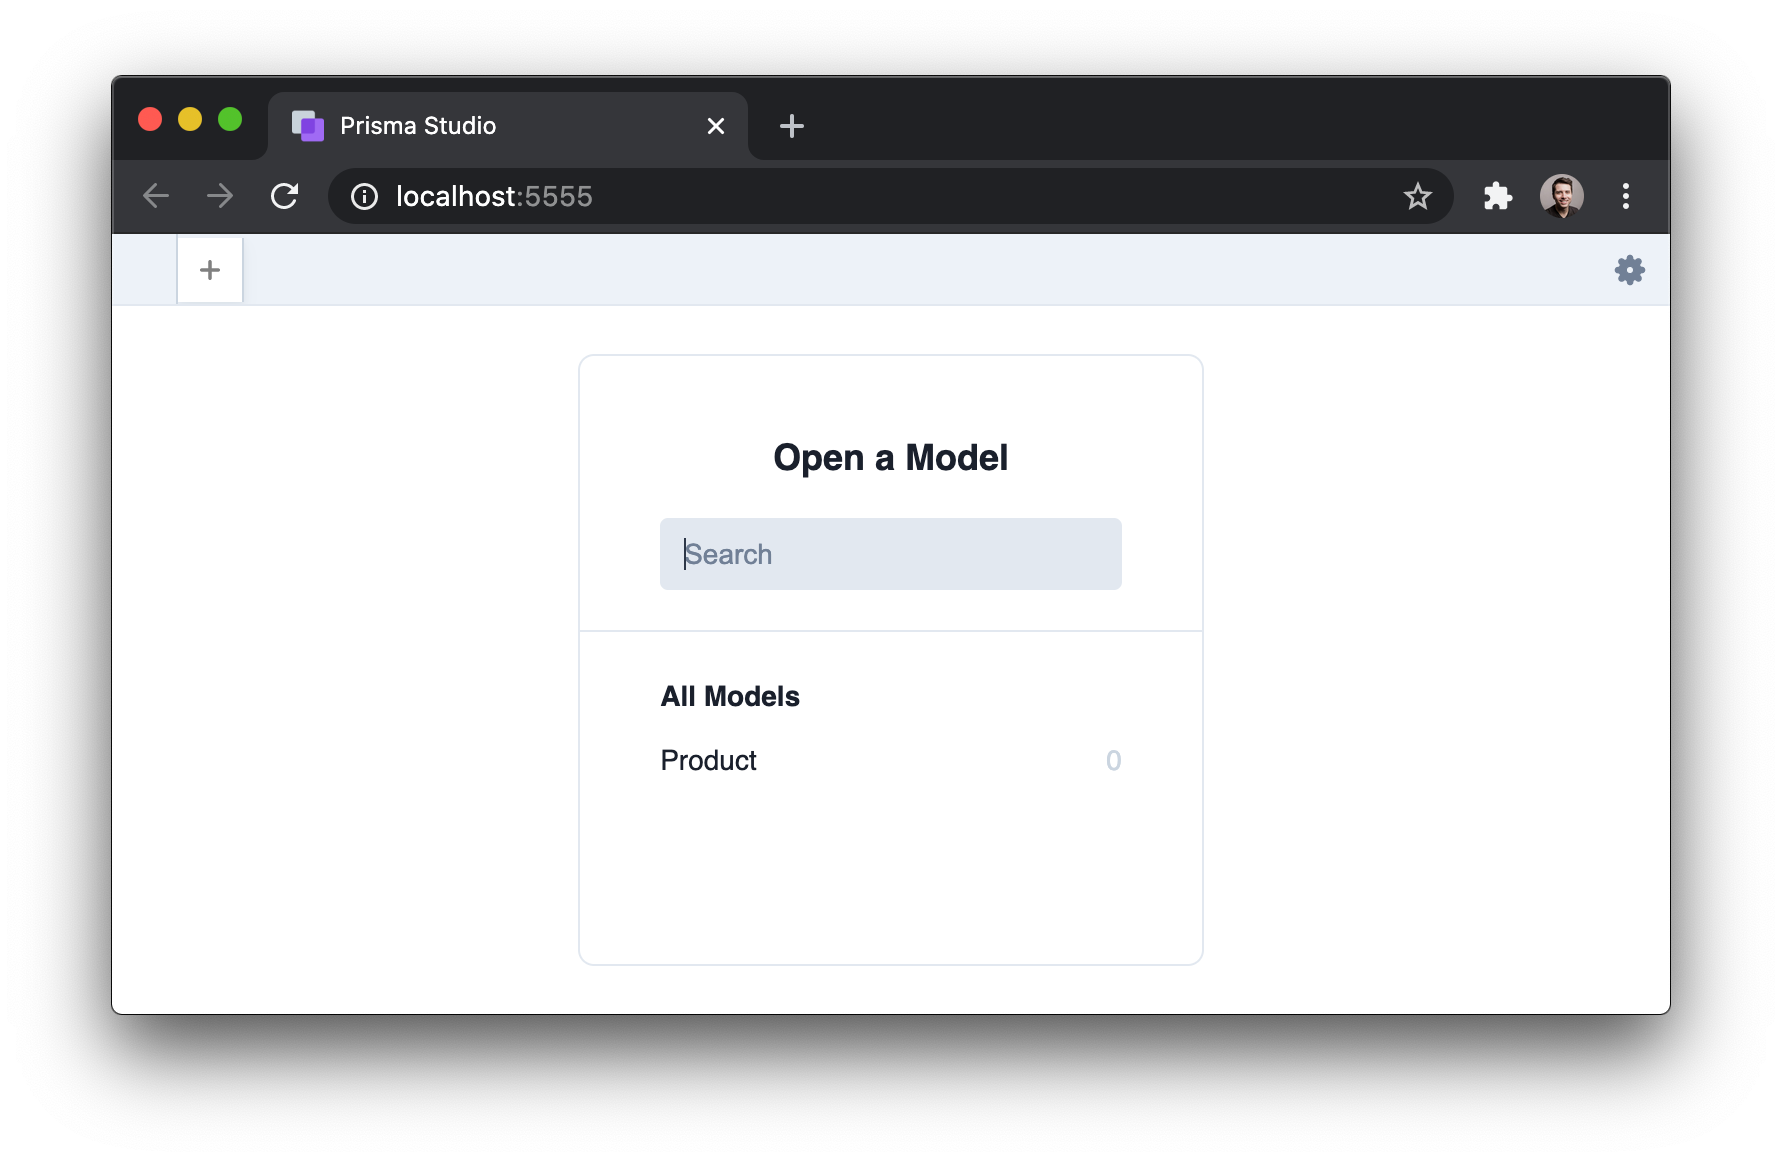
With the database in place and populated with a table, we can now take a look at it and add some data using Prisma Studio. Prisma Studio is a GUI for viewing and managing our databases and is available in-browser or via a desktop app.
In a new terminal window, use the Prisma CLI to fire up Prisma Studio.
npx prisma studio
Running this command will open Prisma Studio. In the browser, it opens at localhost:5555.
We can use Prisma Studio to add data to the database manually. This isn't a great approach if we have a lot of data to seed, but it's useful if we want to add a few records to test with.
Add as many rows as you like and input data for them. If you would like to work with the data seen in this article, you can grab it in this gist.
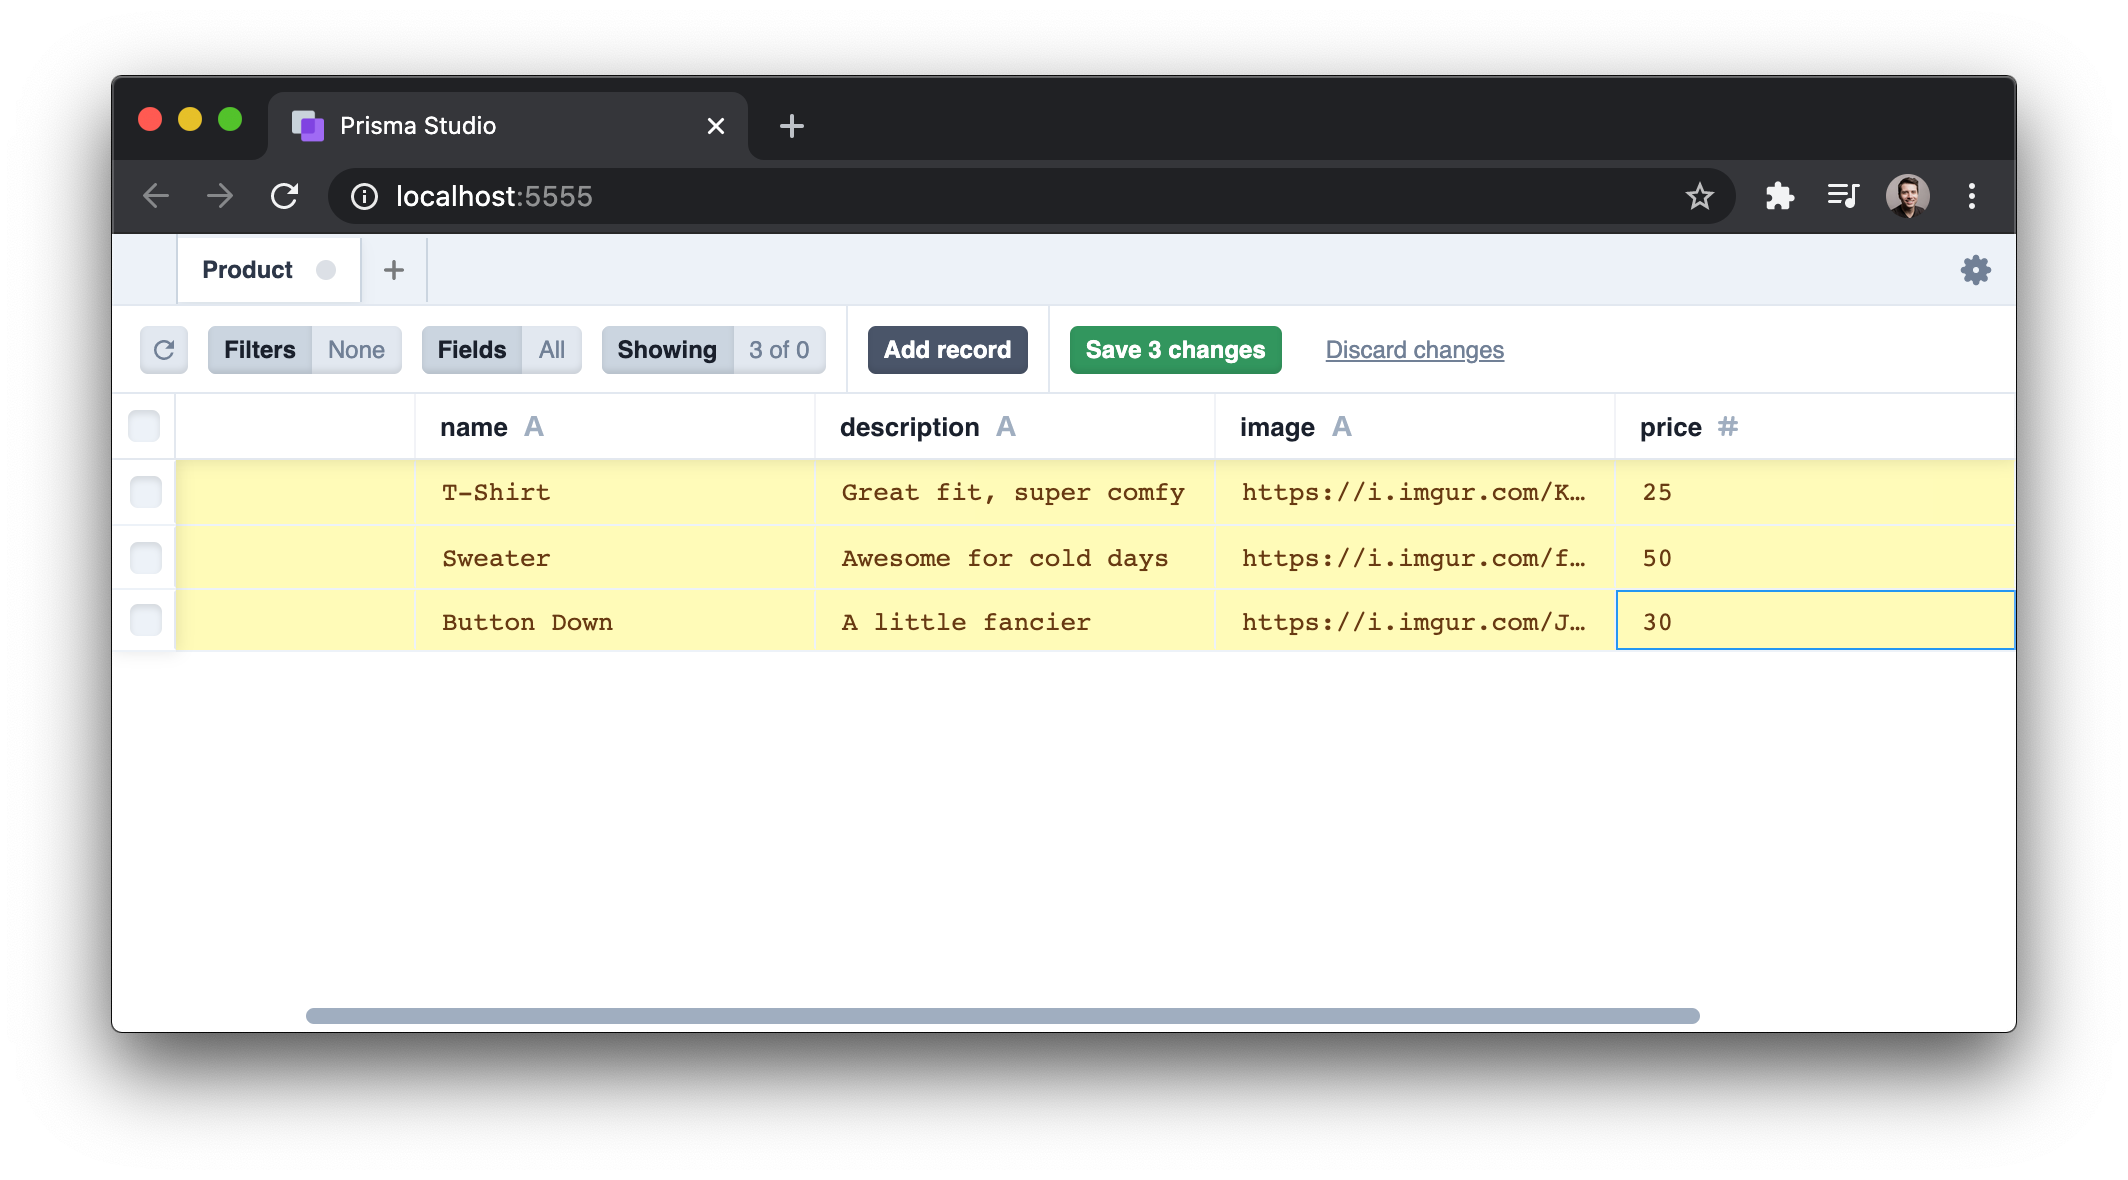
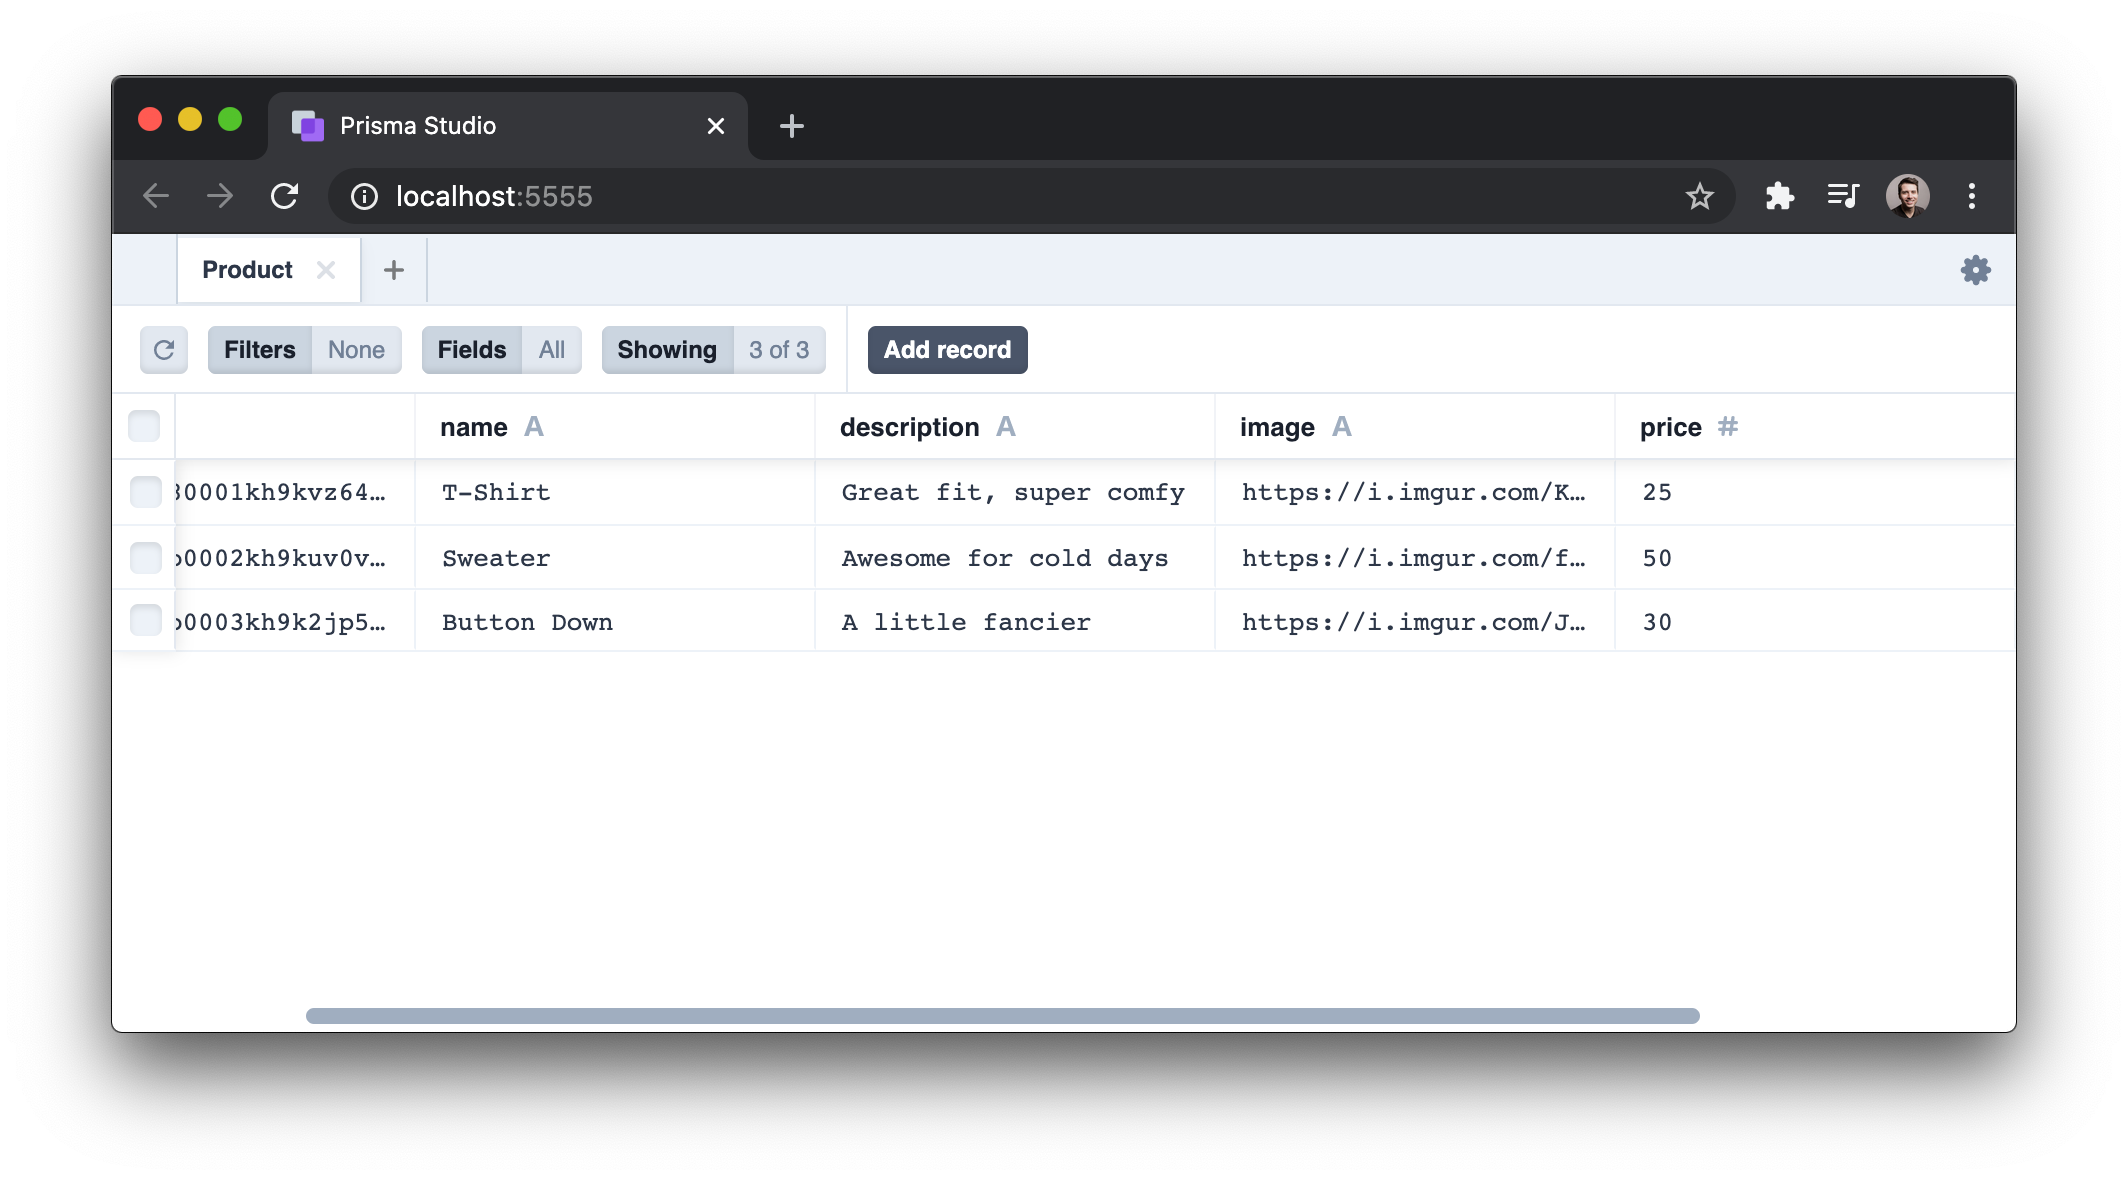
Next, save the changes. IDs for each row will automatically be generated.
We now have all the pieces of our stack in place! We're ready to start writing some code to surface the data from the API and call for it from the Angular app.
Create a Products Controller for the API
The data in our database is ready to go. What we need now is an endpoint we can call to retreive it. To make this happen, we'll create a library for our NestJS controller and a service that we can reach into to expose an endpoint that responds to GET requests.
Use the NestJS Nx plugin to generate a new library called products. Include a controller and a service within.
nx generate @nrwl/nest:library products --controller --service
We'll create a method in the service to reach into our database to get the data. Then, in the controller, we'll expose a GET endpoint which uses the service to get that data and return it to the client.
Let's start by building out the database query within the service. This is the first spot we'll see Prisma's types really shine!
Within products.service.ts, import PrismaClient, create an instance of it, and expose a public method to query for the data.
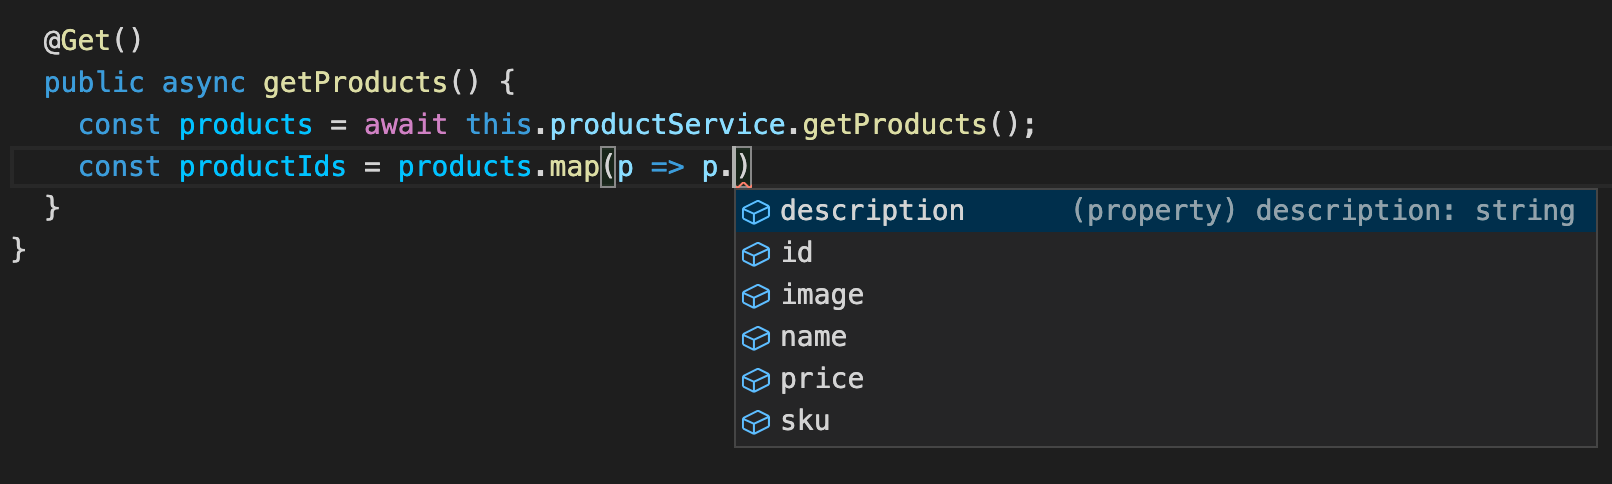
// libs/products/src/lib/products.service.tsimport { Injectable } from '@nestjs/common' import { PrismaClient, Product } from '@prisma/client'const prisma = new PrismaClient()@Injectable() export class ProductService { public getProducts(): Promise<Product[]> { return prisma.product.findMany() } }
We're importing two things from @prisma/client here: PrismaClient and Product.
PrismaClient is what we use to create an instance of our database client and it exposes methods and properties that are useful for querying the database.
The Product import is the TypeScript type that was generated for us by Prisma when we ran our database migrations. This type has the shape of our Product table and is useful for informing consumers of the getProducts method about what it can expect the returned data to look like.
Note: We're instantiating PrismaClient directly within our ProductsService file here. In a real world application, we should instead create a dedicated file for this instance. That way, we wouldn't need to instantiate it multiple times.
Let's now work within the controller to make a call to getProducts to fetch the data. Open up products.controller.ts and add a method which responds to GET requests.
// libs/products/src/lib/products.controller.tsimport { Controller, Get } from '@nestjs/common' import { ProductsService } from './products.service'@Controller('products') export class ProductController { constructor(private productService: ProductsService) {}@Get() public getProducts() { return this.productService.getProducts() } }
We've applied the getProducts method with the @Get decorator which means when we make a GET request to /products, the method will be run. The method itself reaches into the service to get the data.
Before we can test out this endpoint, we need to add ProductsController and ProductsService in the main module for the api.
Open up app.module.ts found within apps/api/src/app and import ProductsController and ProductsService. Then include them in the controllers and providers arrays respectively.
// apps/api/src/app/app.module.tsimport { Module } from '@nestjs/common'import { AppController } from './app.controller' import { AppService } from './app.service' import { ProductsController, ProductsService } from '@shirt-shop/products'@Module({ imports: [], controllers: [AppController, ProductsController], providers: [AppService, ProductsService], }) export class AppModule {}
Now head over to the browser and test it out by going to http://localhost:3333/api/products.
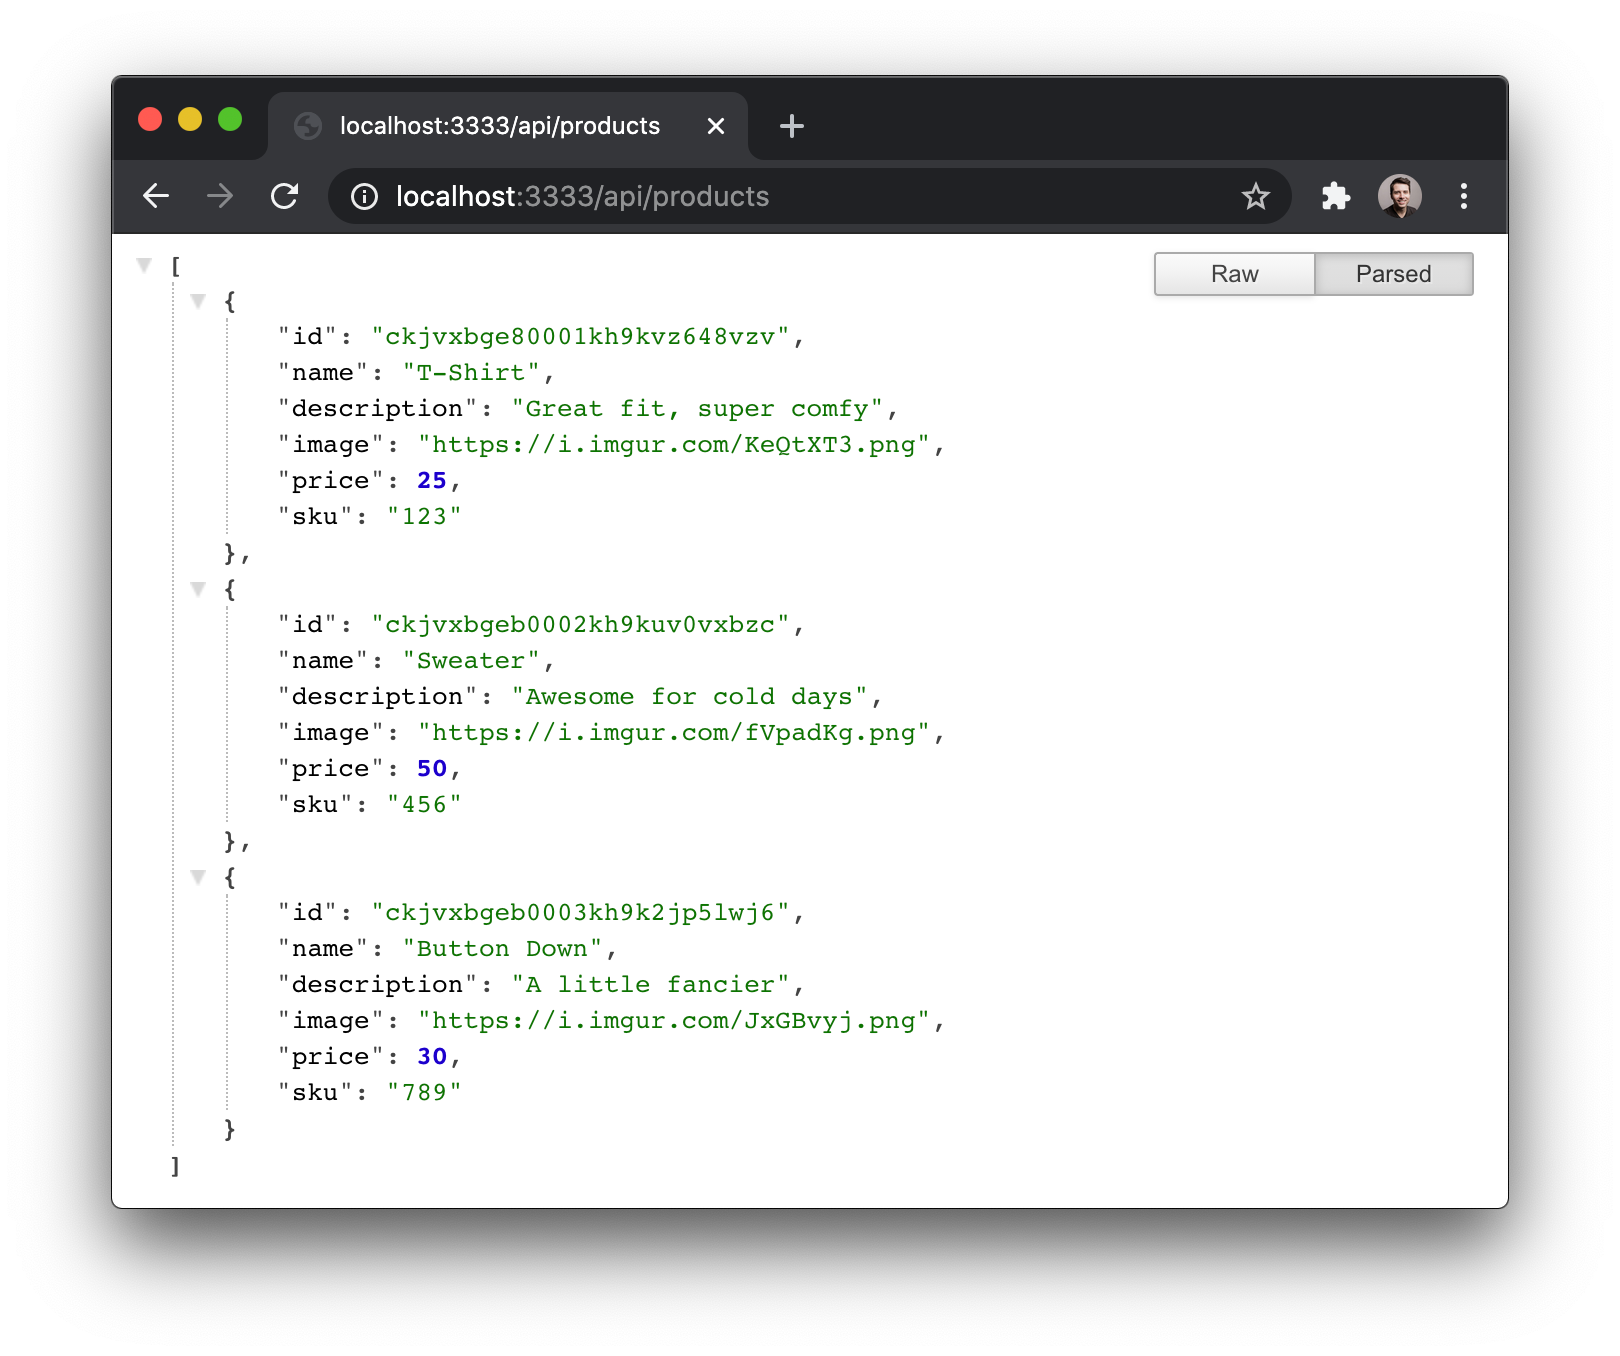
It may not be very apparent at this point, but our endpoint has a layer of type safety applied to it that can help us out if we need to manipulate and/or modify data before it is returned to the client. For example, if we need to map over our data and get access to its properties, we now have full autocompletion enabled when we do so. This occurs because we told the getProducts method in the ProductsService that the return type is a Promise that resolves with an array of type Product.
Now that we have the API working, let's wire up the Angular application to make a call for this data and display it!
Enable CORS
When we create our NestJS API, we have the option of setting up a proxy for our frontend applications such that both the front end and backend get served over the same port. This is useful for situations where we don't want to have separate domains for the two sides of the app.
Instead of setting up a proxy for this demo, we can instead enable CORS on the backend so that our front end can make calls to it. We won't need this until later, but let's get it set up and out of the way now.
Open up apps/api/src/main.ts and add a call to `app.enableCors();
// apps/api/src/main.tsimport { Logger } from '@nestjs/common' import { NestFactory } from '@nestjs/core'import { AppModule } from './app/app.module'async function bootstrap() { const app = await NestFactory.create(AppModule) const globalPrefix = 'api' app.setGlobalPrefix(globalPrefix) app.enableCors() const port = process.env.PORT || 3333 await app.listen(port, () => { Logger.log('Listening at http://localhost:' + port + '/' + globalPrefix) }) }bootstrap()
Create a UI Module for the Angular App
We could just start building components directly within the shirt-shop app in our Nx workspace, but that would be against the advice that Nx gives about how to manage code in our monorepos. Instead, let's create a new module that will be dedicated to components that make up our UI.
Head over to the command line and create a new module. Follow the prompts to select the desired CSS variety.
nx generate @nrwl/angular:lib ui
Once the module is in place, we can create a component to list our products as well as a service to make the API call to get the data.
Let's start by generating a component.
nx g component products --project=ui --export
Using the --project=ui flag tells Nx that we want to put this component in our newly-created ui module. We can see the result under /libs/ui/src/lib/products.
Let's now create a service.
nx g service product --project=ui --export
With the new UiModule in place, we now need to add it to the imports array in our app.module.ts file for the frontend.
// apps/shirt-shop/src/app/app.module.tsimport { BrowserModule } from '@angular/platform-browser' import { NgModule } from '@angular/core'import { AppComponent } from './app.component' import { UiModule } from '@shirt-shop/ui'@NgModule({ declarations: [AppComponent], imports: [BrowserModule, UiModule], providers: [], bootstrap: [AppComponent], }) export class AppModule {}
Note: If you get any errors saying that @shirt-shop/ui cannot be found, try restarting the front end by stopping that process and running nx serve again.
Add an API Call to the Service
We'll use Angular's built-in HttpClientModule to get access to an HTTP client for making requests to the API. To get started, let's import the appropriate module. The place to do this is within the ui.module.ts file in our new UiModule.
// libs/ui/src/lib/ui.module.tsimport { NgModule } from '@angular/core' import { CommonModule } from '@angular/common' import { ProductsComponent } from './products/products.component' import { HttpClientModule } from '@angular/common/http'@NgModule({ imports: [CommonModule, HttpClientModule], declarations: [ProductsComponent], exports: [ProductsComponent], }) export class UiModule {}
We can now import Angular's HttpClient within our ProductService and make calls with it.
// libs/ui/src/lib/product.service.tsimport { HttpClient } from '@angular/common/http' import { Injectable } from '@angular/core' import { Product } from '@prisma/client' import { Observable } from 'rxjs'@Injectable({ providedIn: 'root', }) export class ProductService { private API_URL: string = 'http://localhost:3333/api'constructor(private readonly http: HttpClient) {}public getProducts(): Observable<Product[]> { { return this.http.get<Product[]>(`${this.API_URL}/products`) } } }
Notice that we're using the same Product type that gets exported from @prisma/client here within our ProductService that was used on the backend in the ProductsController. This is a great illustration of how we can benefit from using the same types across our whole stack. When we use the getProducts method from this service, we'll now have type safety applied.
Build Out the Products Component
We're now ready to add some structure and style to our ProductsComponent so we can display the products to our users.
Let's start by adding some CSS that will style our component.
Open up libs/ui/src/lib/products/product.component.css and add the following styles:
/* libs/ui/src/lib/products/product.component.css */:host { display: grid; gap: 40px; grid-template-columns: repeat(3, 33% [col-start]); }.product-card { box-shadow: 0 10px 15px -3px rgba(0, 0, 0, 0.1), 0 4px 6px -2px rgba(0, 0, 0, 0.05); background-color: #fff; border-radius: 15px; padding: 15px; }.product-card img { border-radius: 15px; max-width: 100%; height: 200px; display: block; margin: 0 auto; }.product-name { font-weight: bold; font-size: 22px; }.product-description { color: rgb(122, 122, 122); }.product-price { font-weight: bold; font-size: 24px; }.add-to-cart-button { background: rgb(49, 175, 255); background: linear-gradient(90deg, rgba(49, 175, 255, 1) 0%, rgba(0, 123, 252, 1) 100%); padding: 10px 20px; border-radius: 30px; border: none; color: rgb(219, 233, 248); cursor: pointer; box-shadow: 0 10px 15px -3px rgba(0, 0, 0, 0.1), 0 4px 6px -2px rgba(0, 0, 0, 0.05); }
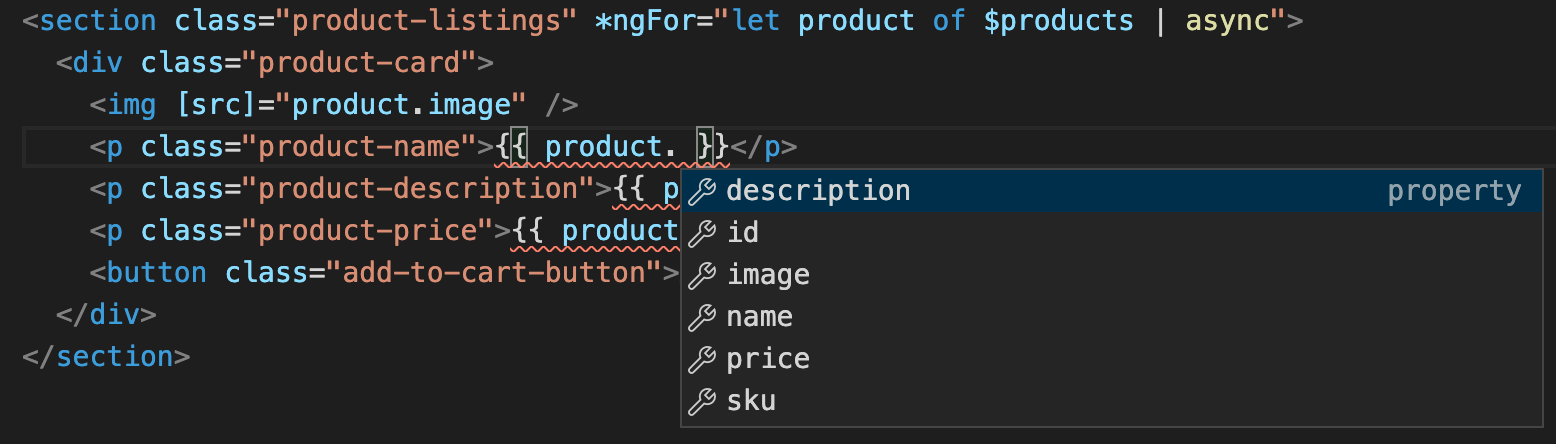
Next, open up libs/ui/src/lib/products/product.component.html and add the structure for products to be displayed..
<section class="product-listings" *ngFor="let product of $products | async">
  <div class="product-card">
    <img [src]="product.image" />
    <p class="product-name">{{ product.name }}</p>
    <p class="product-description">{{ product.description }}</p>
    <p class="product-price">{{ product.price | currency }}</p>
    <button class="add-to-cart-button">Add to Cart</button>
  </div>
</section>
Finally, we need to add a method to the component class which uses the ProductService to get the data. We'll then put the result on the $products observable that we've already stubbed out in our template above.
// libs/ui/src/lib/products/products.component.tsimport { Component, OnInit } from '@angular/core' import { ProductService } from '../product.service' import { Observable } from 'rxjs' import { Product } from '@prisma/client'@Component({ selector: 'shirt-shop-products', templateUrl: './products.component.html', styleUrls: ['./products.component.css'], }) export class ProductsComponent implements OnInit { public $products: Observable<Product[]>constructor(public productService: ProductService) {}ngOnInit(): void { this.$products = this.productService.getProducts() } }
This is another spot where we're using our Product type from @prisma/client to give ourselves type safety. Applying this type directly to the $products observable means that we can get autocompletion in our Angular templates.
With our component in place, we're now ready to call it from the shirt-shop app and display the results!
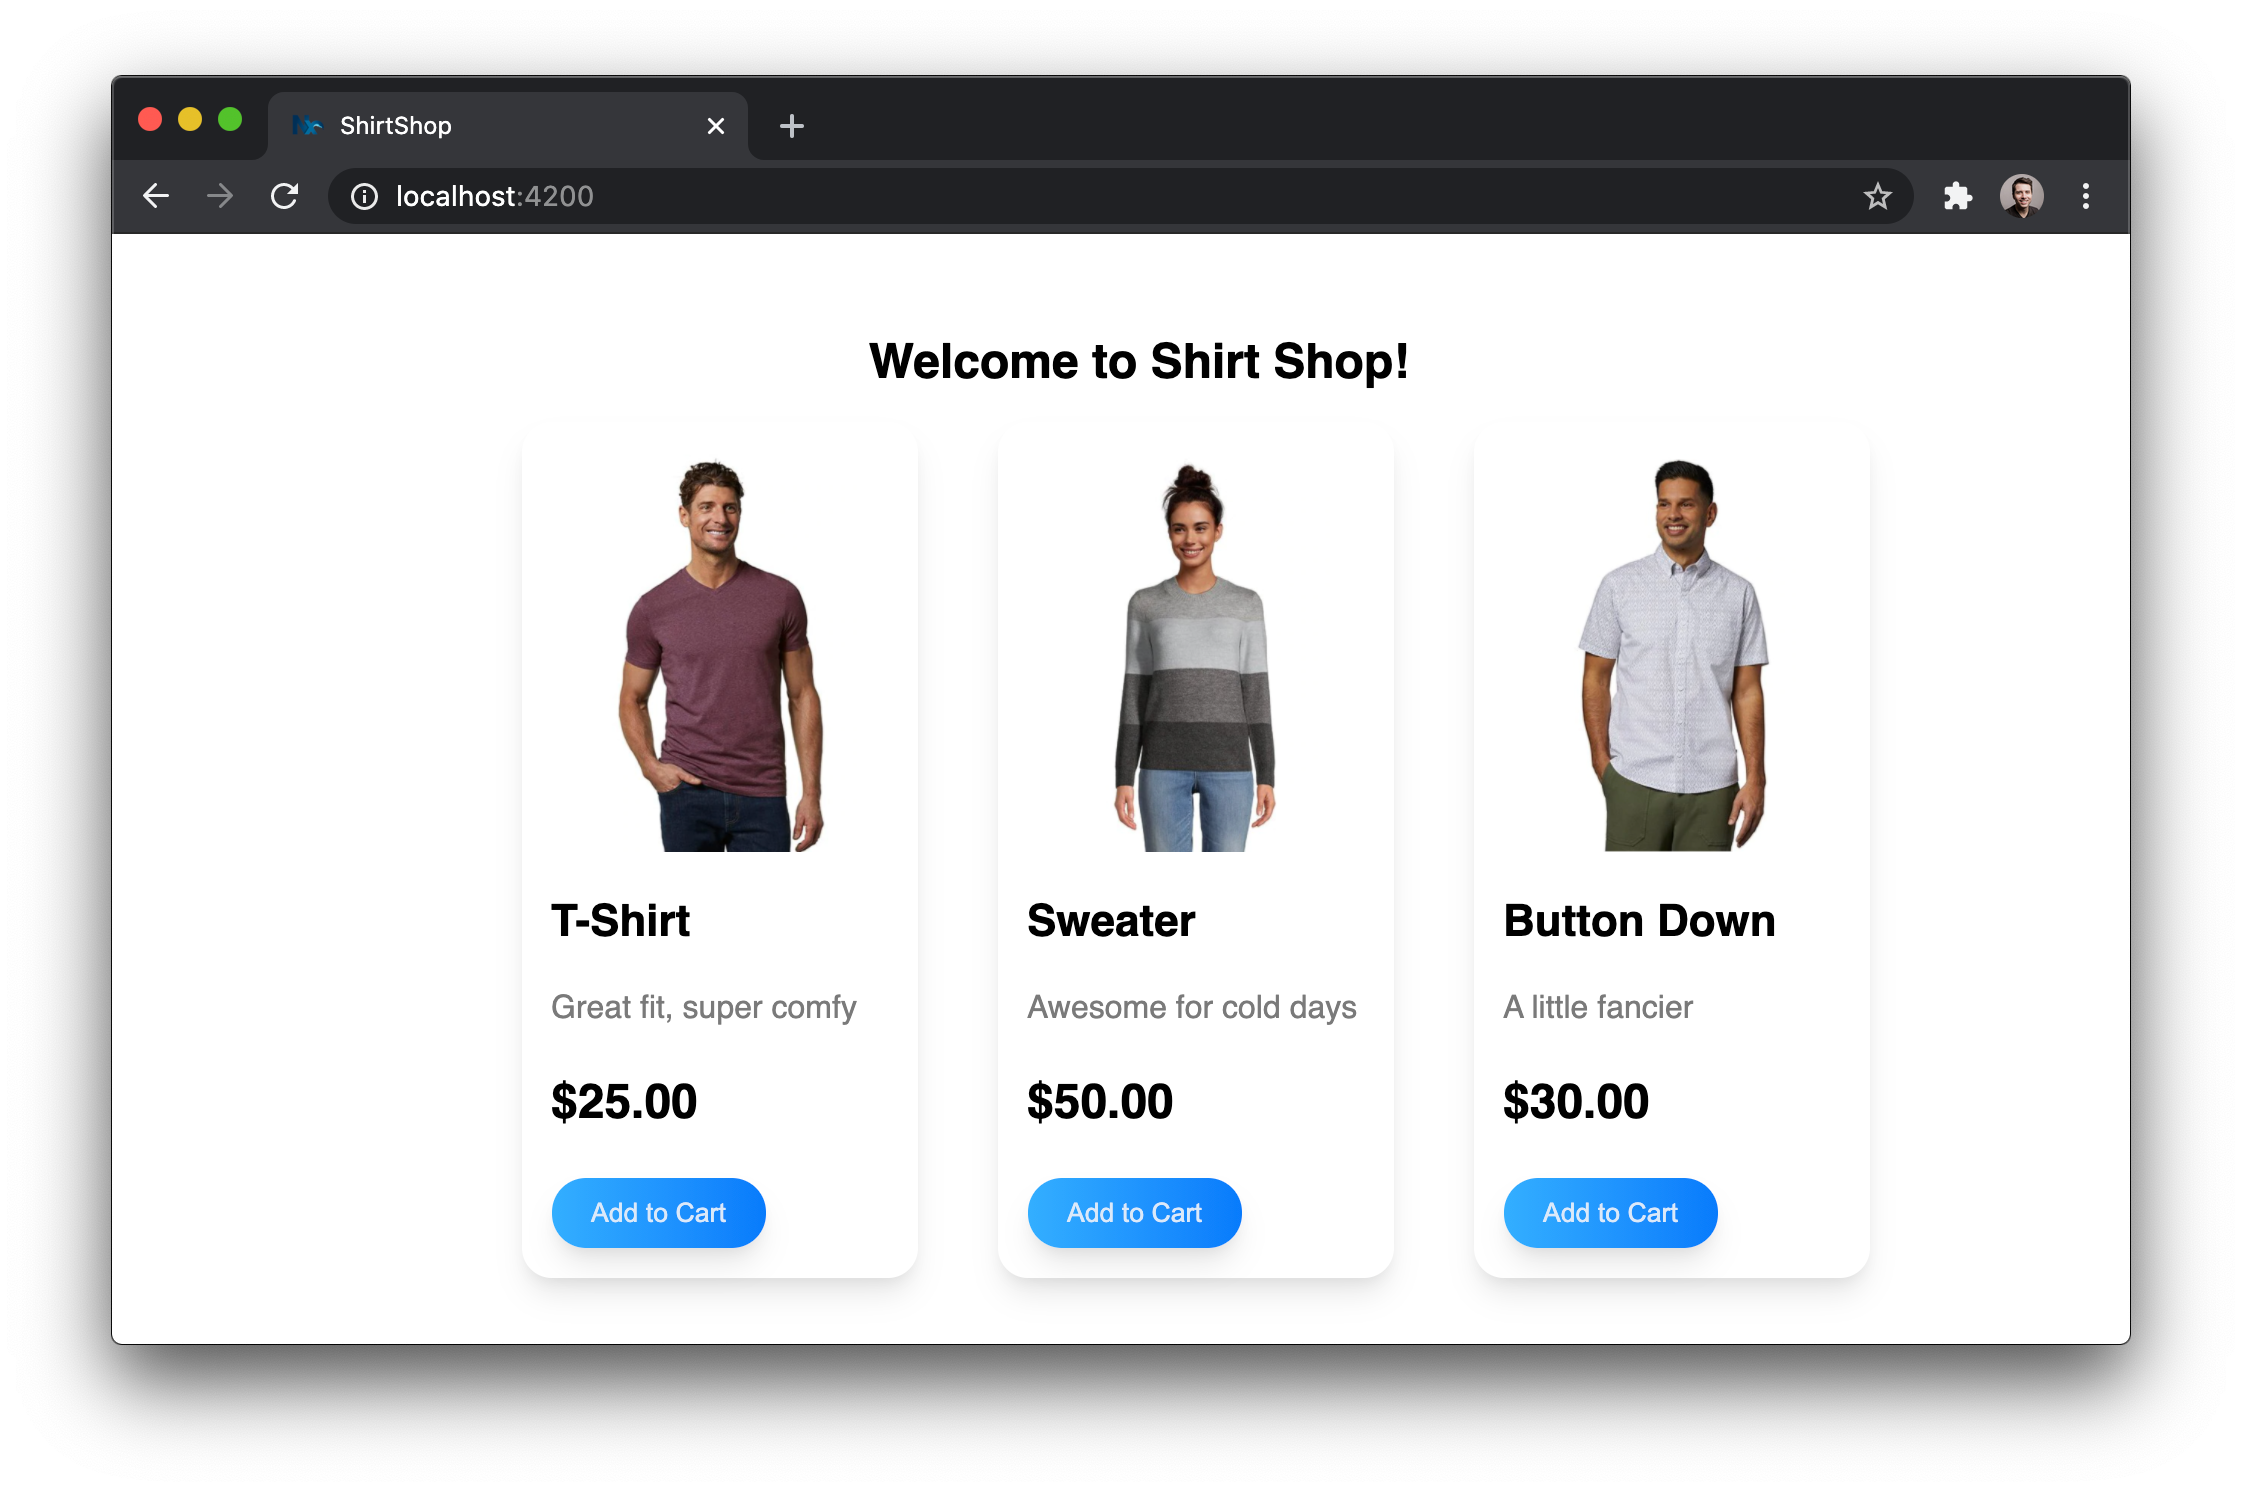
Open up apps/shirt-shop/src/app/app.component.html and include the Products component.
<h1>Welcome to Shirt Shop!</h1>
<shirt-shop-products></shirt-shop-products>
Going Beyond Displaying Data
For any real-world applicaton, we no doubt need a way to take user input and create records in the database.
We won't build out a full CRUD experience for this demonstration, but we can take a quick look at some of the features from the PrismaClient that would help us store new data.
Let's say we have a section in our app which allows admins to add new products in. We'd likely want to start by creating an endpoint to receive this data and store it. In this case, we could use the create method on PrismaClient along with the ProductCreateInput type that is exposed on a top-level export called Prisma.
import { Injectable } from '@nestjs/common' import { PrismaClient, Product, Prisma } from '@prisma/client'const prisma = new PrismaClient()@Injectable() export class ProductService { // ...public createProduct(data: Prisma.ProductCreateInput): Promise<Product> { return prisma.product.create({ data, }) } }
The createProduct method takes in some data which is type-hinted to abide by the Product model from our Prisma schema. The returned result is a single Product that gets resolved from a Promise.
It should be noted that just type-hinting our data parameter here doesn't do anything to add real validation to this endpoint. For data validation at the endpoint, we need to use Validation Pipes from NestJS.
总结
TypeScript自从早期在Angular社区中被采用以来,已经走过了很长的路。在前端和后端都使用TypeScript对开发人员的经验和信心来说是个好兆头。将类型安全应用于数据库访问更进一步,为大大小小的团队提供了一系列好处。将整个应用程序封装在像Nx提供的单回购中,为我们提供了一种在整个堆栈中重用代码(包括类型定义)的简单方法。
- 登录 发表评论