
了解如何通过示例项目进行开发和构建
There are so many ways we can build Angular apps and ship for production. One way is to build Angular with NodeJS or Java and another way is to build the angular and serve that static content with NGINX web server. With NodeJS we have to deal with the server code as well, for example, you need to load index.html page with node.
In this post, we will see the details and implementation with the NodeJS. We will go through step by step with an example.
- Introduction
- Prerequisites
- Example Project
- Just Enough NodeJS For This Project
- Development Phase
- How To Build Project For Production
- How To Package Project For Production
- Deploying On AWS Elastic Beanstalk
- Deploying On AWS ECS
- Summary
- Conclusion
Introduction
Angular is a javascript framework for building web apps and it doesn’t load itself in the browser. We need some kind of mechanism that loads the index.html (single page) of Angular with all the dependencies(CSS and js files) in the browser. In this case, we are using node as the webserver which loads Angular assets and accepts any API calls from the Angular app.
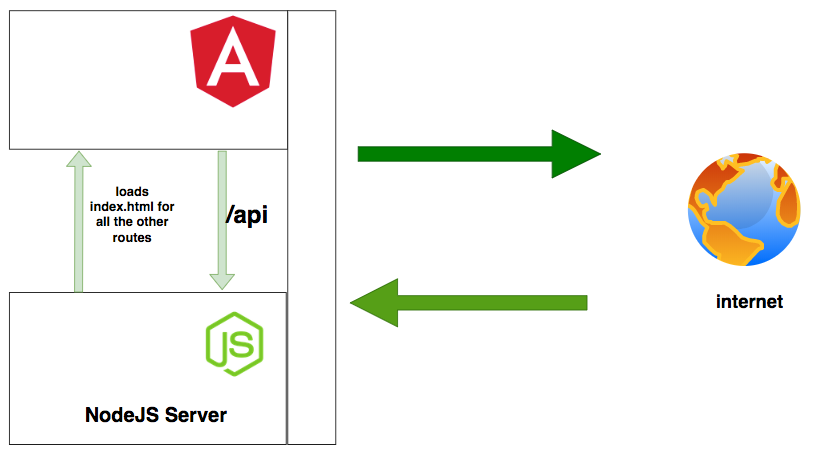
If you look at the above diagram all the web requests without the /api will go to Angular routing. All the paths that contain /api will be handled by the Node server.
In this post, we are going to develop an Angular app with NodeJS and see how to build for production.
Prerequisites
There are some prerequisites for this article. You need to have nodejs installed on your laptop and how http works. If you want to practice and run this on your laptop you need to have these on your laptop.
Example Project
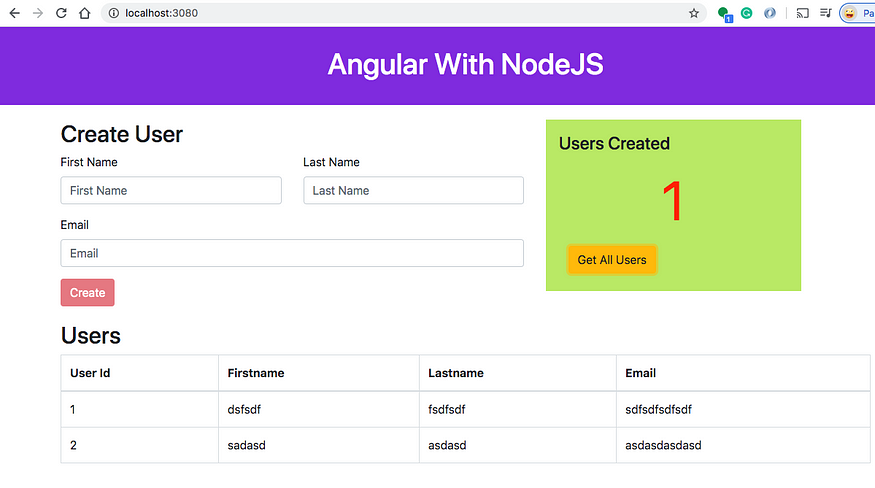
This is a simple project which demonstrates developing and running Angular application with NodeJS. We have a simple app in which we can add users, count, and display them at the side, and retrieve them whenever you want.
As you add users we are making an API call to the nodejs server to store them and get the same data from the server when we retrieve them. You can see network calls in the following video.
Here is a Github link to this project. You can clone it and run it on your machine.
// clone the project
https://github.com/bbachi/angular-nodejs-example.git// install and start the project
npm install
npm start
Just Enough NodeJS For This Project
If you are new to NodeJS don’t worry this short description is enough to get you started with this project. If you are already aware of NodeJS, you can skip this section.
NodeJS is an asynchronous event-driven javascript runtime environment for server-side applications. The current version of the nodejs is 12 and you can install it from this link here. You can click on any LTS link and the NodeJS package is downloaded and you can install it on your laptop.
You can check the version of the Node with this command node -v. You can run javascript on the node REPL by typing the command node on the CLI.

The installation of a node is completed and you know how to run javascript. You can even run javascript files. For example, Let’s put the above commands in the sample.js file and run it with this command node sample.js.
var x = 10;
var y = 20;
var z = x + y;
console.log(z);
Development Phase
Usually, the way you develop and the way you build and run in production are completely different. Thatswhy, I would like to define two phases: The development phase and the Production phase.
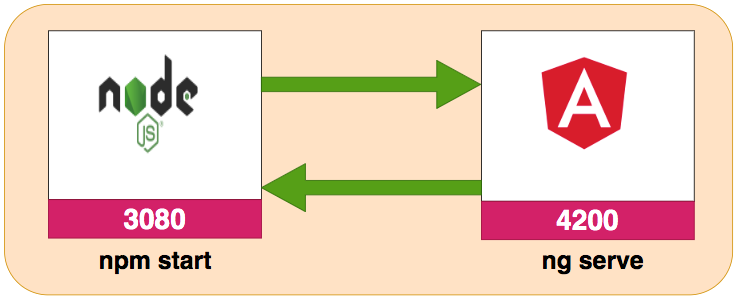
In the development phase, we run the NodeJS server and the Angular app on completely different ports. It’s easier and faster to develop that way. If you look at the following diagram the Angular app is running on port 4200 with the help of a webpack dev server and the NodeJS server is running on port 3080.
Project Structure
Let’s understand the project structure for this project. We will have two package.json: one for Angular and another for nodejs API. It’s always best practice to have completely different node_modules for each one. In this way, you won’t get merging issues or any other problems regarding web and server node modules collision.
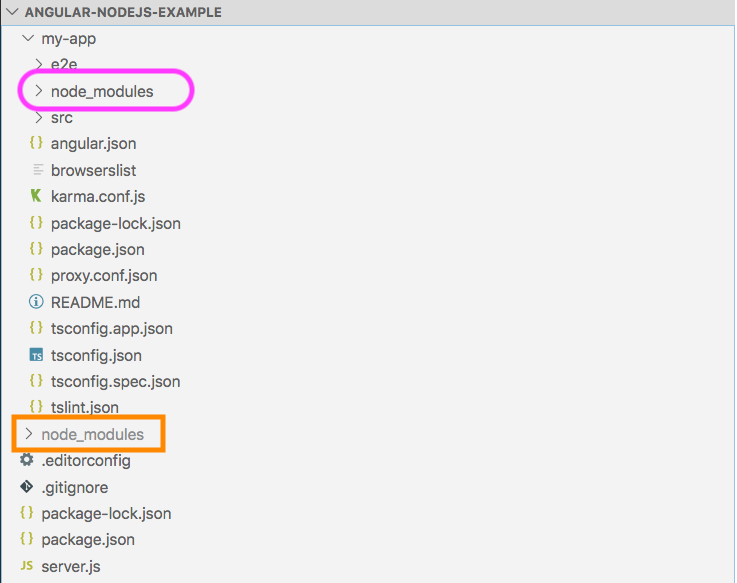
If you look at the above project structure, all the Angular app resides under the my-app folder and nodejs API resides under the root folder. You can have a separate folder for nodejs API as well.
NodeJS API
We use the express and nodemon on the server-side. Express is the Fast, unopinionated, minimalist web framework for NodeJS and nodemon is the library which makes your API reloads automatically whenever there is a change in the files. Let’s install these two dependencies. nodemon is only used for development so install this as a dev dependency.
npm install express --save
npm install nodemon --save-dev
Here is the package.json of nodejs API.
{
  "name": "angular-nodejs-example",
  "version": "1.0.0",
  "description": "node server",
  "main": "index.js",
  "scripts": {
    "start": "node index.js",
    "dev": "nodemon ./server.js localhost 3080",
    "test": "echo \"Error: no test specified\" && exit 1"
  },
  "repository": {
    "type": "git",
    "url": "git+https://github.com/bbachi/angular-nodejs-example.git"
  },
  "author": "Bhargav Bachina",
  "license": "ISC",
  "bugs": {
    "url": "https://github.com/bbachi/angular-nodejs-example/issues"
  },
  "homepage": "https://github.com/bbachi/angular-nodejs-example#readme",
  "dependencies": {
    "express": "^4.17.1"
  },
  "devDependencies": {
    "nodemon": "^2.0.2"
  }
}
We need to import express and define two routes: /api/users and /api/user and the server listening on the port 3080. Here is the server.js file. We use body-parser to handle data in the http request object.
const express = require('express');
const app = express(),
      bodyParser = require("body-parser");
      port = 3080;

const users = [];

app.use(bodyParser.json());

app.get('/api/users', (req, res) => {
  res.json(users);
});

app.post('/api/user', (req, res) => {
  const user = req.body.user;
  users.push(user);
  res.json("user addedd");
});

app.get('/', (req,res) => {
    res.send('App Works !!!!');
});

app.listen(port, () => {
    console.log(`Server listening on the port::${port}`);
});
You need to start the nodejs API with this command npm run devand the moment you change any file, it will be automatically updated.

Angular App
Now the nodejs API is running on port 3080. Now it’s time to look at the Angular app. The entire Angular app is under the folder my-app. You can create with this command ng new my-app. I am not going to put all the files here you can look at the entire files in the above Github link or here.
Let’s see some important files here. Here is the service file which calls node API.
import { Injectable } from '@angular/core';
import { HttpClient } from '@angular/common/http';

@Injectable({
  providedIn: 'root'
})
export class AppService {

  constructor(private http: HttpClient) { }

  rootURL = '/api';

  getUsers() {
    return this.http.get(this.rootURL + '/users');
  }

  addUser(user: any) {
    return this.http.post(this.rootURL + '/user', {user});
  }

}
Here is the app component which subscribes to these calls and gets the data from the API.
import { Component, OnDestroy } from '@angular/core';
import { FormGroup, FormControl, Validators } from '@angular/forms';
import { AppService } from './app.service';
import { takeUntil } from 'rxjs/operators';
import { Subject } from 'rxjs';

@Component({
  selector: 'app-root',
  templateUrl: './app.component.html',
  styleUrls: ['./app.component.css']
})
export class AppComponent implements OnDestroy {

  constructor(private appService: AppService) {}

  title = 'angular-nodejs-example';

  userForm = new FormGroup({
    firstName: new FormControl('', Validators.nullValidator && Validators.required),
    lastName: new FormControl('', Validators.nullValidator && Validators.required),
    email: new FormControl('', Validators.nullValidator && Validators.required)
  });

  users: any[] = [];
  userCount = 0;

  destroy$: Subject<boolean> = new Subject<boolean>();

  onSubmit() {
    this.appService.addUser(this.userForm.value).pipe(takeUntil(this.destroy$)).subscribe(data => {
      console.log('message::::', data);
      this.userCount = this.userCount + 1;
      console.log(this.userCount);
      this.userForm.reset();
    });
  }

  getAllUsers() {
    this.appService.getUsers().pipe(takeUntil(this.destroy$)).subscribe((users: any[]) => {
        this.users = users;
    });
  }

  ngOnDestroy() {
    this.destroy$.next(true);
    this.destroy$.unsubscribe();
  }
}
Interaction between Angular and Node API
In the development phase, the Angular app is running on port 4200 with the help of a webpack dev server and nodejs API running on port 3080.
There should be some interaction between these two. We can proxy all the API calls to nodejs API. Angular provides an inbuilt proxying method. First, we need to define the following proxy.conf.json under my-app folder.
{
  "/api": {
    "target": "http://localhost:3080",
    "secure": false
  }
}
If you look at the file, all the paths that start with /api will be redirected to http://localhost:3080 where the nodejs API running. Then, you need to define in angular.json under the serve part with the proxyConfig key. Here is the complete angular.json file.
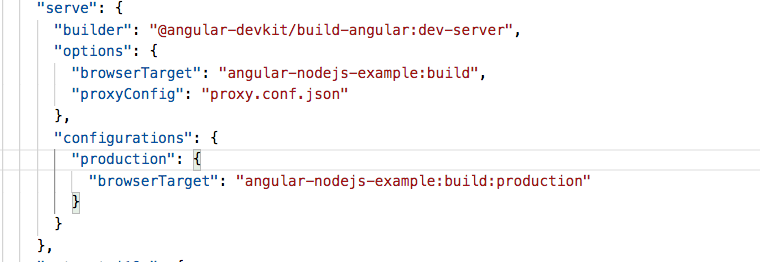
Once this is configured, you can run the Angular app on port 4200 and NodeJS API on 3080 still make them work together.
// nodejs API (Terminal 1)
npm run dev
// Angular app (Terminal 2)
npm start
How To Build Project For Production
The Angular app runs on the port 4200 with the help of a webpack dev server. This is not the case for running in production. We have to build the Angular project and load those static assets with the node server. Let’s see those step by step here.
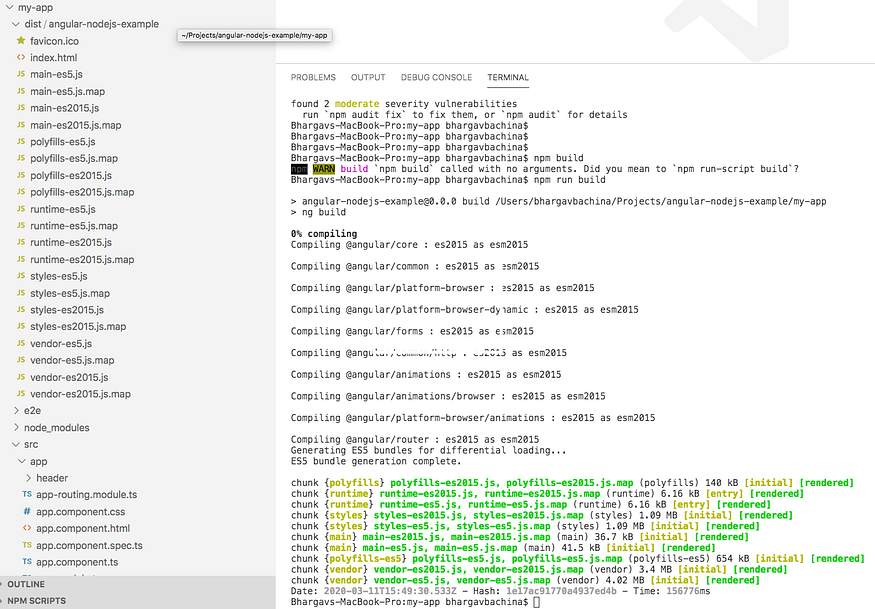
First, we need to build the Angular project with this command npm run build and all the built assets will be put under the dist folder.
Second, we need to make some changes on the server-side. Here is the modified server.js file.
- We have to use express.static at line number 9 to let express know there is a dist folder and assets of the Angular build.
- Load index.html for the default route / at line number 22
const express = require('express');
const app = express(),
      bodyParser = require("body-parser");
      port = 3080;

const users = [];

app.use(bodyParser.json());
app.use(express.static(process.cwd()+"/my-app/dist/angular-nodejs-example/"));

app.get('/api/users', (req, res) => {
  res.json(users);
});

app.post('/api/user', (req, res) => {
  const user = req.body.user;
  users.push(user);
  res.json("user addedd");
});

app.get('/', (req,res) => {
  res.sendFile(process.cwd()+"/my-app/dist/angular-nodejs-example/index.html")
});

app.listen(port, () => {
    console.log(`Server listening on the port::${port}`);
});
Once you are done with the above changes, you can actually run the whole app with the nodejs server running on port 3080 like below as nodejs acts as a web server as well.
How To Package Project For Production
Here is a separate article on how to package this application for production. Check it out.
Packaging Your Angular App With NodeJS Backend For Production
A step by step Guide With Different Approaches
Deploying On AWS Elastic Beanstalk
Once the package is done. Let’s deploy this to AWS Elastic Beanstalk. The following post walks you through how to do that.
AWS — Deploying Angular With NodeJS App On Elastic Beanstalk
A step by step guide with an example project
Deploying On AWS ECS
Let’s deploy this app on AWS ECS. The following post walks you through how to do that.
AWS — Deploying Angular With NodeJS App On ECS
A step by step guide with an example project
Summary
- There are so many ways we can build Angular apps and ship for production.
- One way is to build Angular with NodeJS.
- In the development phase, we can run Angular and Nodejs on separate ports.
- The interaction between these two happens with proxying all the calls to API.
- In the production phase, you can build the Angular app and put all the assets in the dist folder and load it with the node server.
- Nodejs act as a web server as well in the above case. You need to let express know where are all the Angular assets are.
- We can package the application in a number of ways.
- You can deploy the packaged zip folder in any node environment.
Conclusion
This is one way of building and shipping Angular apps. This is really useful when you want to do server-side rendering or you need to do some processing. NodeJS is non-blocking IO and it is very good for normal websites as well. In future posts, I will discuss more on deploying strategies for this kind of architecture.
- 登录 发表评论