
category
In this post, you'll learn how you can set up and integrate Amazon Bedrock with your LangChain app for an end-to-end RAG pipeline
👋
New to LangChain? Start with this introductory post first. It'll give you a great overview of everything you need to know before diving in. Come back when you're done!
What is Amazon Bedrock?
Amazon Bedrock is a fully managed AWS service that gives you access to popular foundation models from leading AI companies like Anthropic and Mistral AI via a single API.
Since this is a fully managed service, it has the ability to handle the complete RAG pipeline for your application
💡
For a complete list of available foundation models, visit the official AWS documentation here.
For this tutorial, we're going to work with the Amazon Titan Text G1 - Lite model, specifically: amazon.titan-text-lite-v1.
Why choose Amazon Bedrock?
Whether you're an existing AWS customer or new to the platform, Amazon Bedrock is a solid choice for the following reasons:
- Fine-tuning and RAG: You can easily fine-tune your choice of foundation models to suit your needs. Bedrock can also be used as a RAG-as-a-service since it can completely handle your RAG pipeline.
- Serverless and scalable: You can go to production without worrying about the infrastructure while AWS easily scales based on your application requirements and usage needs.
- Simple model evaluation via Single API: You could switch between models without heavily re-writing your code. All foundation models integrate with the same Bedrock API.
- Access to powerful foundation models (FMs): Easily access multiple foundation models from the same dashboard.
RAG using Amazon Bedrock
What is Retrieval-Augmented Generation (RAG)?
Retrieval-augmented generation (RAG) is a technique that uses knowledge that wasn't part of a model's initial training data. This helps the model get additional relevant context from specific data sources so its output is enhanced.
Knowledge like private company documents could be used to improve a LLM's response to a specific user prompt or query.
RAG options using Amazon Bedrock
We have two options to build a Retrieval augmented generation (RAG) pipeline using Amazon Bedrock.
- Integrate with data framework: This option is suitable if you just need to use Bedrock's Foundation Models (FM) for NLP tasks. You'll need to handle the RAG pipeline outside of Bedrock using a data framework, like LangChain.
- Knowledge Bases for Amazon Bedrock: This option lets Bedrock fully handle the RAG pipeline using Knowledge Bases. This could be referred to as: "RAG-as-a-service". Behind the scenes, Bedrock will handle ingestion, embedding, querying, and vector stores and can also provide source attribution from your private documents and data sources.
We're going to implement both options in this tutorial.
How to access Amazon Bedrock
By default, you do not have access to the Amazon Bedrock Foundation Models (FMs). You'll need to:
- Step 1: Add the required permissions to the user
- Step 2: Request access to the foundation model
Step 1: Grant user Bedrock permissions in IAM
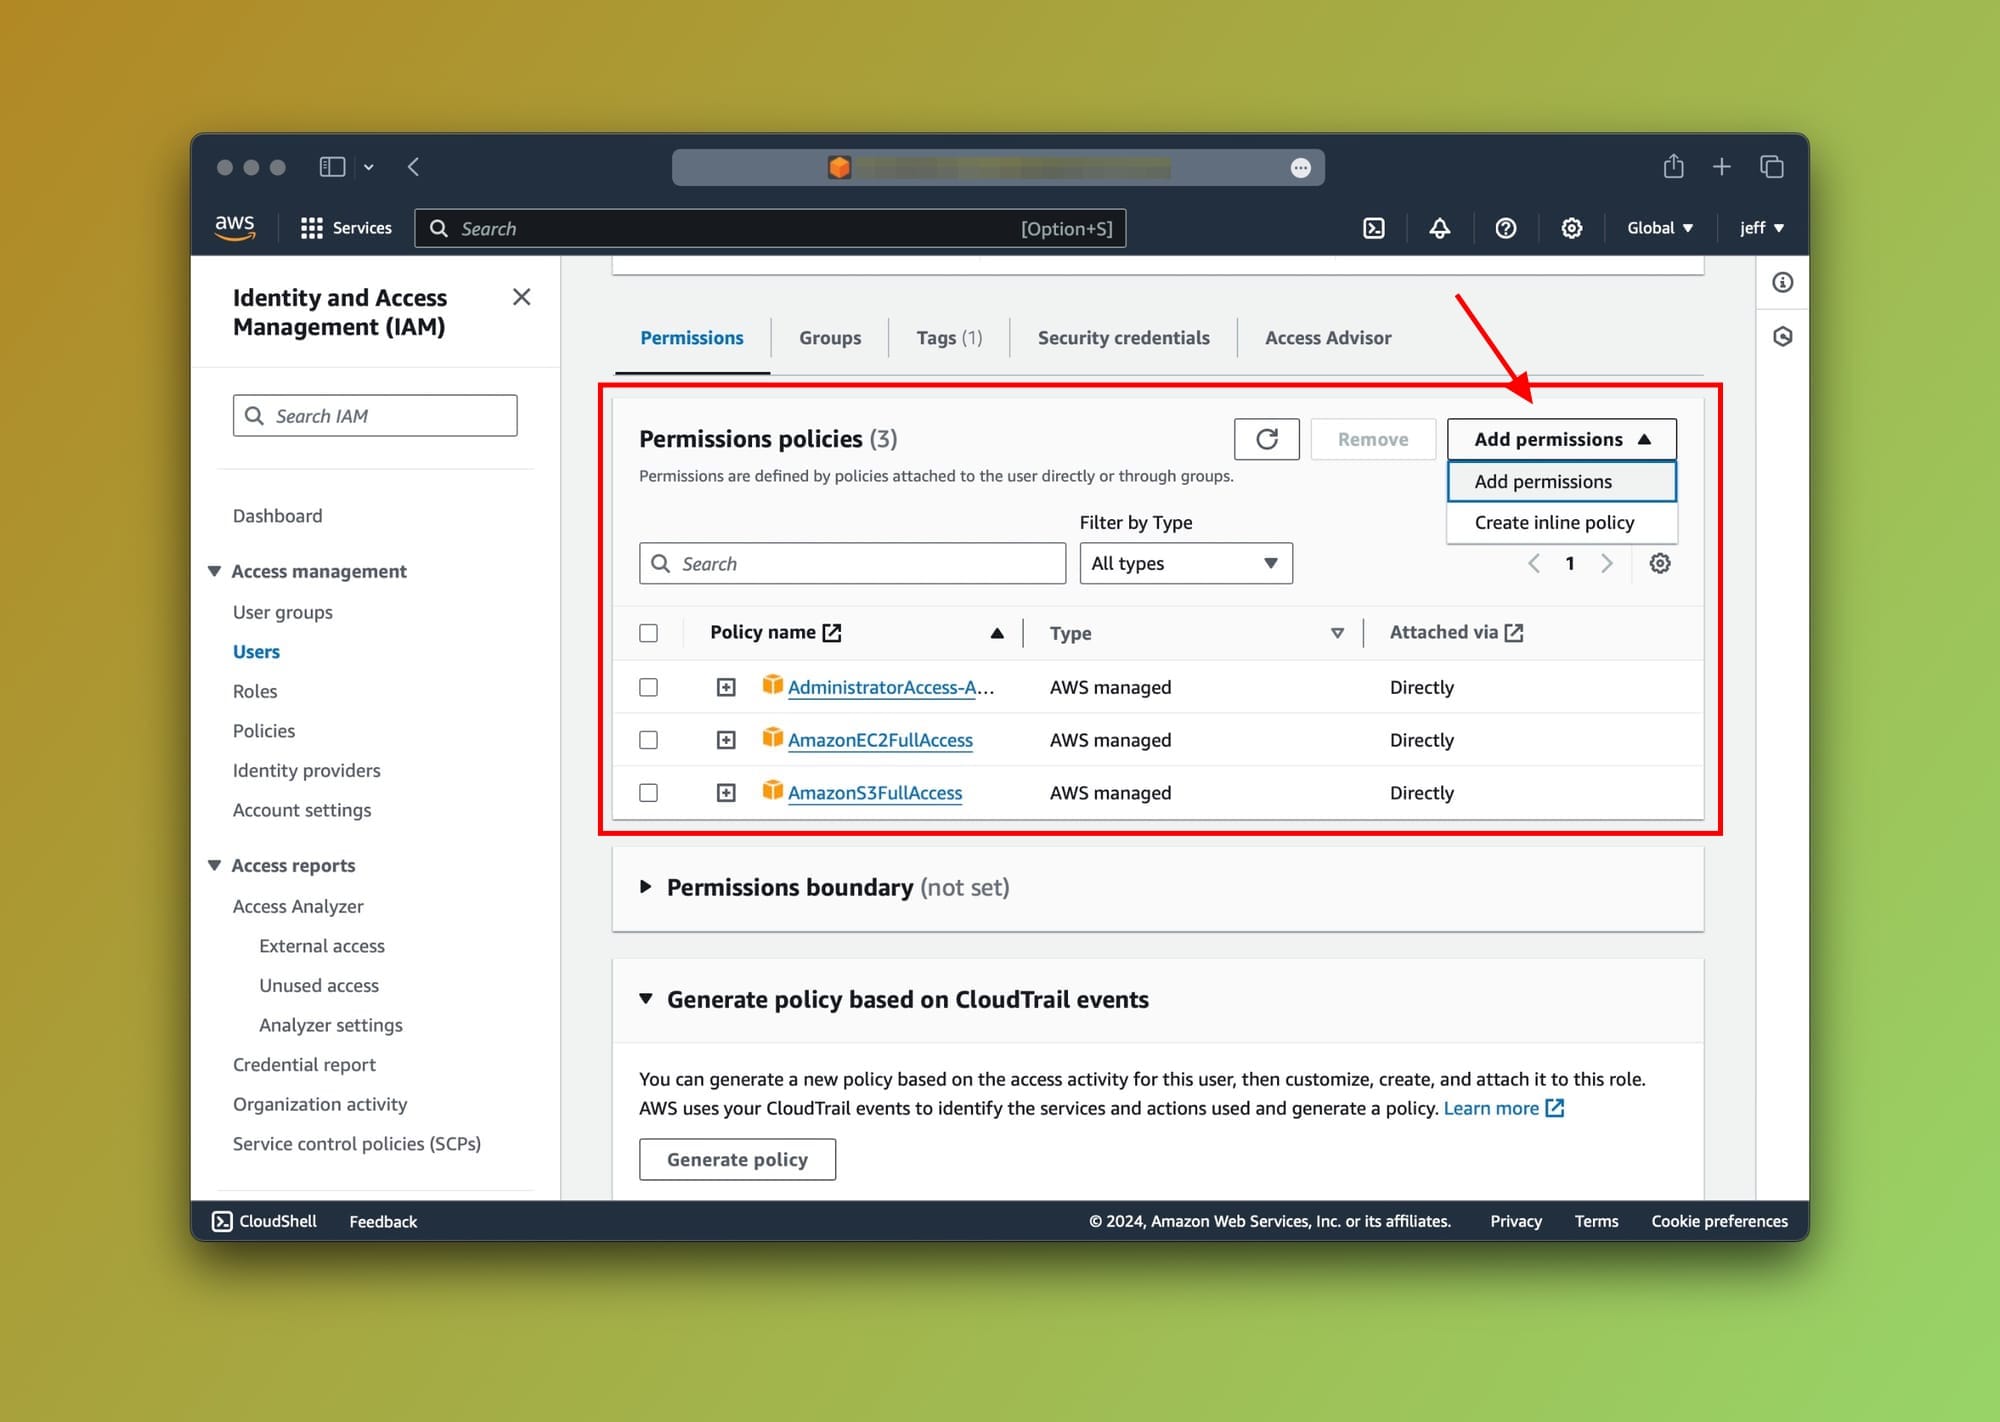
Sign into your AWS Console and navigate to the Identity and Access Management (IAM) page. You should then click on the User name that will be used to access the Amazon Bedrock foundation models.
⚠️
Using the root user with Knowledge Bases is not supported. If you're planning on using Knowledge Bases, create a new IAM user.

After selecting the user, scroll down to the Permissions tab and choose Add permissions from the dropdown options as shown below:
Great. The last step is to find the AmazonBedrockFullAccess permission from the list by searching for it. To proceed, select it and save the updated settings.
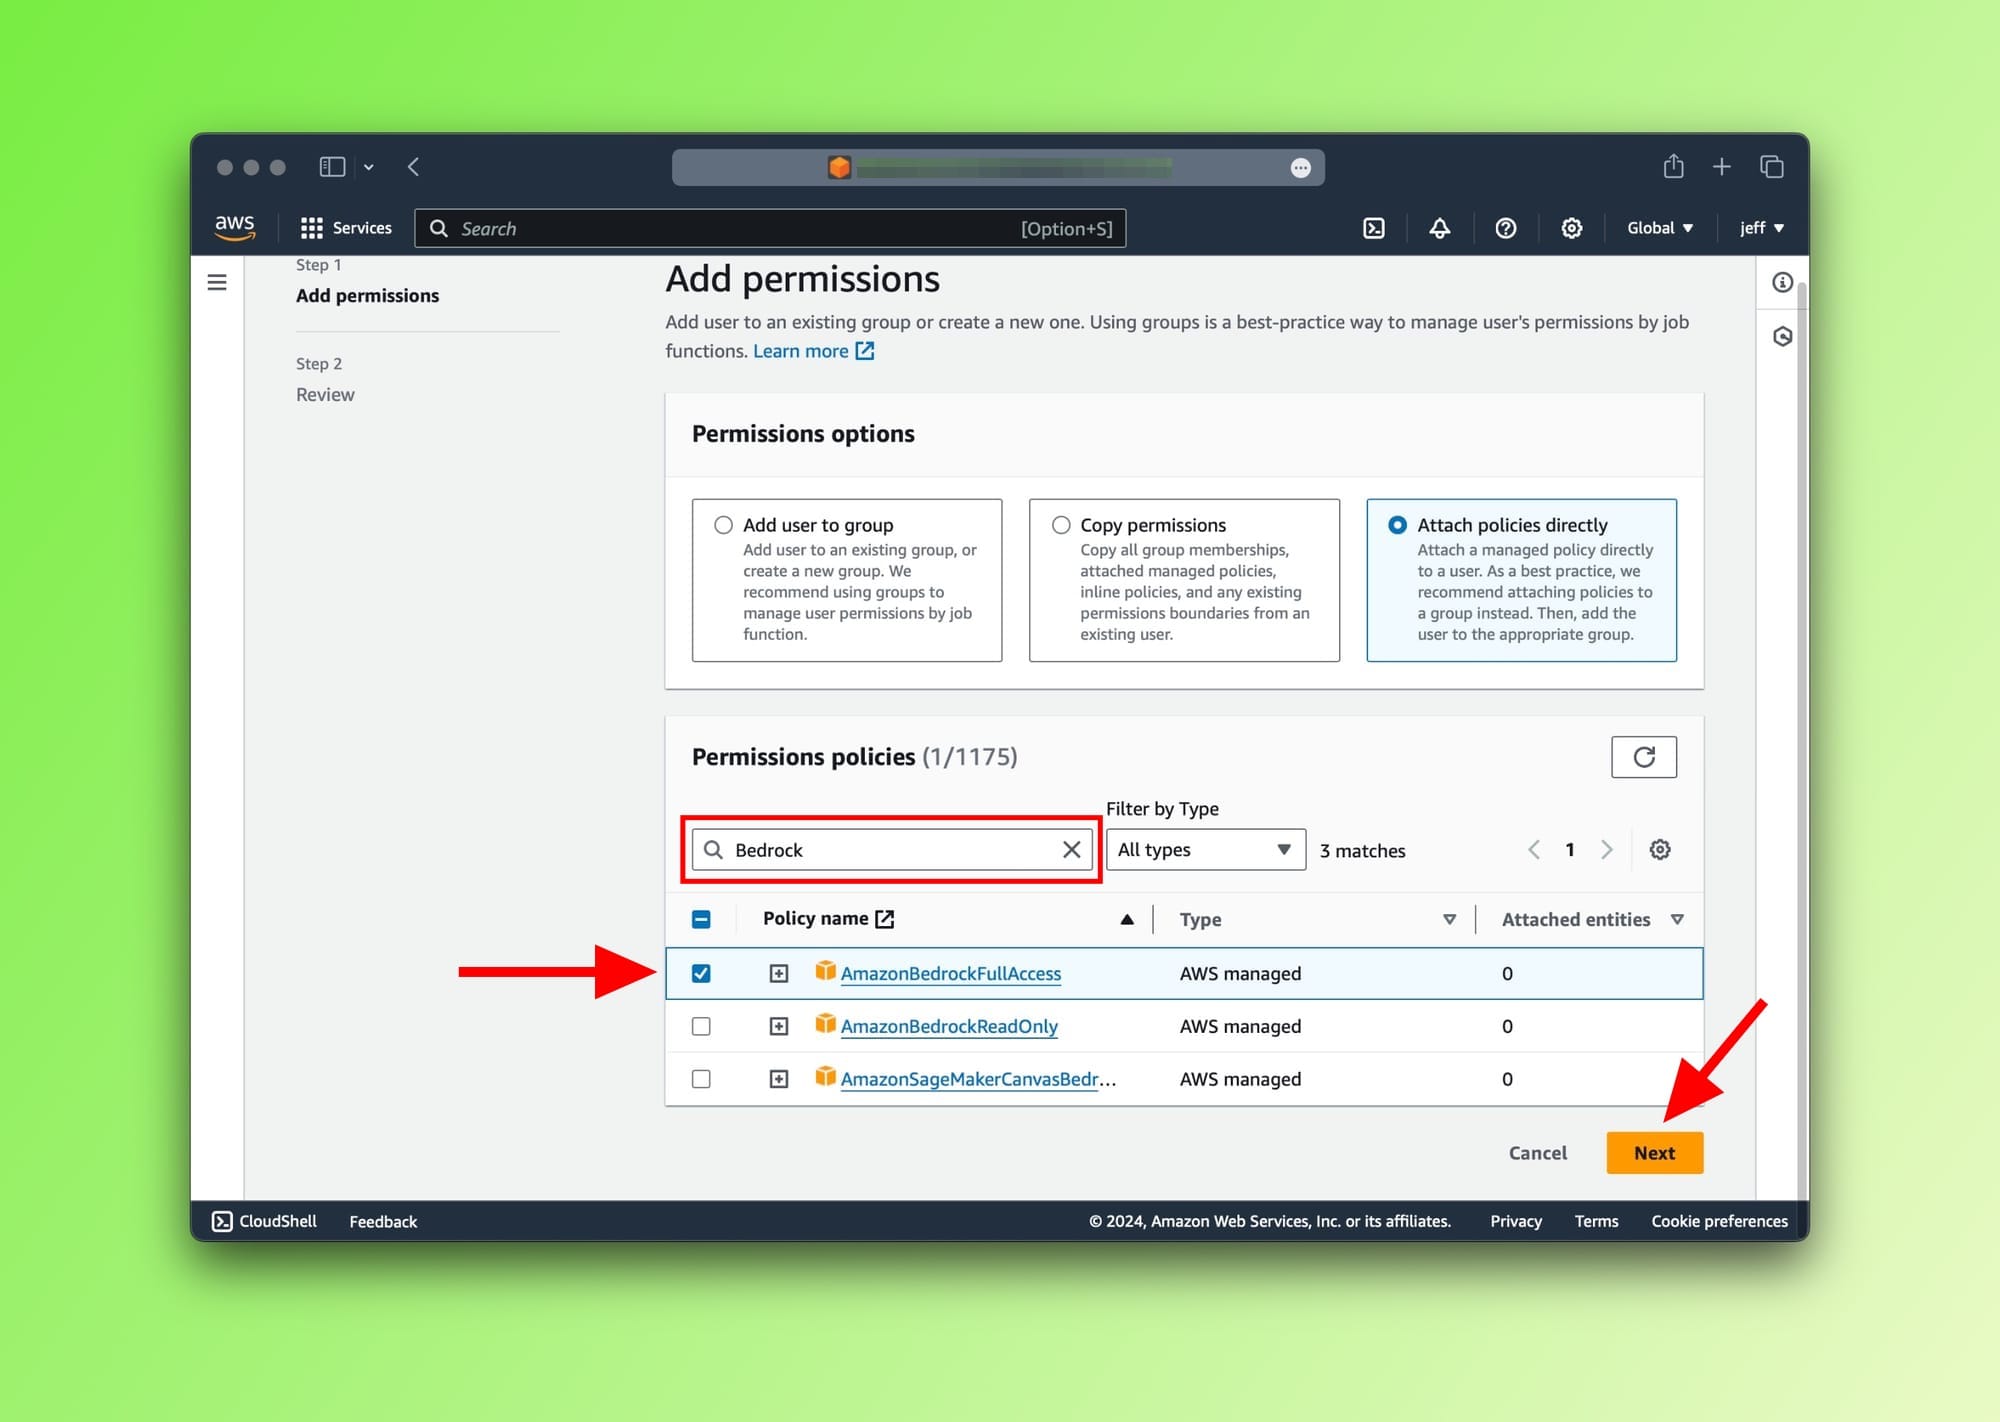
AmazonBedrockFullAccess permission to usersStep 2: Request access to Bedrock's FMs
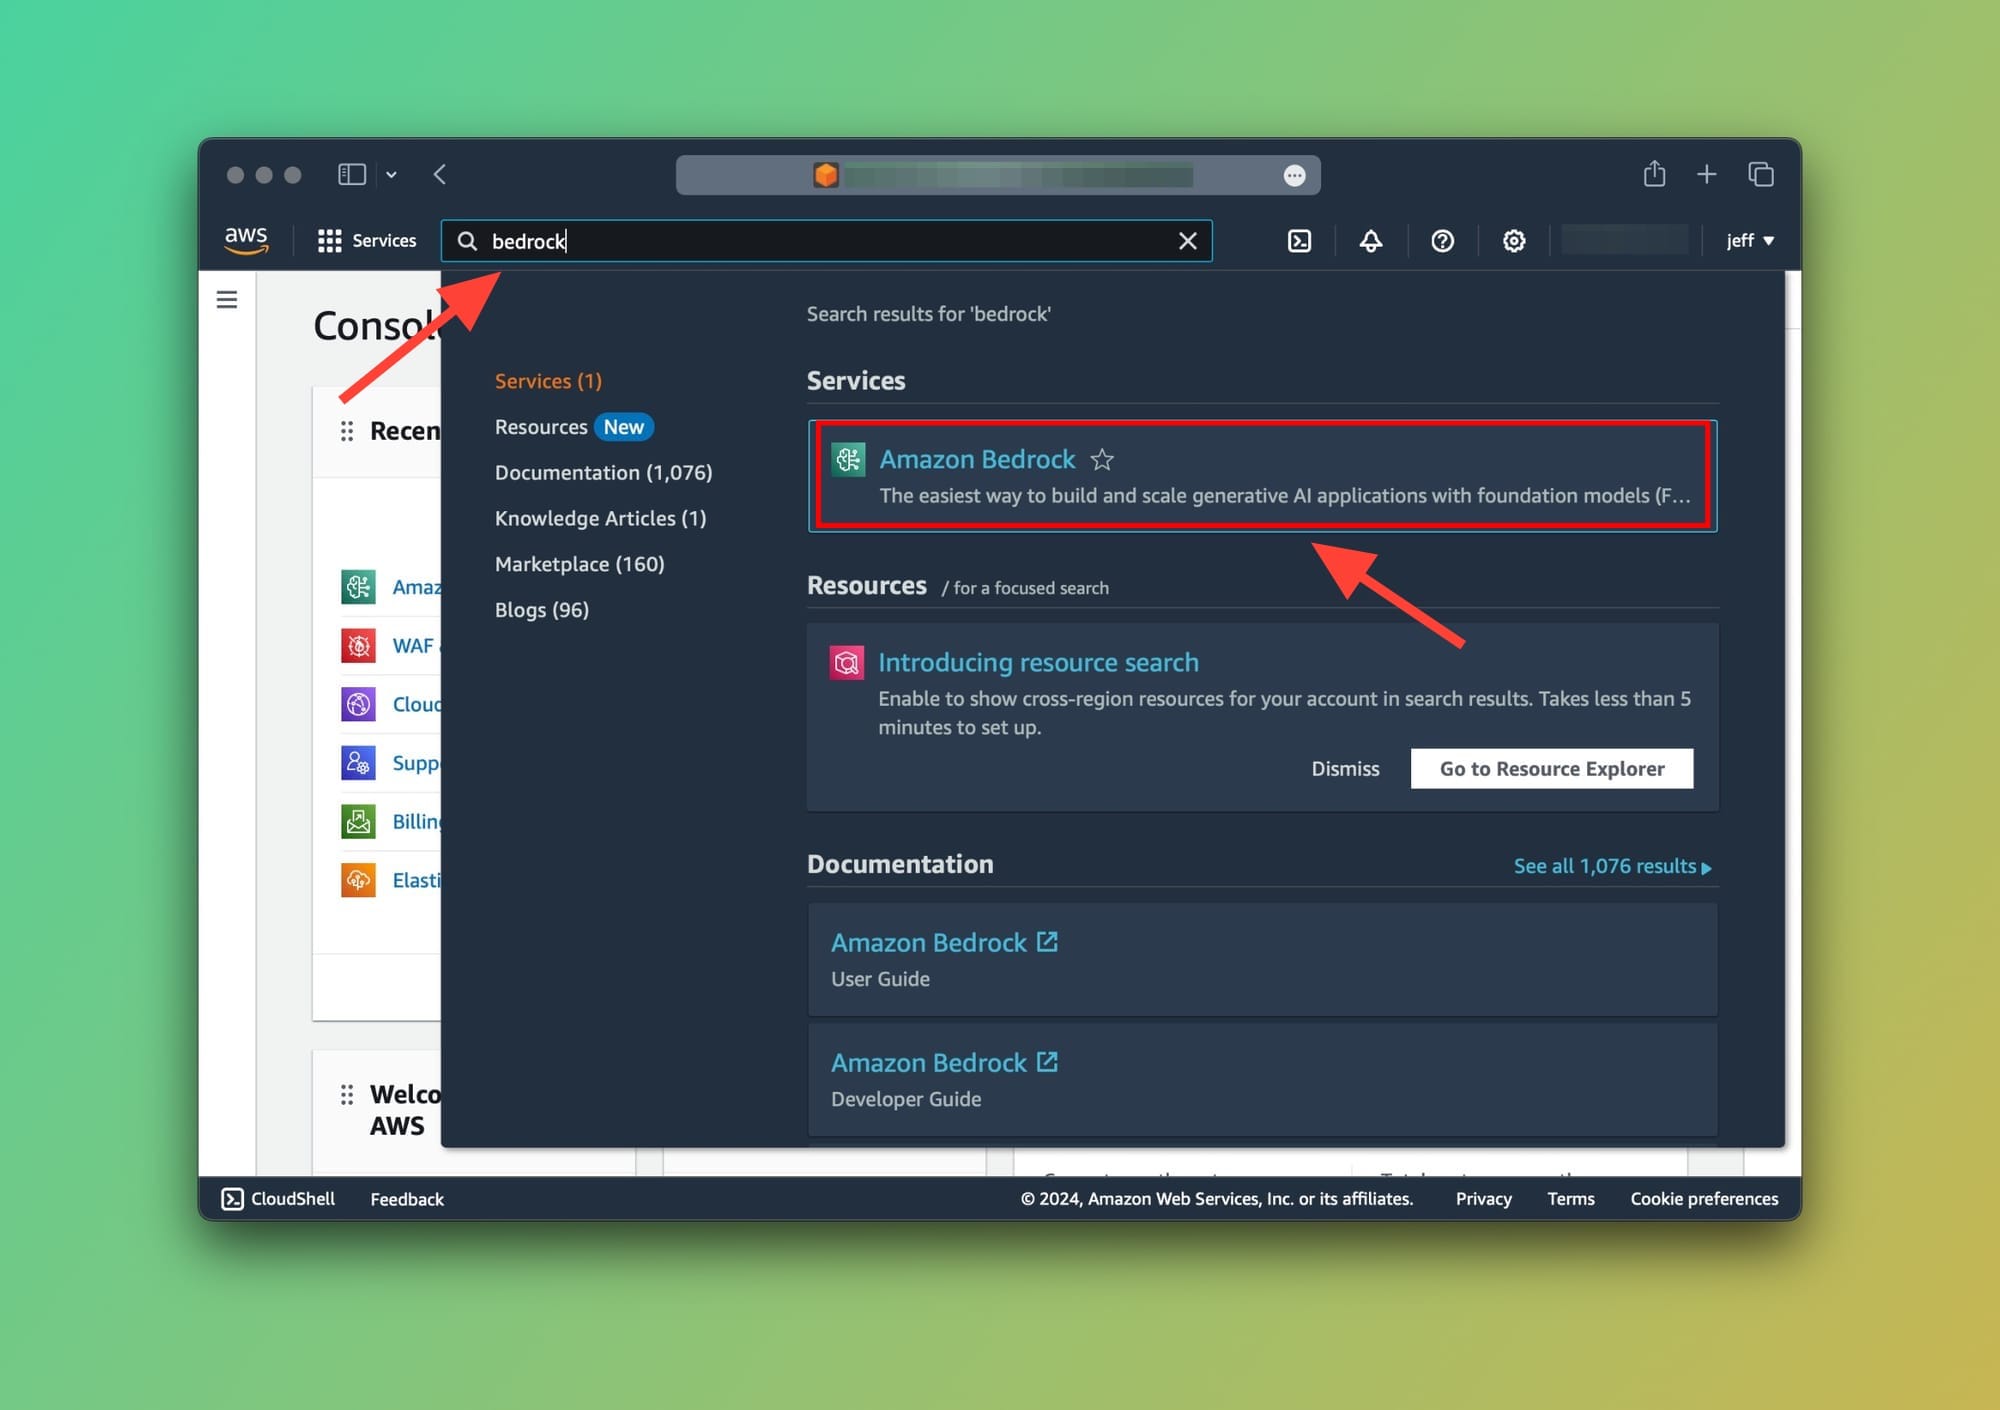
Now we need to navigate to Amazon Bedrock to request access to the foundation model, in our case the Amazon Titan. Type Bedrock in the AWS console search bar then click on the Amazon Bedrock service, as shown below:
Now, let's go ahead and request access to the Amazon Titan Text G1 - Lite model. You can choose whichever foundation model you like from the available ones and request access.
On the top right, click on the Manage model access button.
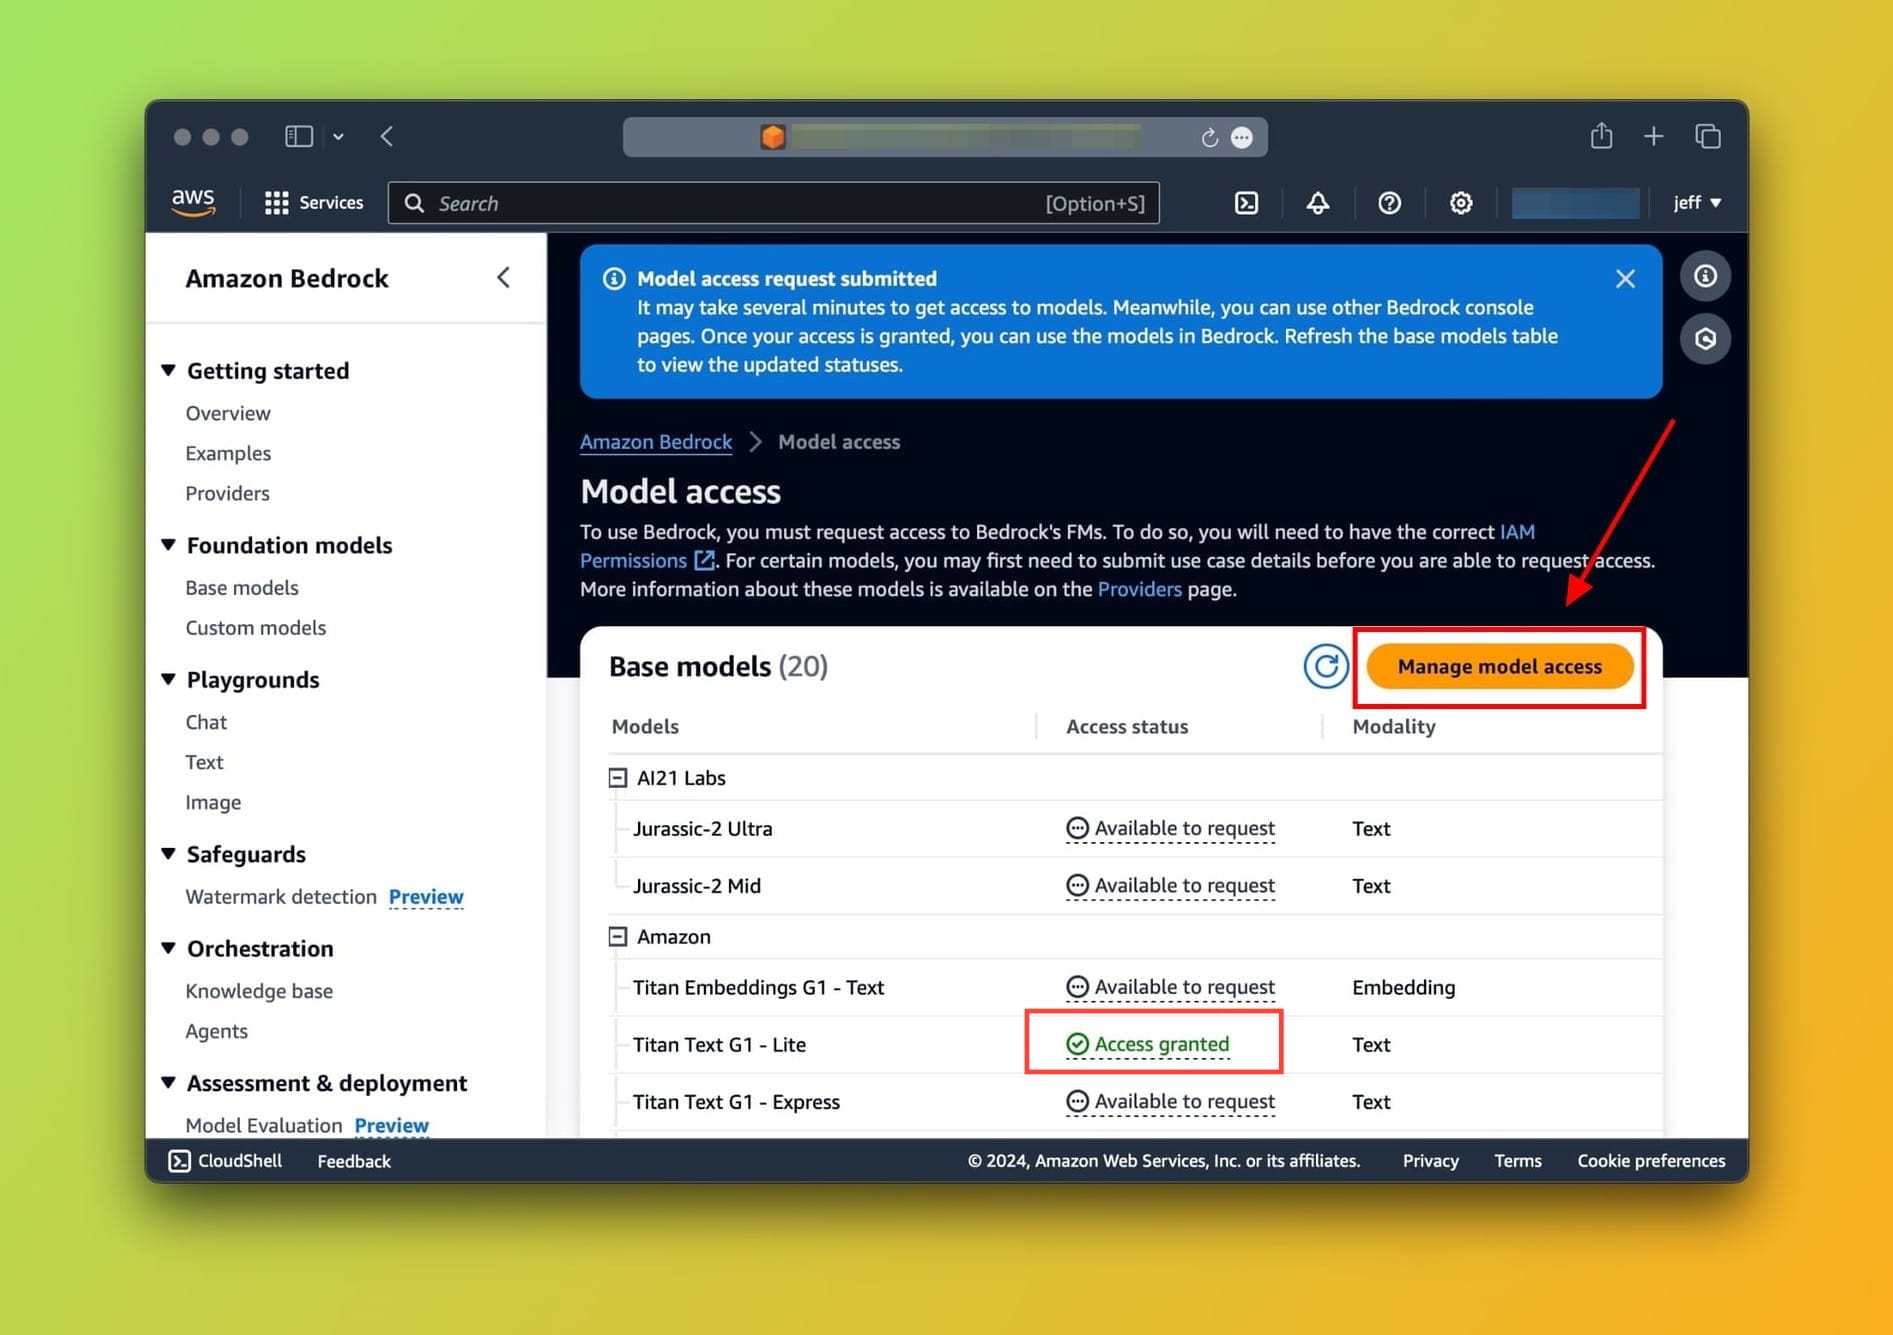
This will enable selecting which models you want to request access to. For this tutorial, let's go ahead and choose Titan Text G1 - Lite then click on Request access at the bottom of the screen.
You should see the text Access granted in the Access status column next to the Titan Text G1 - Lite once you're done (As shown in the screenshot above).
Okay, great. So far we've:
- Added permissions to IAM user
- Requested access to the Titan foundation model
- Acquired access to the model
LangChain and Bedrock
Let's set up our environment and write some code that will let our Python LangChain app interact with the foundation model.
To do this, we're going to:
- Step up the work directory
- Configure Boto3
- Configure AWS Access Keys
- Using AWS CLI
- Manual configuration
- Integrate LangChain and Bedrock
Step 1: Set up the work directory
Type the following in your terminal to create a new directory and a new Python file. As usual, we'll call it: main.py
mkdir langchain-bedrock-demo
cd langchain-bedrock-demo

touch main.py
The next step is optional but recommended. I always create a virtual environment for my project. This makes it easier to manage packages and dependencies:
python -m venv venv
source venv/bin/activate
Now, we'll install Boto3 and LangChain using pip:
pip install boto3 langchain
This will download and install boto3 and langchain.
💡
Boto3 is a Python library that lets you programmatically interact with Amazon Web Services (AWS) resources, like Amazon Bedrock.
Step 2: Configure Boto3
To give the application access to our AWS resources, including Bedrock, we'll need to set up the AWS authentication credentials for the IAM user.
This means we'll need to grab the following keys from the IAM console:
aws_access_key_idaws_secret_access_key
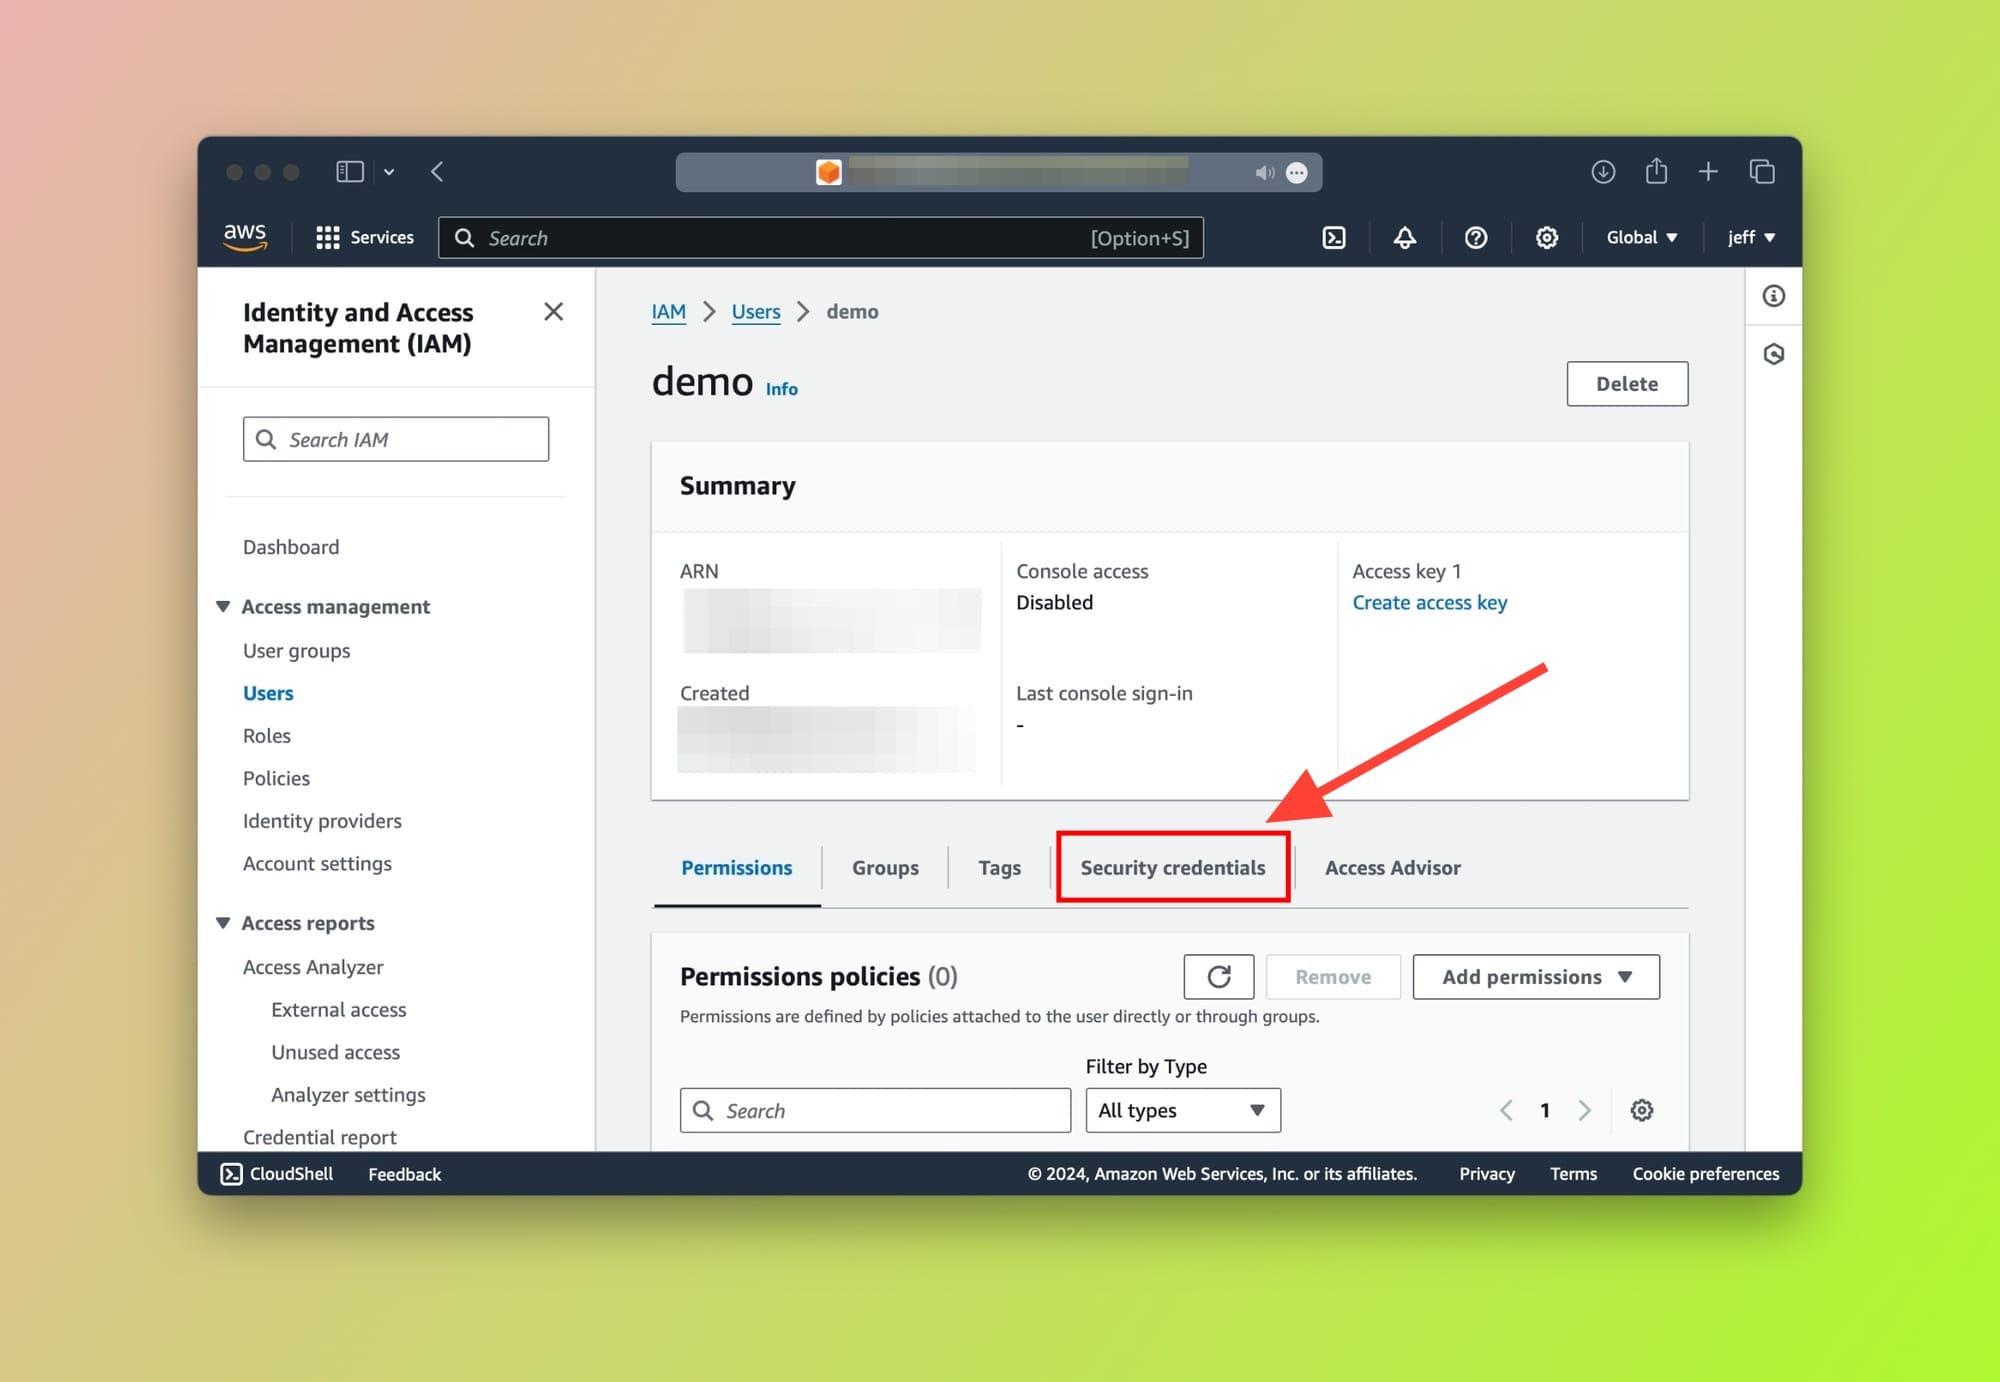
In your AWS console, go to the IAM service, choose your User then navigate to the Security credentials tab as shown here:
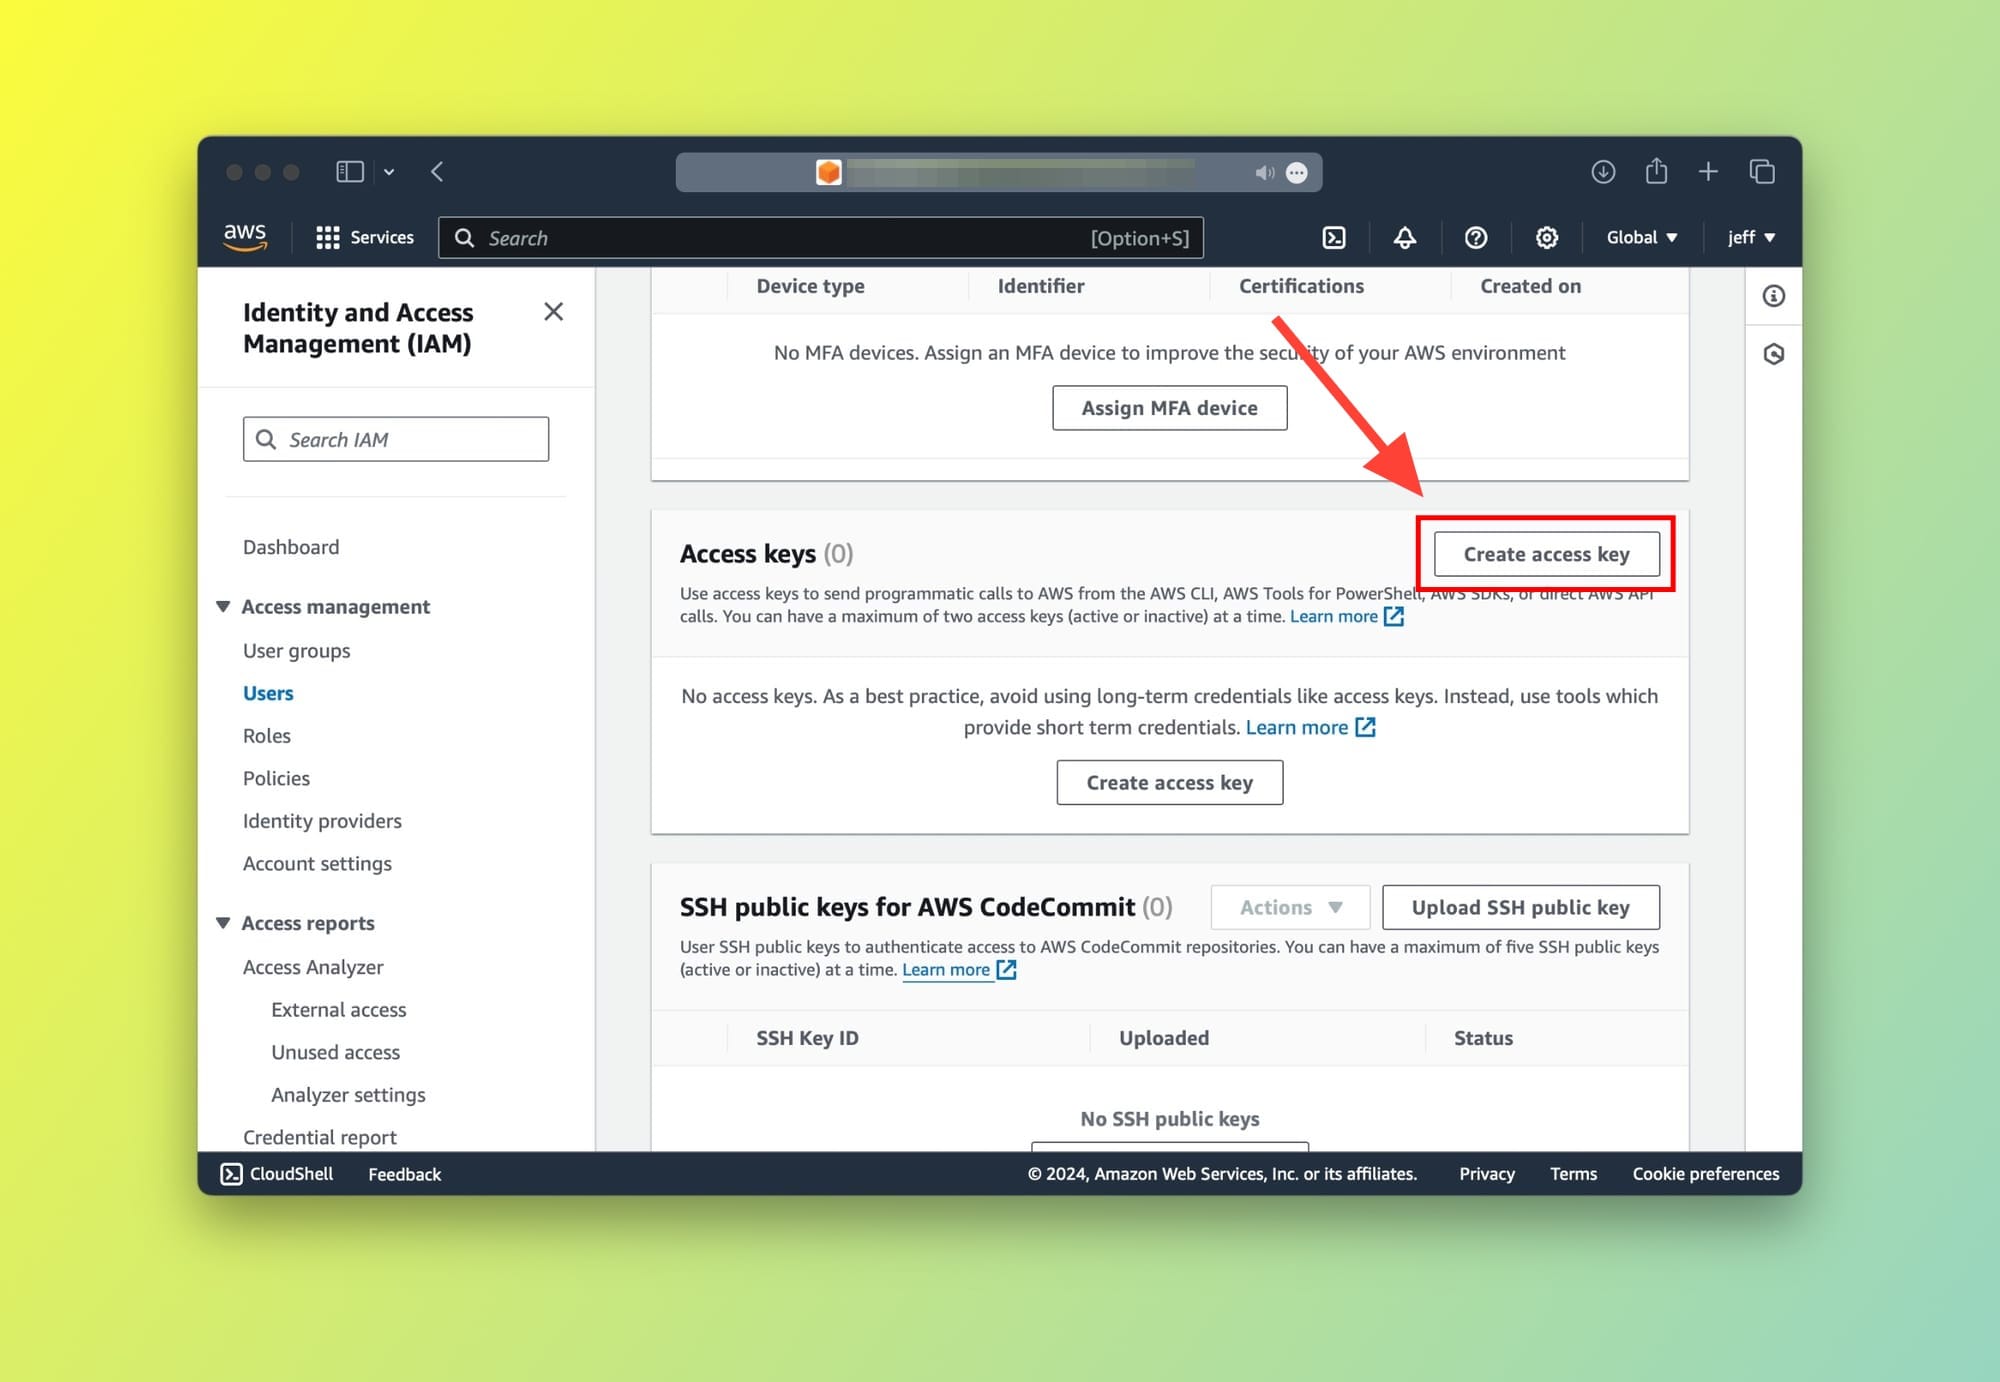
After clicking on the Security credentials tab, scroll down until the Access keys card is visible. On the top right, click on the Create access key button:
💡
You can use existing keys if you like. However, it's highly recommended that you use a new set of keys for each application.
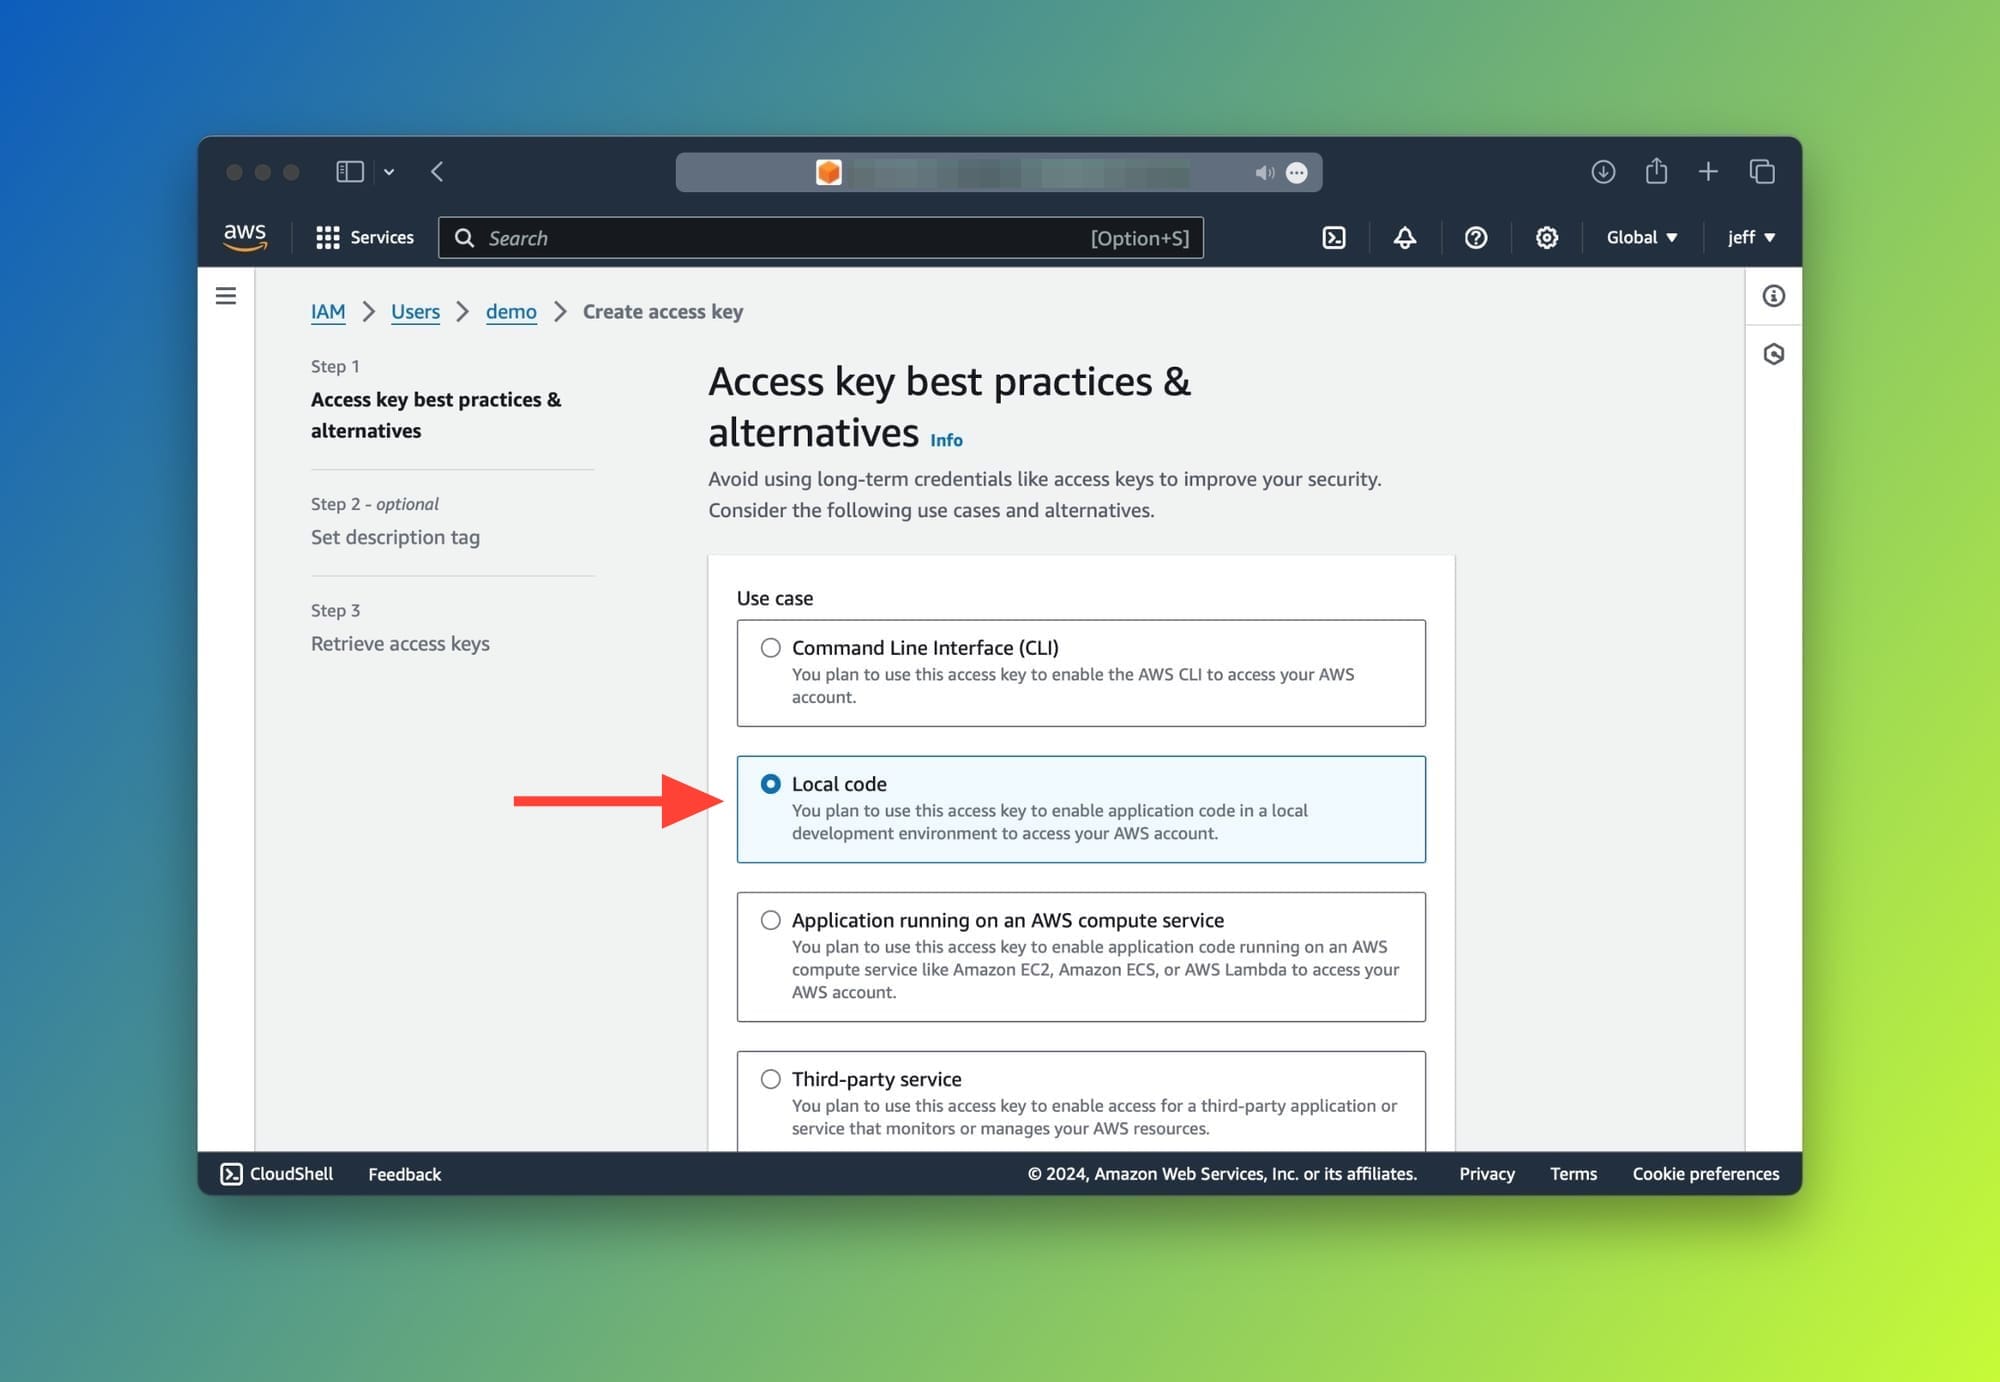
Choose Local code from the list. The purpose of this page is just to inform you about the best practices when using access keys.
Lastly, you will be able to see your access keys.
⚠️
A reminder that access keys should be handled properly since misuse or unauthorized access may incur unexpected charges.
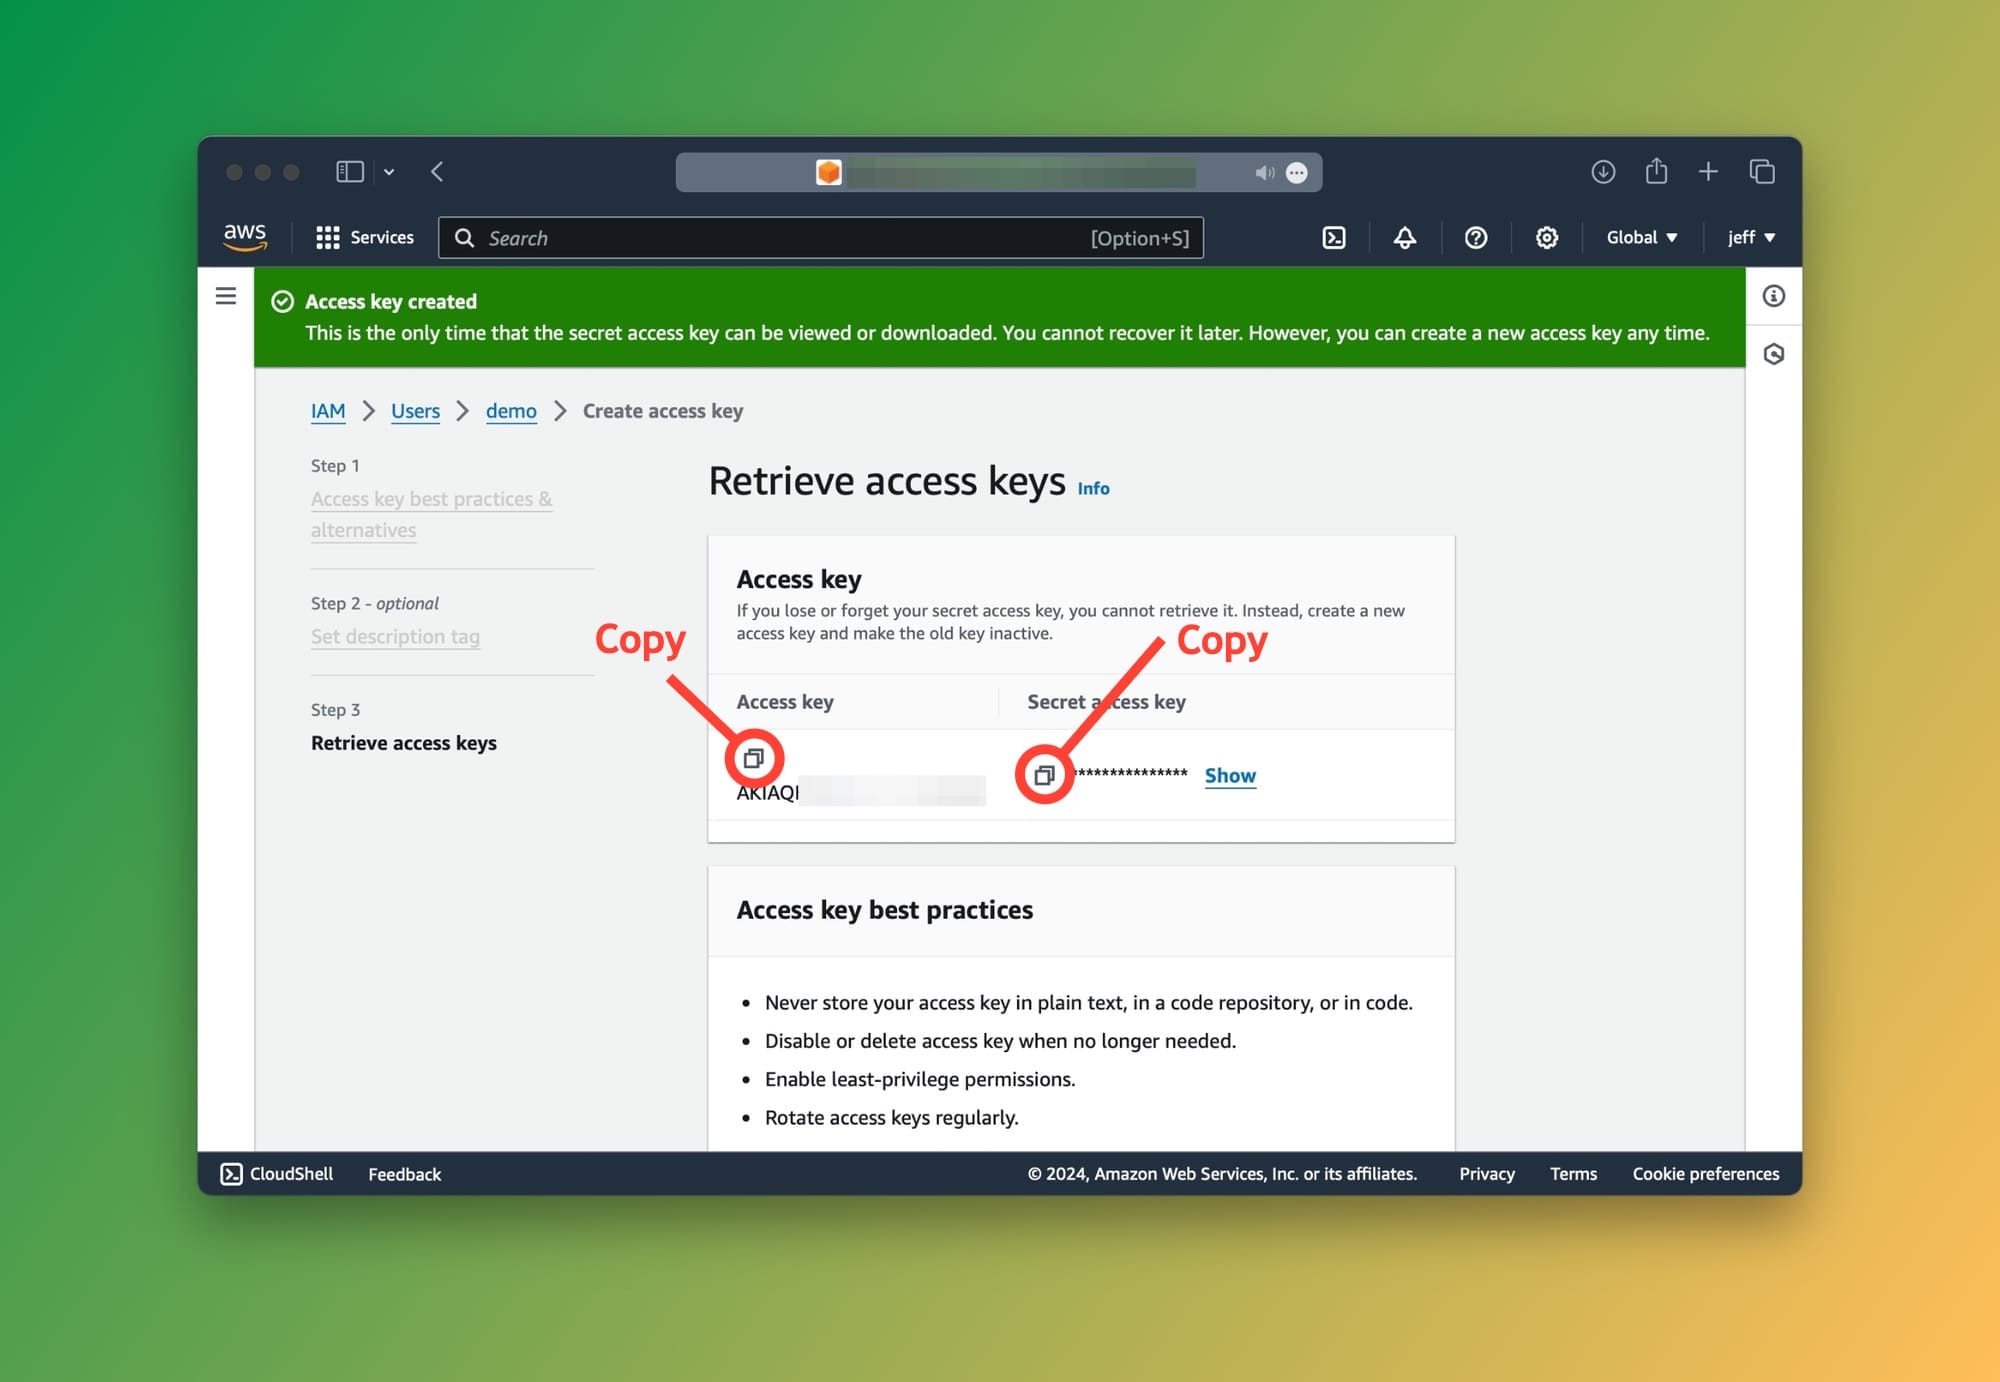
Great! The credentials are created and ready to use. We now need to configure them on our machine to let Boto3 and our application so that they can communicate securely with AWS.
Make sure to copy your keys and keep them handy for the next step below.
Step 3: Configuring AWS Access keys for Boto3
We have two options to configure the AWS Access keys:
- Using the AWS CLI
- Manual configuration
Option 1: Using the AWS CLI
This is the fastest way but requires you to download the AWS CLI. You should opt for this option if you already the CLI installed on your system.
In your terminal window, type aws configure. This instructs the AWS CLI to generate a credentials file. The CLI will ask you for the following:
AWS Access Key ID: Paste your access key here.AWS Secret Access Key: Paste your secret key here.Default region name: Enter the region where you set up Bedrock (for exampleus-west-1.Default output format: Leave blank. It will default toJSON.
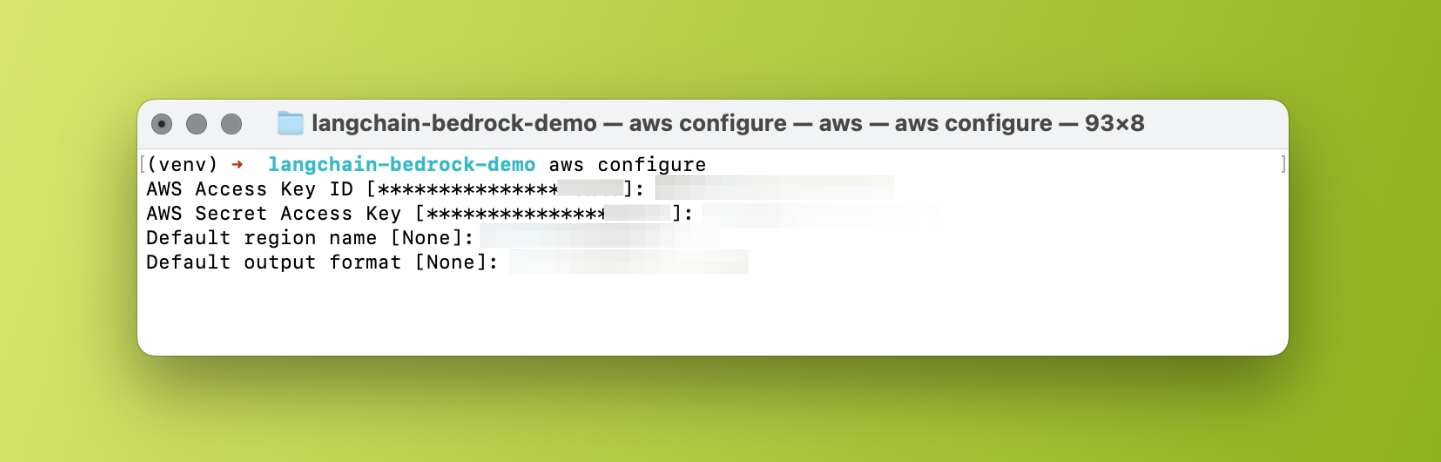
aws configure in the macOS terminalOnce you're done, the AWS CLI will generate your credentials file in the ~/.aws/credentials directory.
That's it, Boto3 (and LangChain) will use this file to communicate with Bedrock.
Option 2: Manual configuration
If you prefer not to use the AWS CLI, you can manually create the credentials file or add a new profile with the associated keys to an existing file.
Create credentials file
To create the credentials file, type the following in your terminal and hit return:
touch ~/.aws/credentials
Open the file by typing open ~/.aws/credentials, then paste the following:
[bedrock]
aws_access_key_id = YOUR_ACCESS_KEY
aws_secret_access_key = YOUR_SECRET_KEY
💡
The [bedrock] value is your profile name. This is useful when you have more than one set of access keys. You can add as many profiles in this file as needed.
Create config file
Create the config file in the same directory. Type: touch ~/.aws/config then open the file: open ~/.aws/config.
The purpose of this file is to store the resource region. For instance, if your Bedrock was initiated in the us-west-1 region your file should look like this:
[bedrock]
region=us-west-1
⚠️
Make sure the profile names match in both files, in this case, we're using [bedrock].
Step 4: Integrating Bedrock with LangChain
It's code time! Let's start by importing the required packages. Add the following to your main.py file:
from langchain.chains import LLMChain
from langchain_community.llms import Bedrock
from langchain_core.prompts import PromptTemplate
Let's initialize a llm variable with the following parameters:
llm = Bedrock(
  model_id="amazon.titan-text-lite-v1",
  credentials_profile_name="bedrock"
)
This lets LangChain know which model to communicate with and which AWS credentials profile to use.
Finally, we'll create an LLMChain to prompt the model:
prompt_template = "What is the capital city of {country}?"

prompt = PromptTemplate(
    input_variables=["country"], template=prompt_template
)

llm = LLMChain(llm=llm, prompt=prompt)

response = llm.invoke({"country": "Canada"})

print(response['text'])
Voila! 🎉 Here's the response:
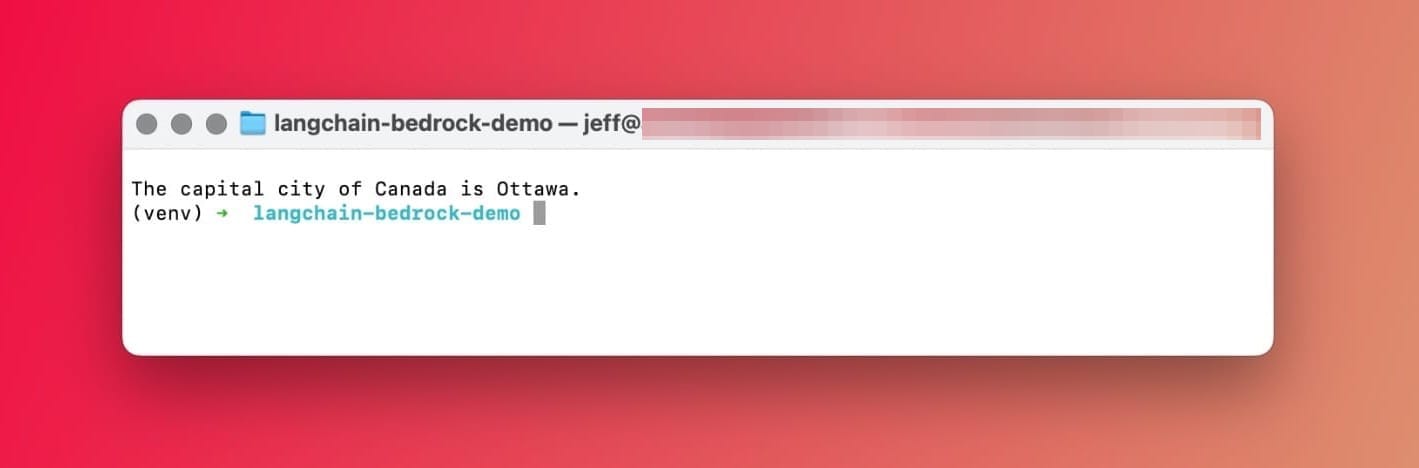
The capital city of Canada is OttawaEasy, eh? 🇨🇦 Gotta love LangChain.
All good so far? Great. Now, if you're looking for a managed end-to-end RAG pipeline, we'll need to implement Knowledge Bases for Amazon Bedrock.
Knowledge Bases for Amazon Bedrock
Knowledge Bases for Amazon Bedrock takes care of the full RAG pipeline. In practice, this means that Bedrock will handle embeddings, storage, data ingestion. and querying. It acts as a RAG-as-a-service fully managed by AWS.
How do Knowledge Bases for Amazon Bedrock work?
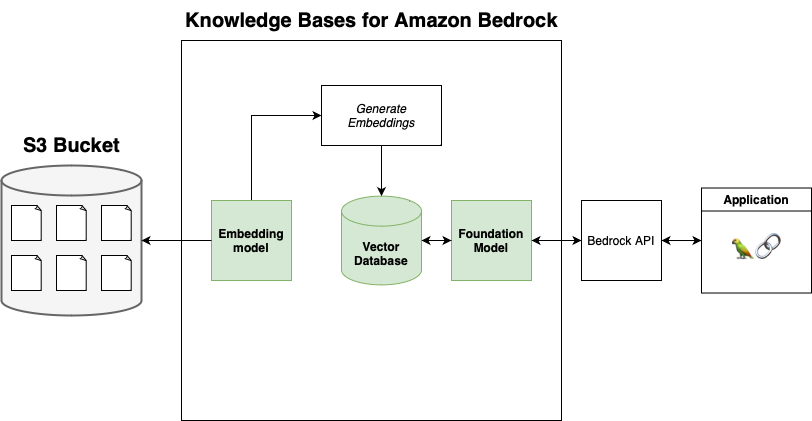
Knowledge Bases for KBs require you to use an S3 bucket as the data source. It will set up an embedding model that converts the contents of the files in the S3 bucket to vector embeddings which it will store in a vector database.
Here's a simplified diagram:
Important notes about Knowledge Bases
While Knowledge Bases is a solid option for those seeking a quick and easy to setup, it comes with a few limitations listed below:
Supported foundation models
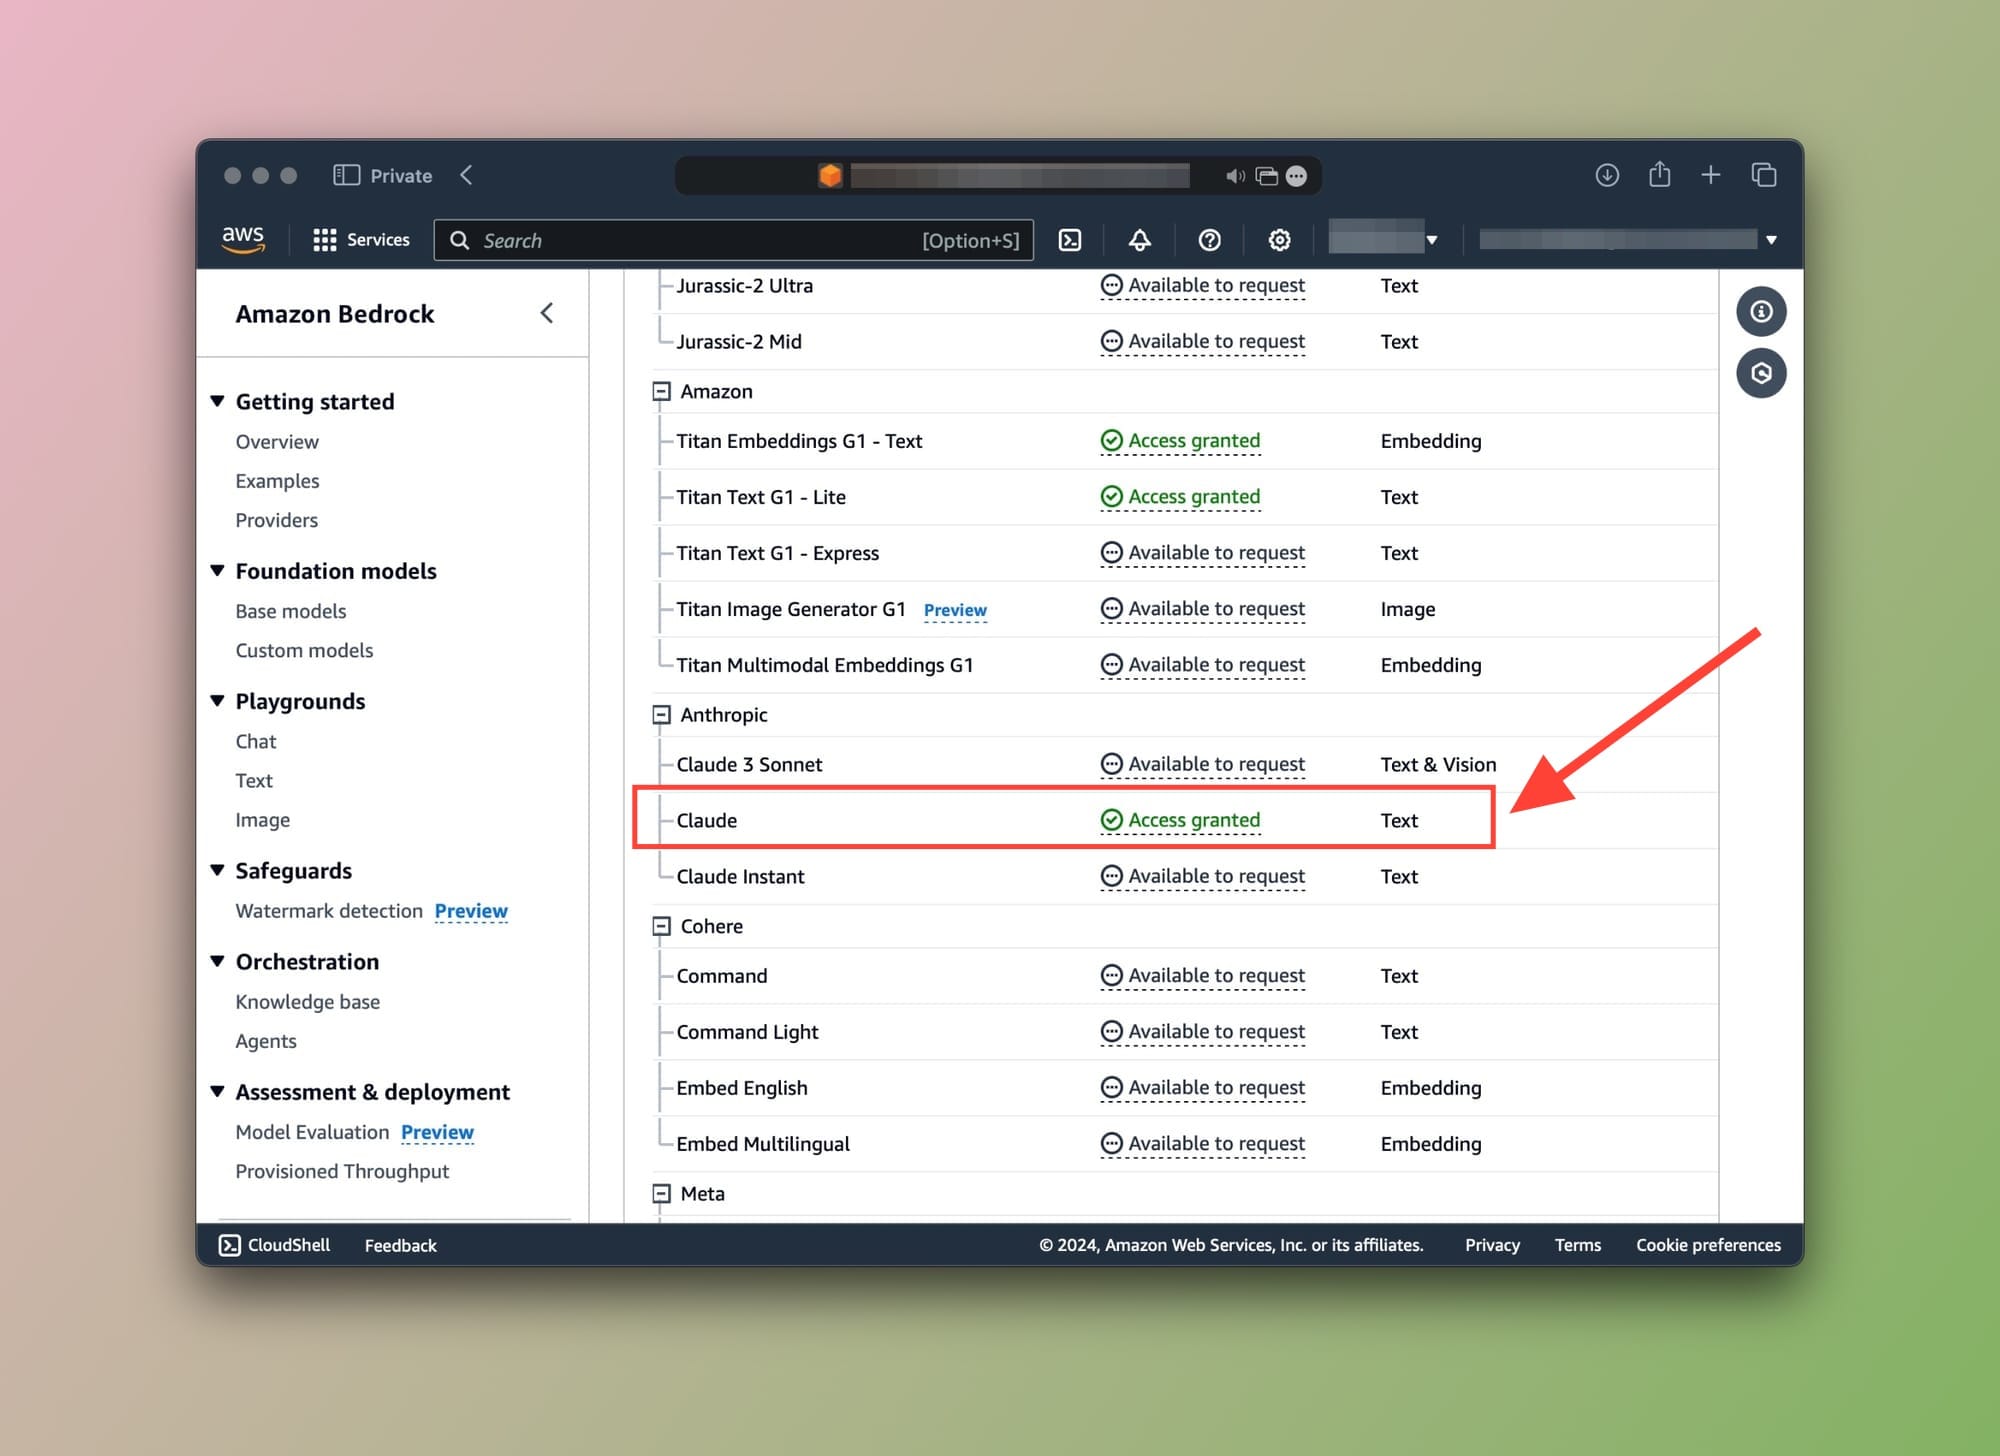
Anthropic models are only supported for querying. This means we'll need to go back to the Request model access page and submit a use case for Anthropic models before we can query your data.
Once done, the Access status should look like this:
Supported vector databases
At the time of publishing this post, the supported vector databases are:
- Pinecone
- Amazon OpenSearch Serverless (Default option)
- Redis Enterprise Cloud
- Amazon Aurora (Coming soon)
- MongoDB (Coming soon)
Creating a new Knowledge base (KB)
Okay, with all that said and done, let's start by creating our first Knowledge Base. Head over to your Amazon Bedrock service and click on the Knowledge base item from the sidebar as shown below:
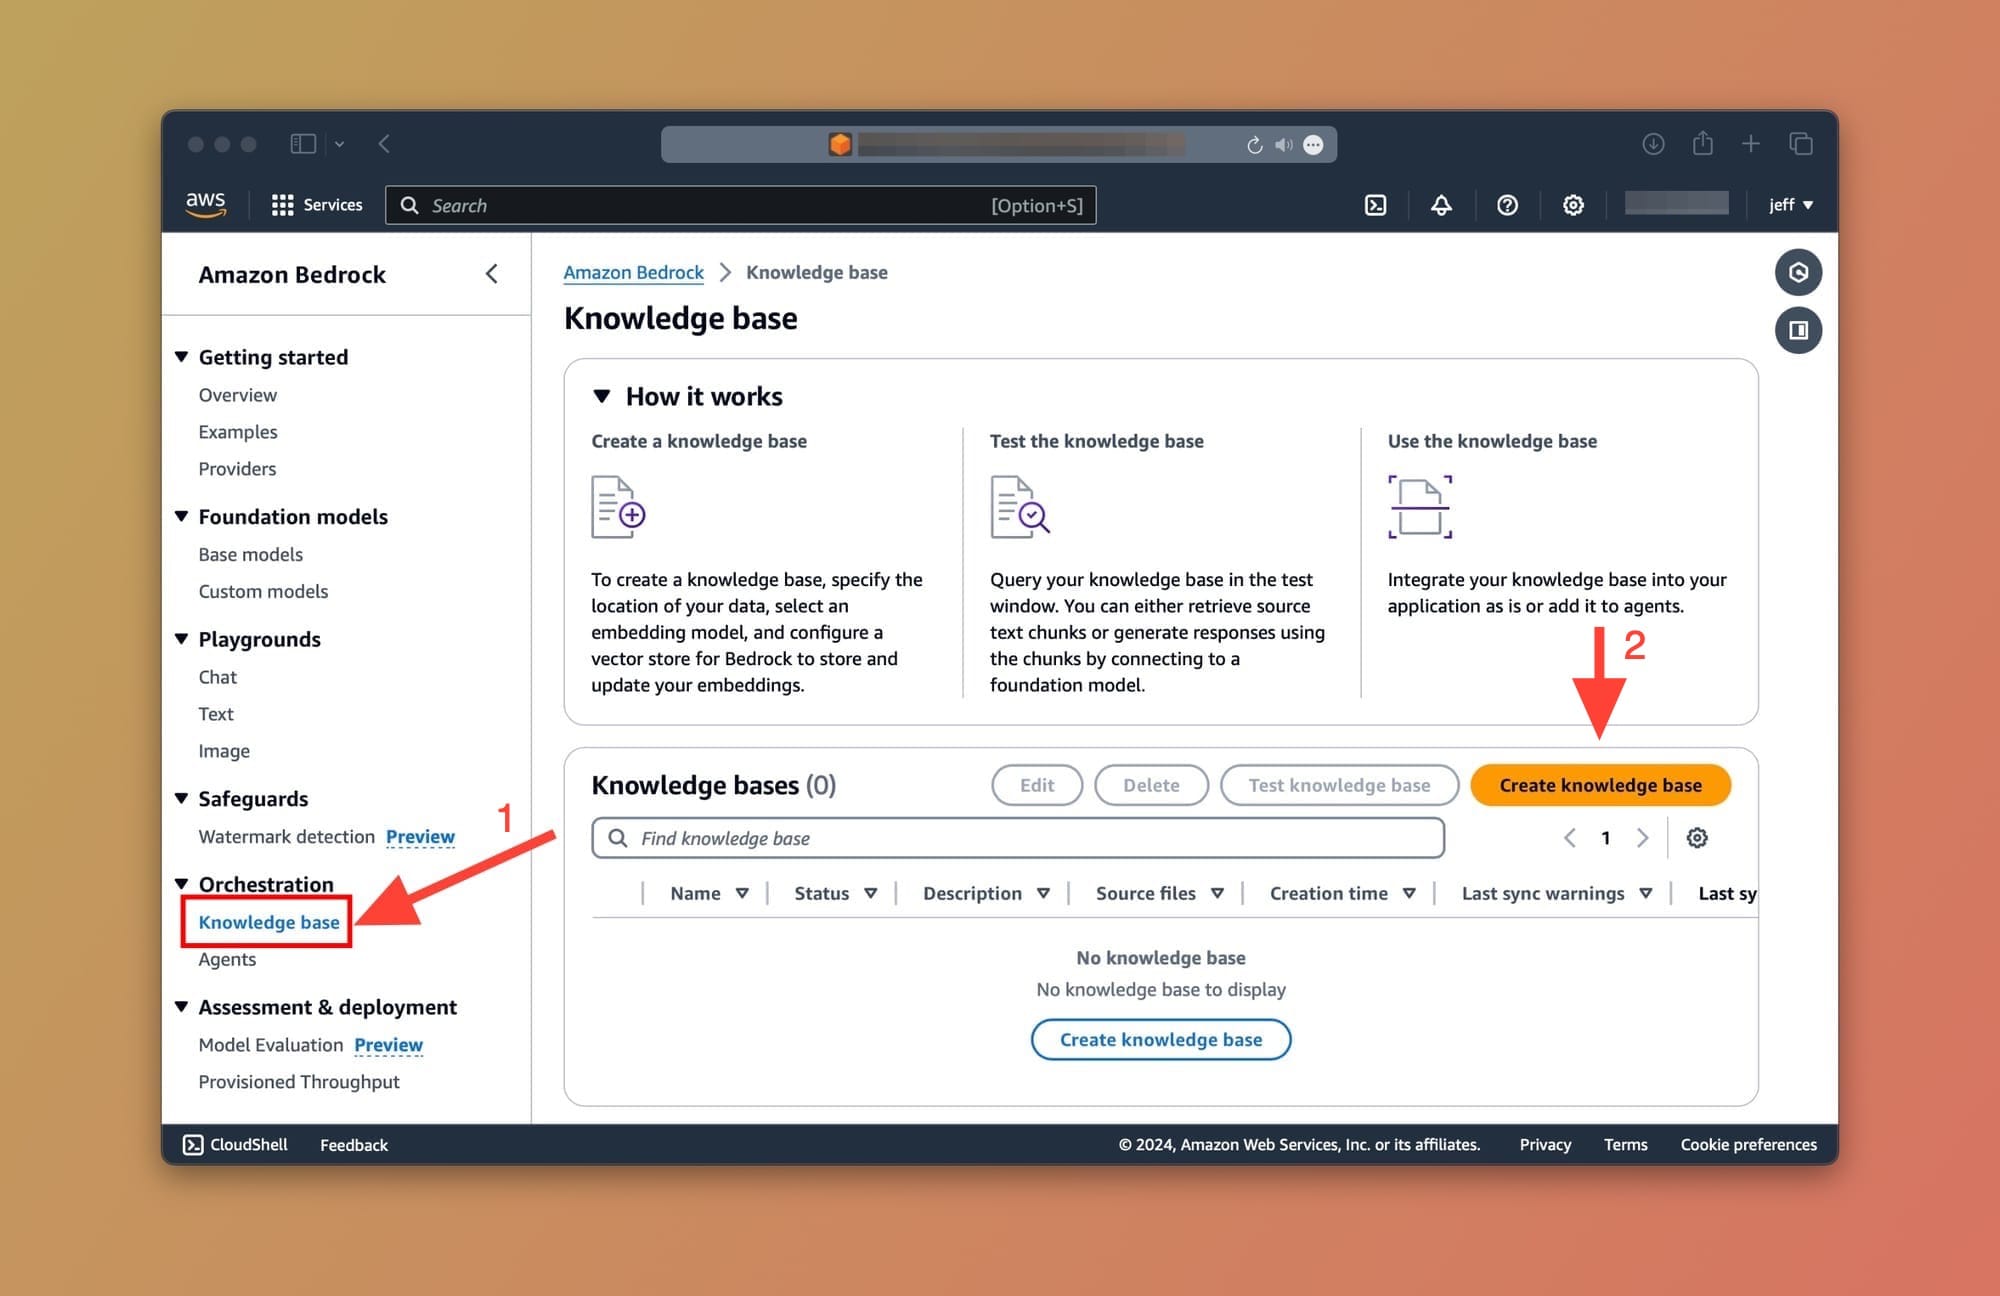
From the Knowledge Base screen, click on the Create Knowledge Base button.
⛔
Creating Knowledge bases is not supported when logged into the root AWS account. If you proceed you'll get this error message: "Knowledge Base creation with a root user is not supported. Please sign-in with an IAM user or IAM role and try again."
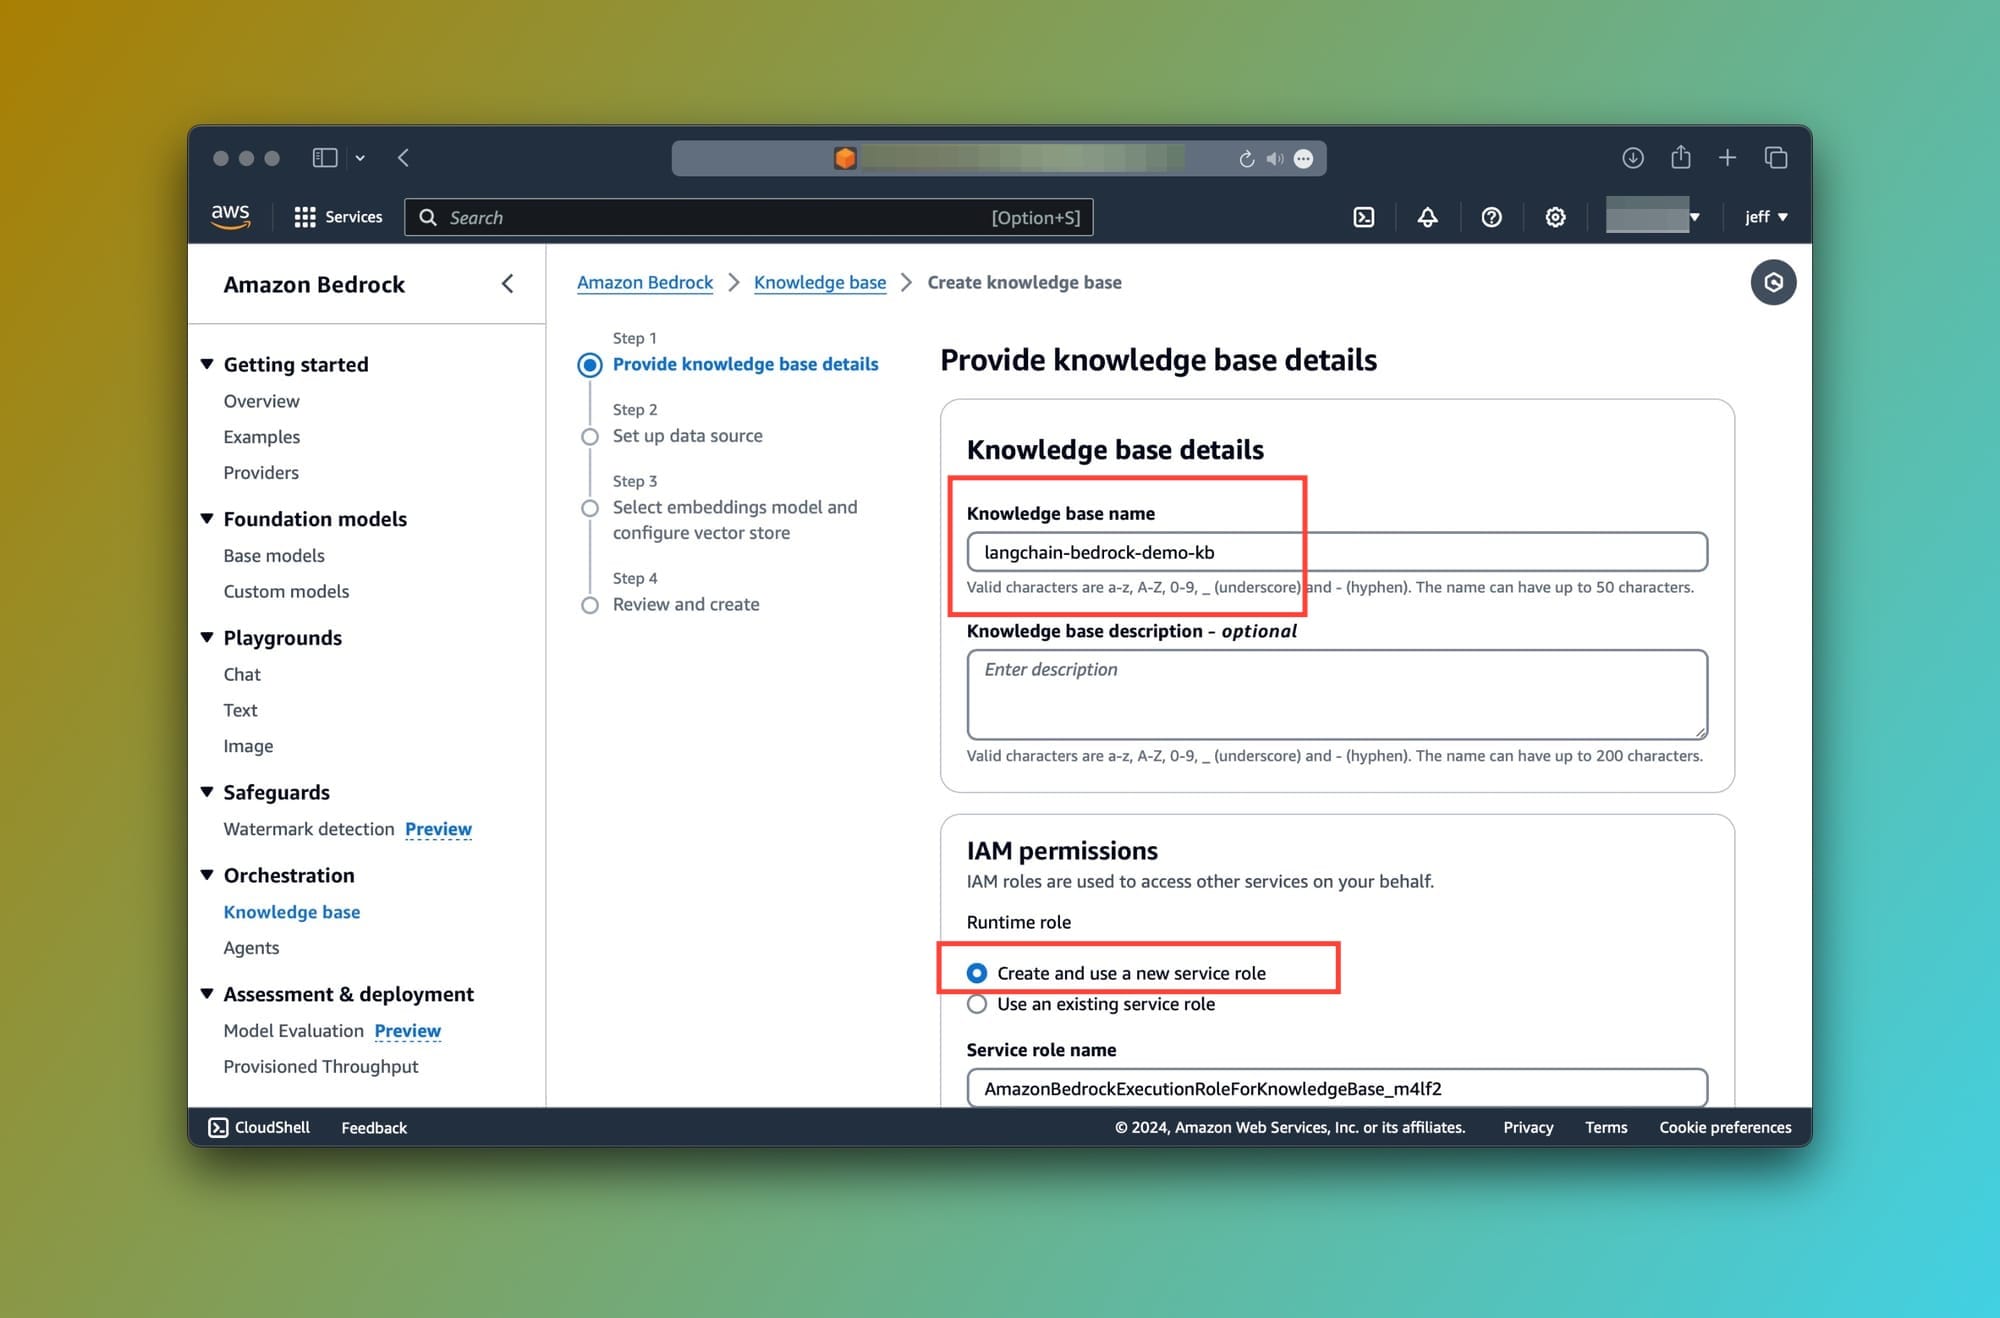
To continue, we'll need to fill in some information:
- Knowledge base details: Enter any name for your Knowledge base. Then, Choose Create and use a new service role and click on the Next button:
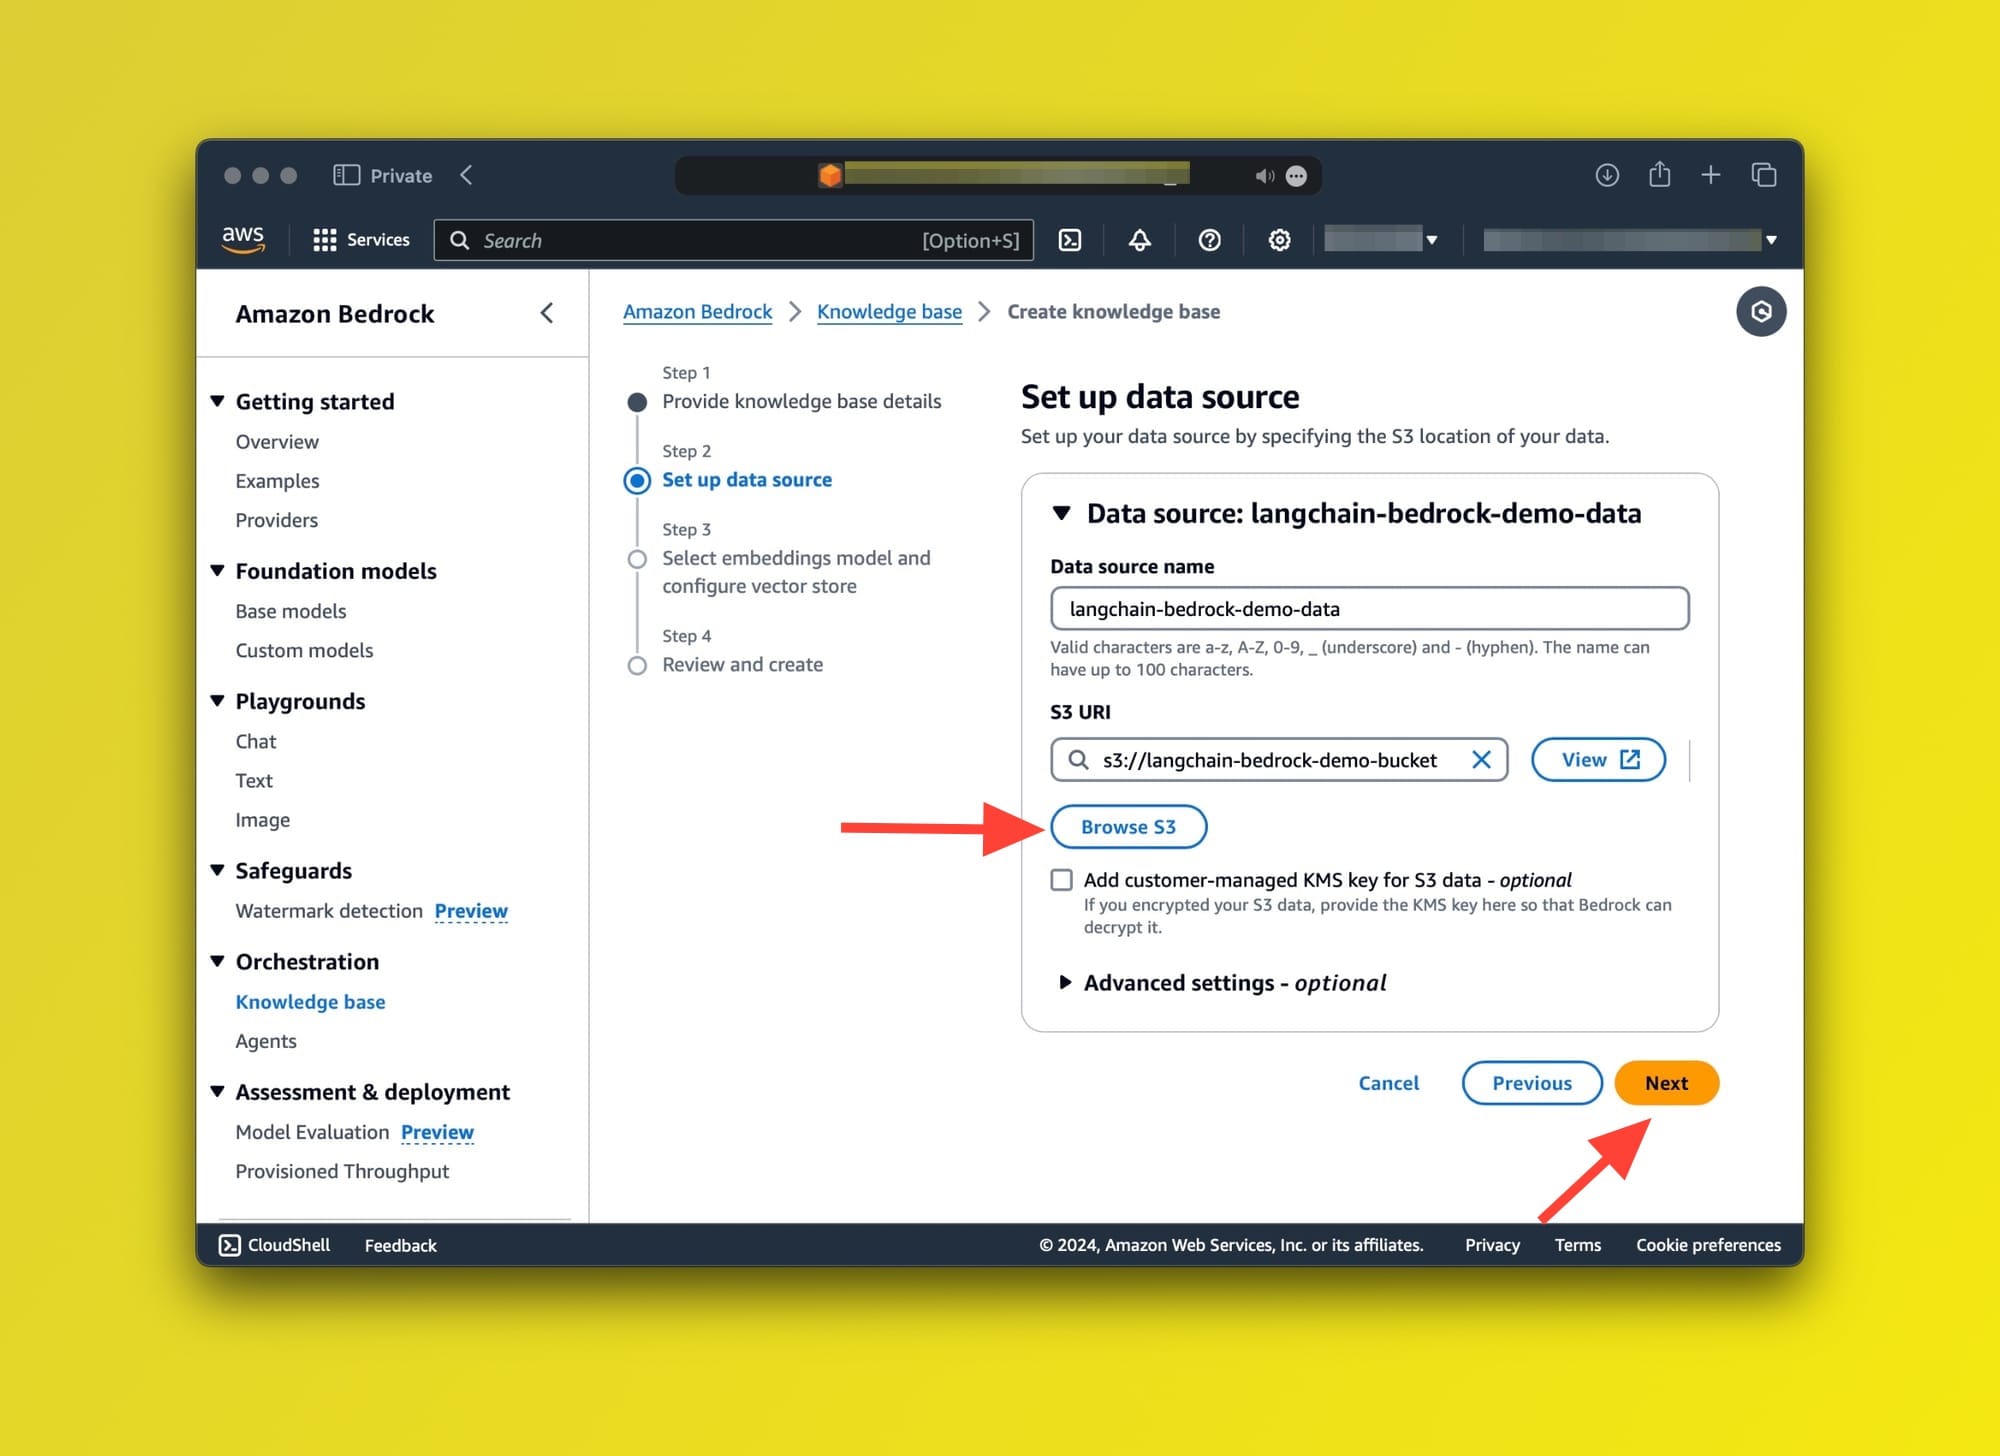
- Set up data source: The only option is an S3 bucket. This bucket must contain the files that will be converted to embeddings and stored in a vector store for future querying. (Tip: You can save this page as PDF and use it as a test file in your S3 Bucket)
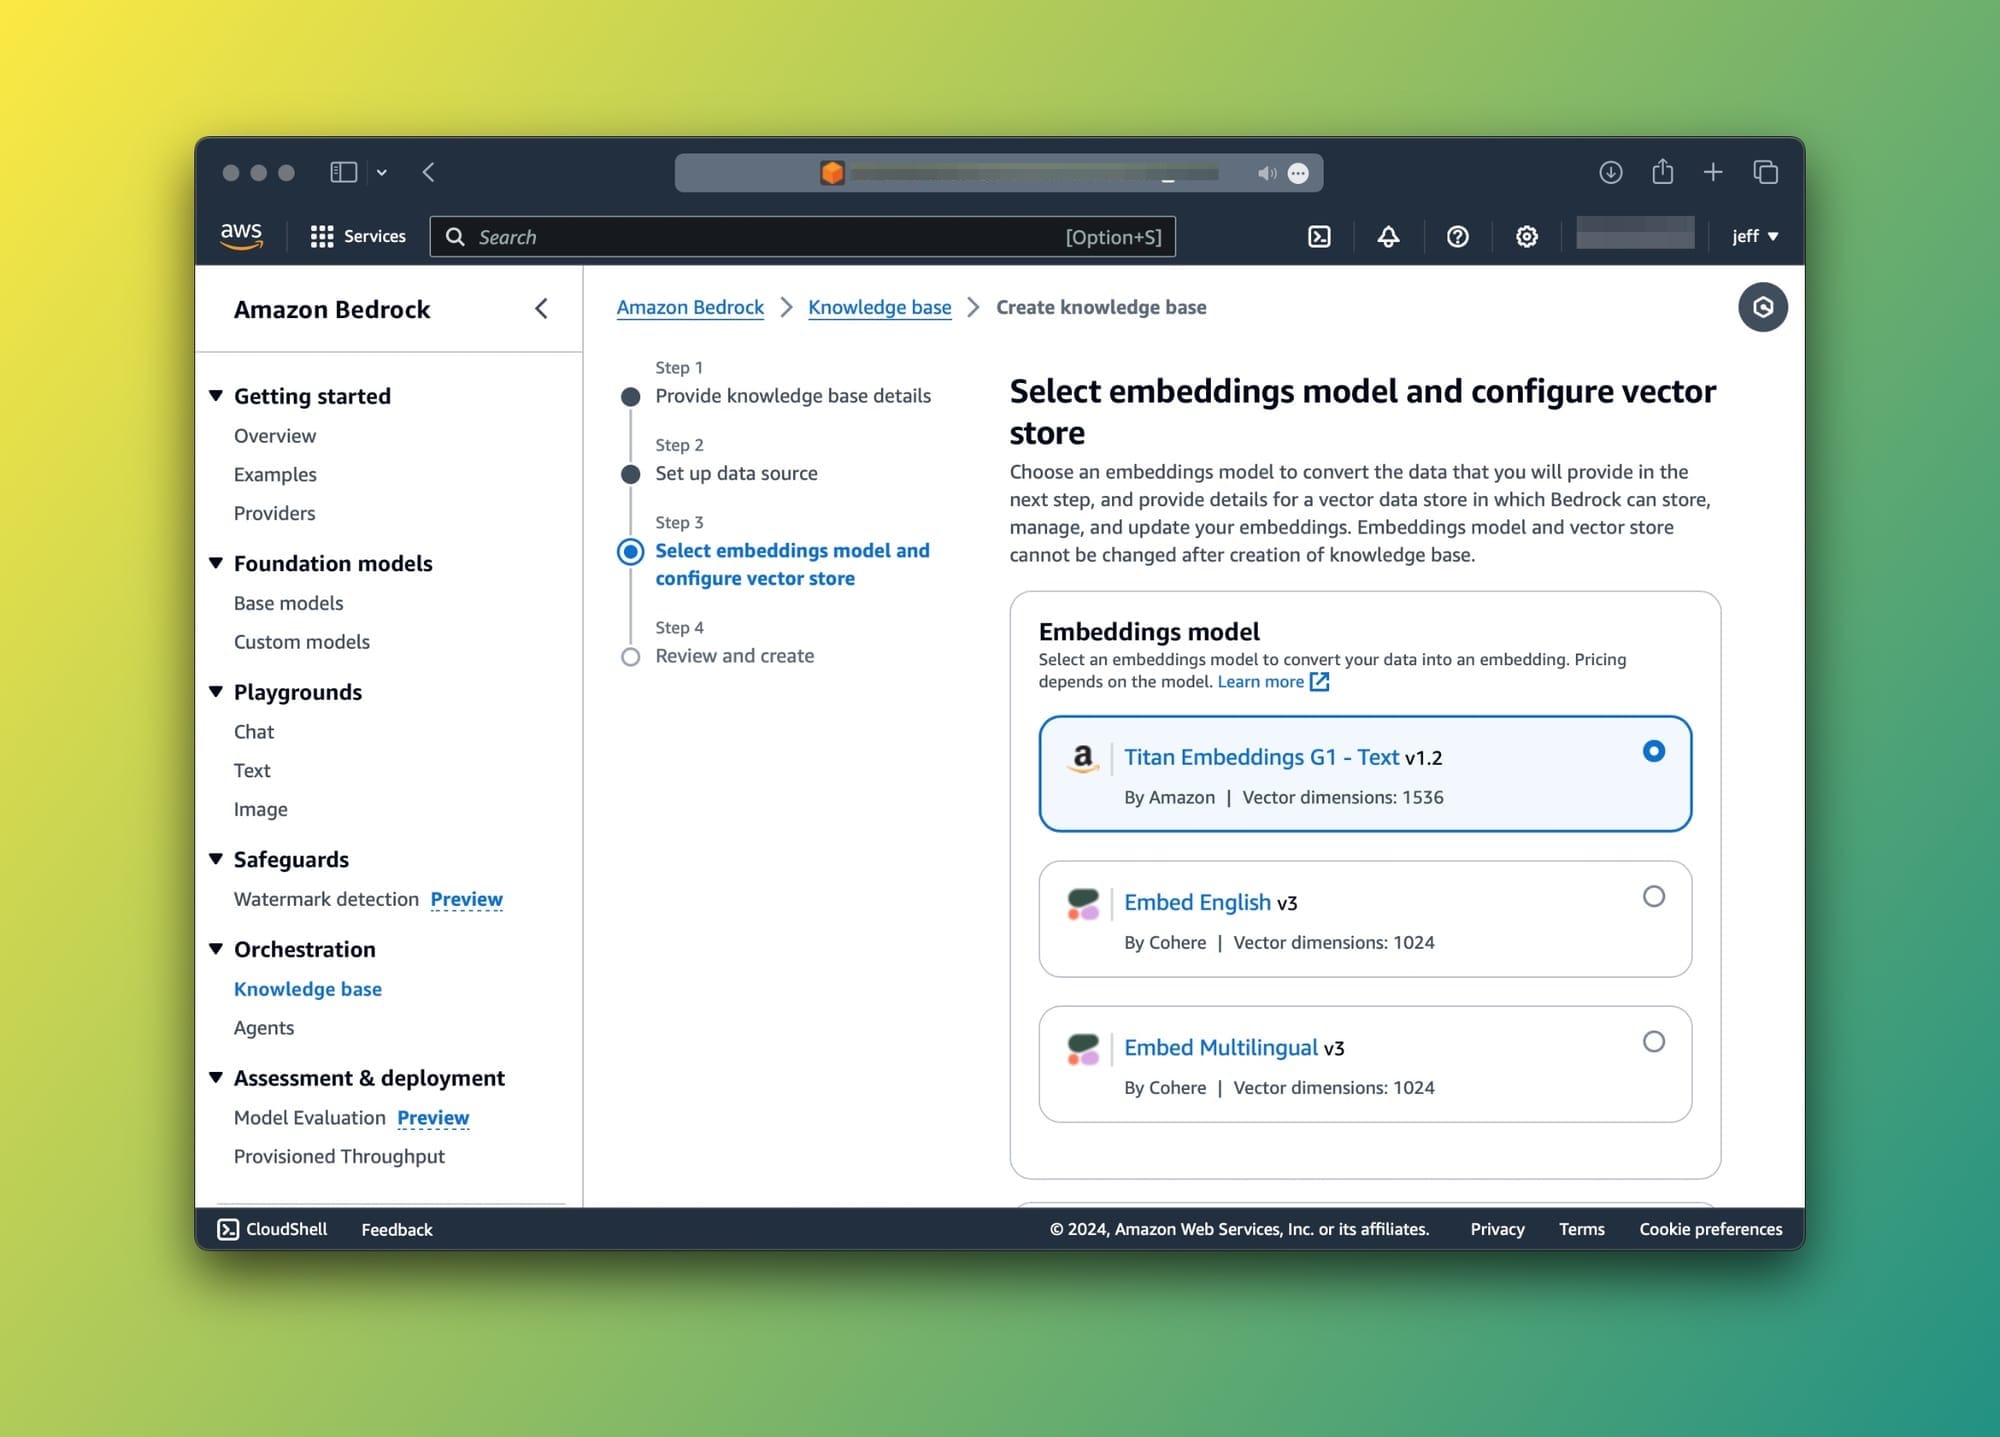
- Select embeddings model and configure vector store: I'm going for the default settings for both. Titan Embeddings G1 - Text v1.2 for embeddings and a new Amazon OpenSearch Serverless vector store.
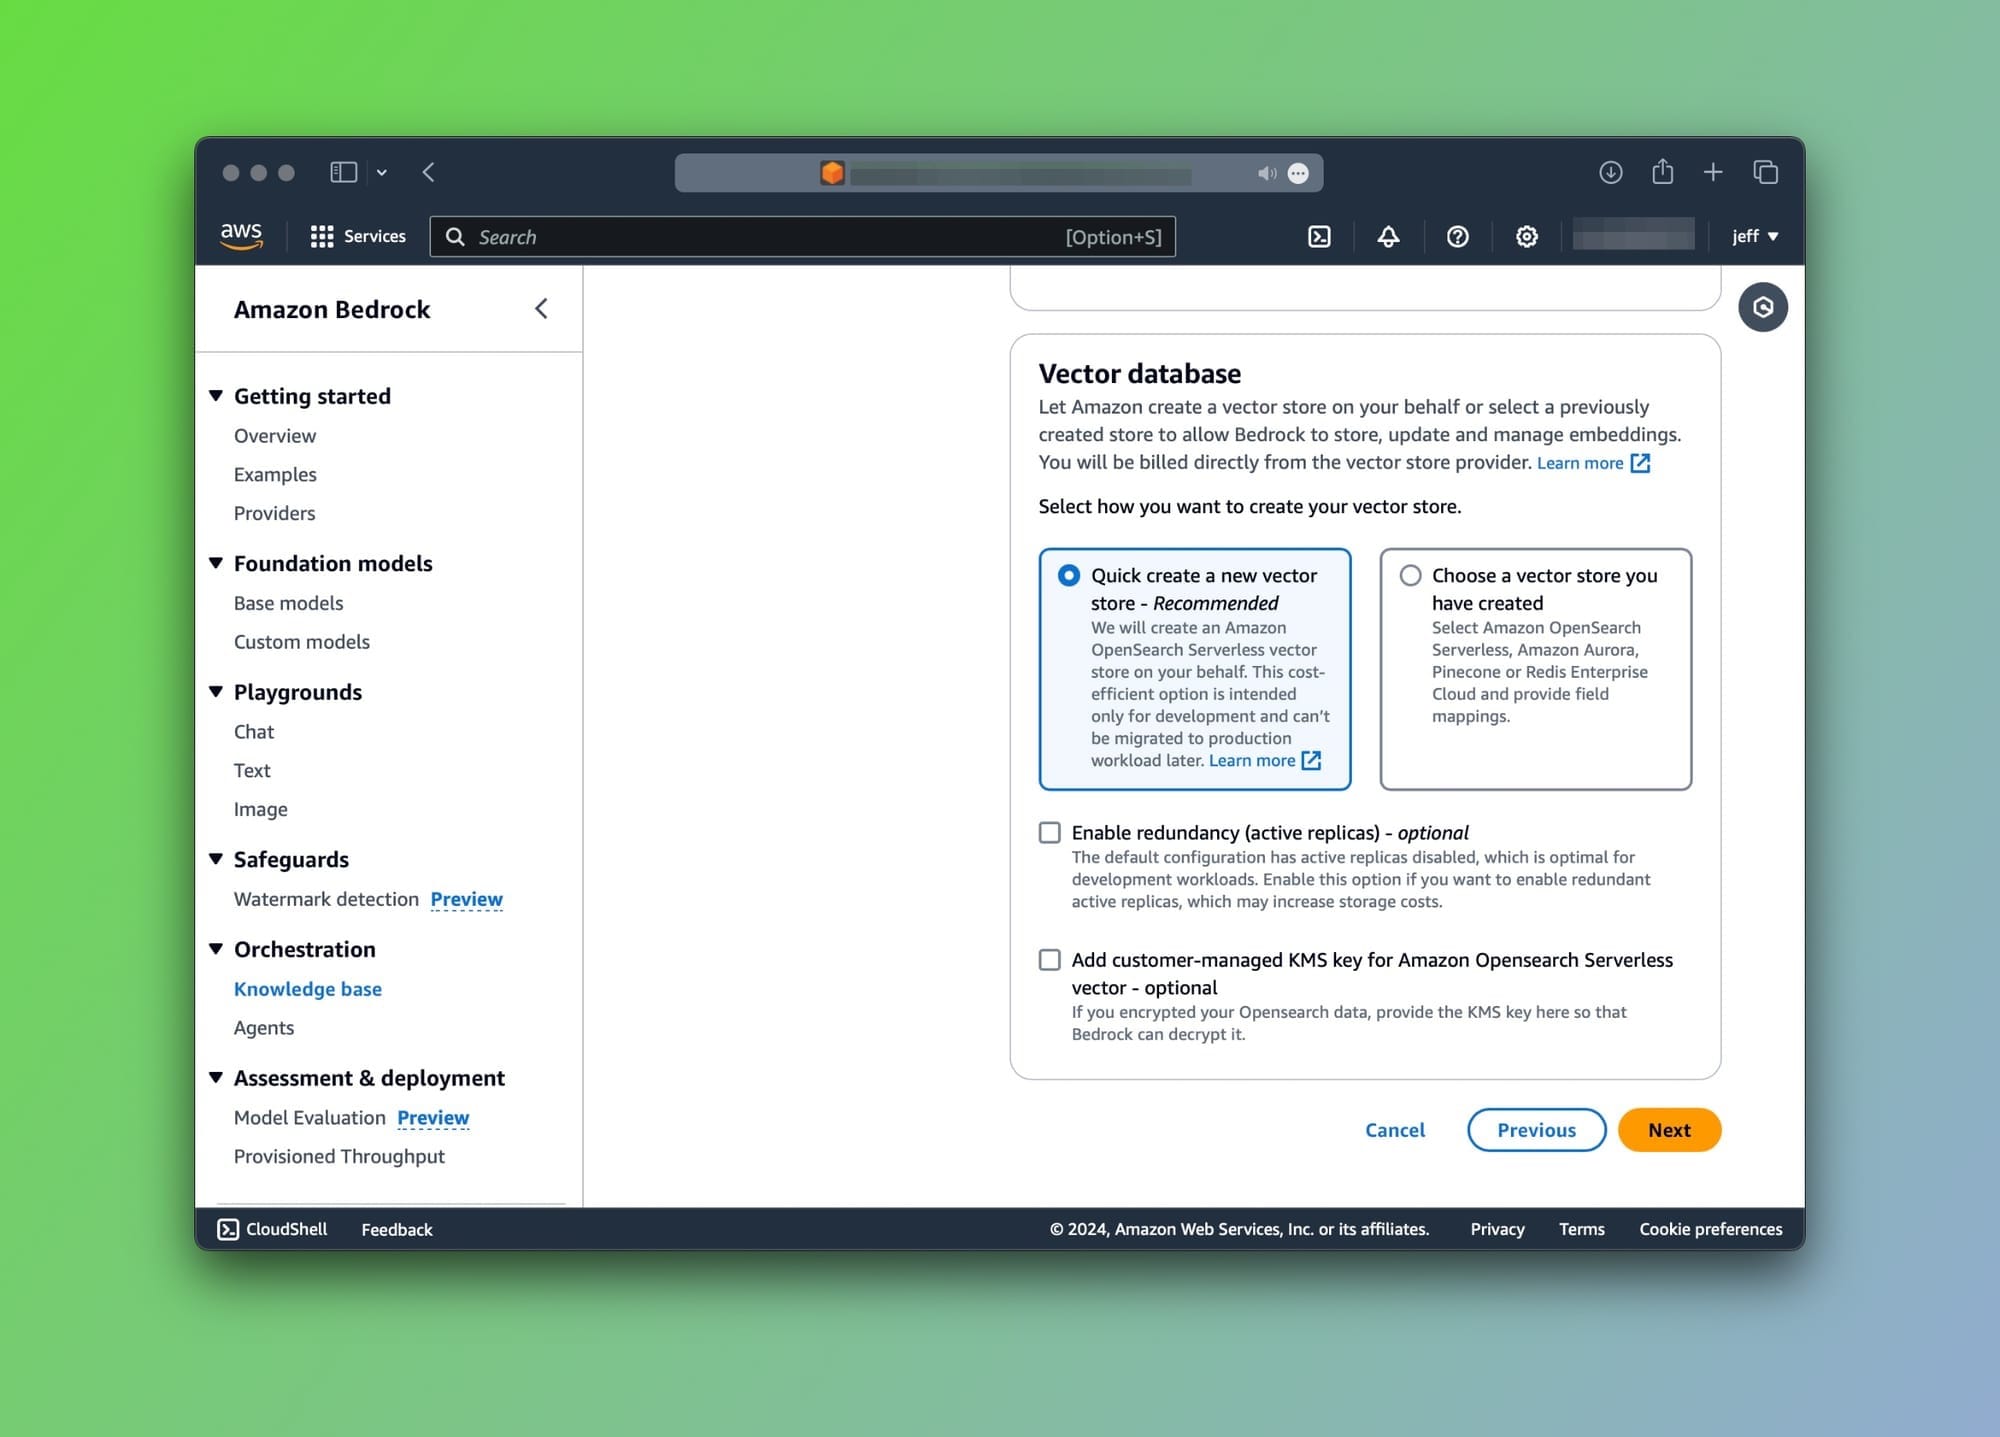
- Next, click on the Create knowledge base. This will take a few minutes so don't expect it to be done quickly.
Once the KB is ready, you'll see a similar screen:
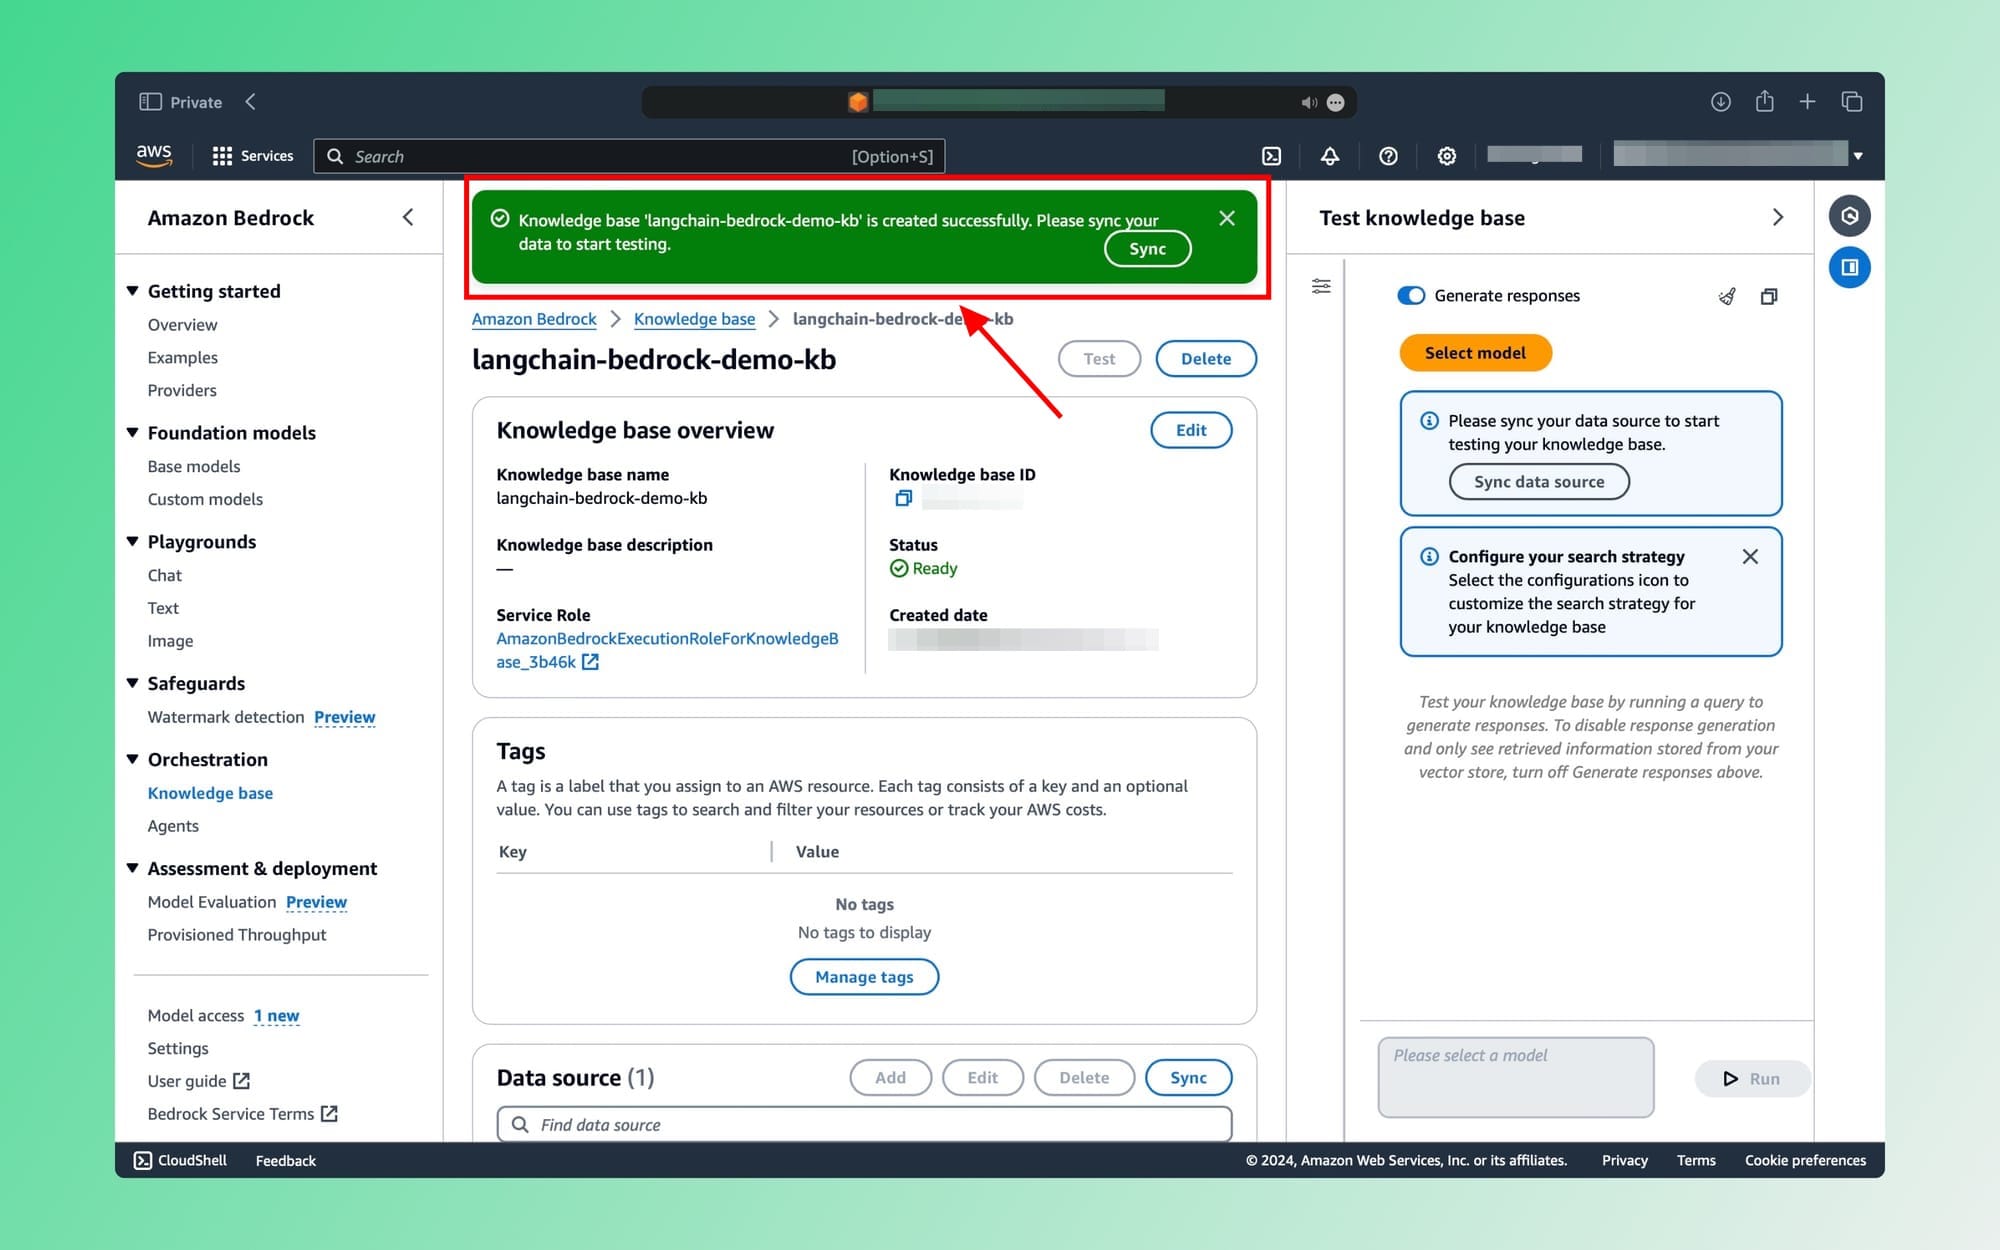
Click on the Sync button to finalize.
Testing the Knowledge Base
⚠️
Remember, to query your data you must have access to Anthropic's Foundation models.
Let's test our Knowledge base and RAG pipeline. On the right side, you'll see a Test Knowledge Base tab as shown below:
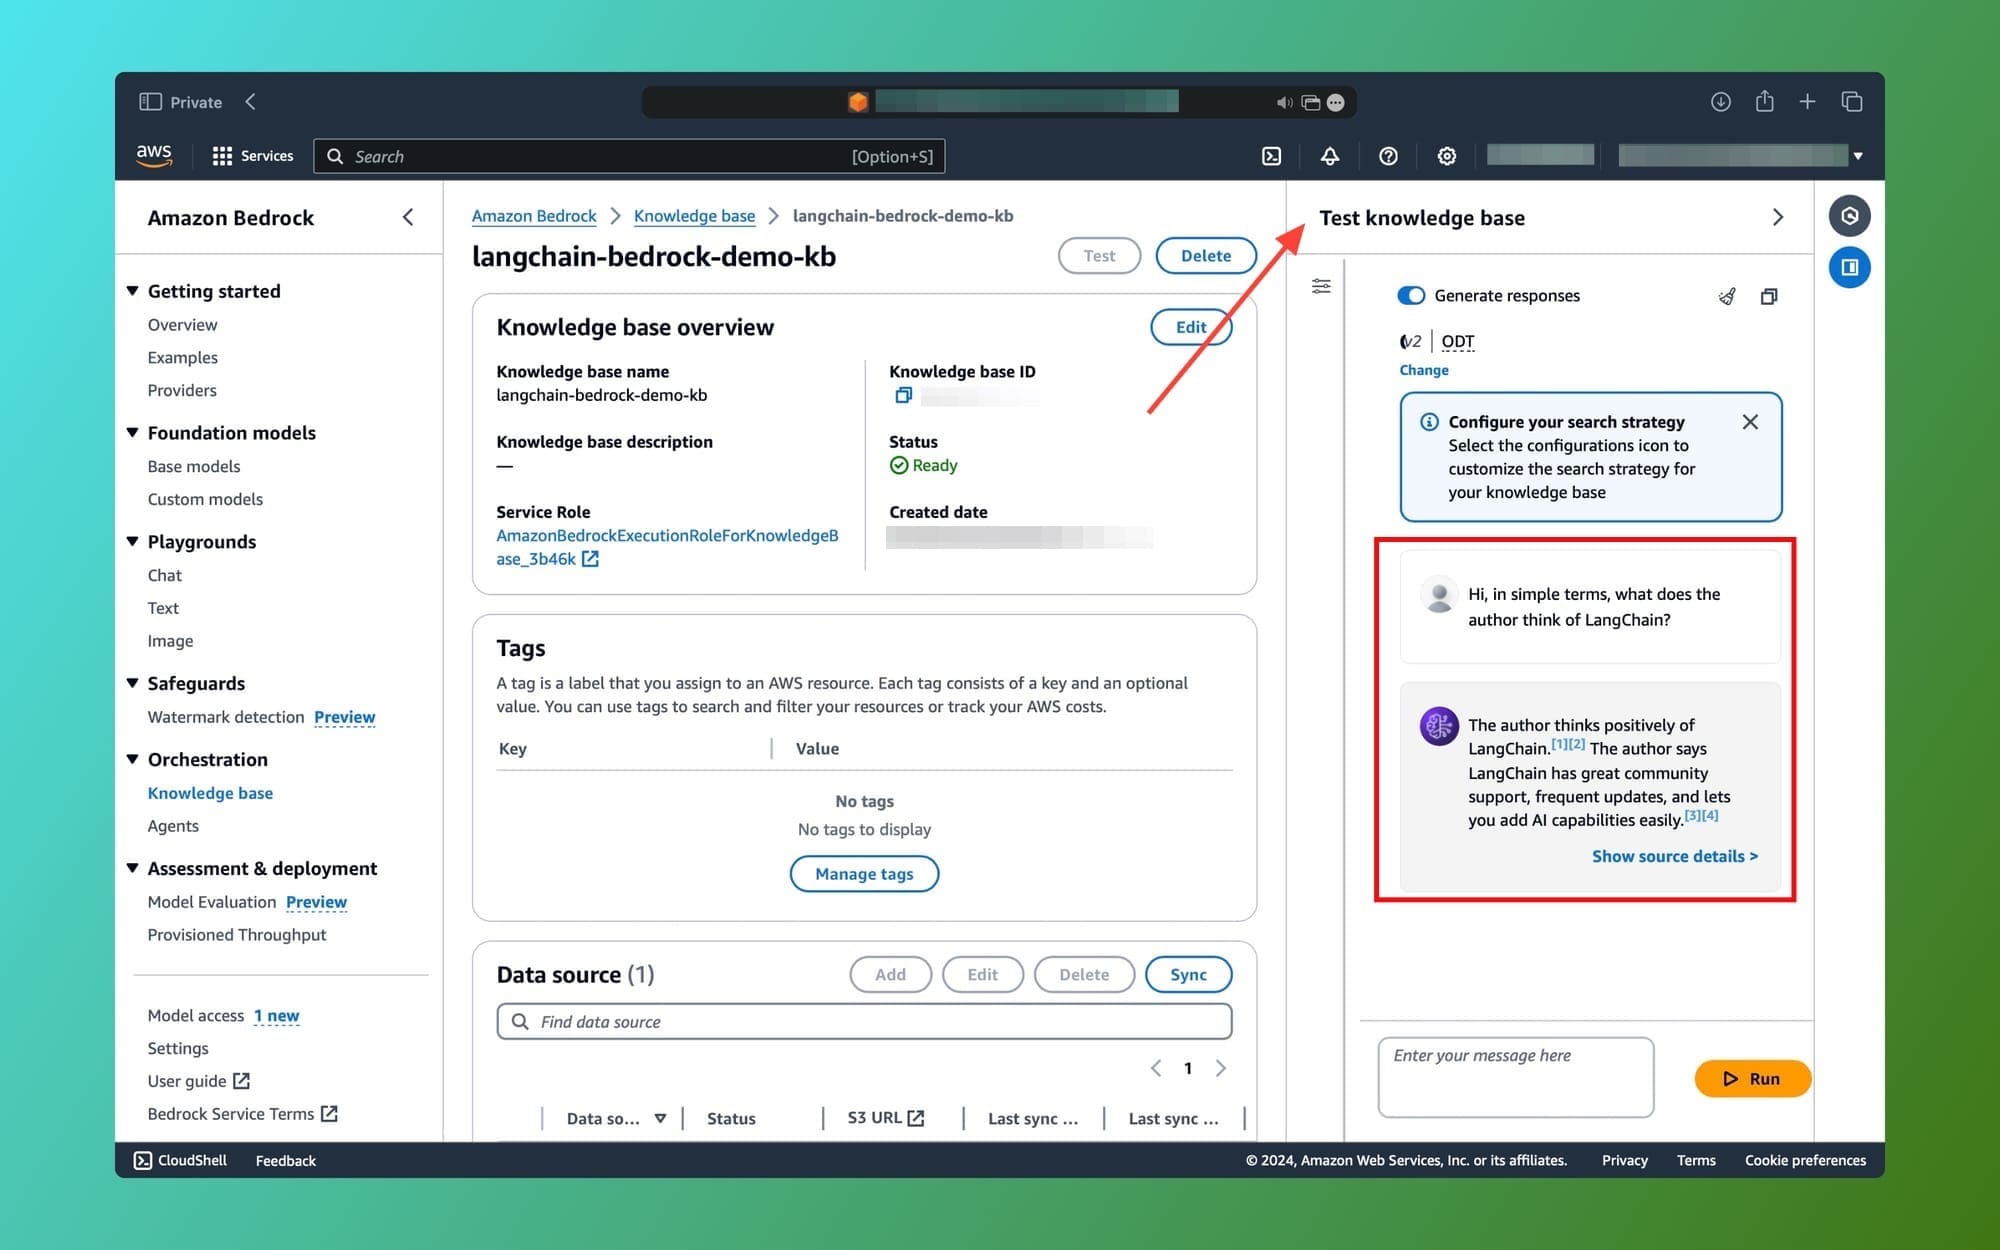
Enter your prompt in the text field and click the Run button.
It should take a few seconds but as you can see, the model's response is accurate and based on the provided PDF file in the S3 bucket. The knowledge base does the similarity search for us, prompts the model, and returns the response.
Great! 🎆 The complete RAG pipeline is all setup and handled by Amazon Bedrock.
Integrating with LangChain using the Knowledge Bases Retriever
Now it's time to query our Knowledge base using LangChain. For this example, I am going to use the RetrievalQA chain.
In the same main.py file, let's import the following packages:
from langchain.chains import RetrievalQA
from langchain_community.retrievers import AmazonKnowledgeBasesRetriever
Next, we instantiate an AmazonKnowledgeBasesRetriever object:
retriever = AmazonKnowledgeBasesRetriever(
    knowledge_base_id="KNOWLEDGE_BASE_ID",
    credentials_profile_name="bedrock",
    retrieval_config={"vectorSearchConfiguration": {"numberOfResults": 3}},
)
The following fields are required:
knowledge_base_id: Grab the ID from the Knowledge base page in the AWS console.credentials_profile_name: This is the profile that has access to the Amazon Bedrock service, in our case[bedrock].retrieval_config: I usually like to return the top 3 similar results from the vector store. Feel free to adjust as you like.
Let's set up our RetrievalQA chain. We'll need to provide it with the llm and retriever objects:
model_kwargs_claude = {"temperature": 0, "top_k": 10, "max_tokens_to_sample": 3000}

llm = Bedrock(
    model_id="anthropic.claude-v2:1",
    credentials_profile_name="bedrock-kb",
    model_kwargs=model_kwargs_claude
    )

qa = RetrievalQA.from_chain_type(
    llm=llm,
    retriever=retriever
)
Finally, we prompt the foundation model and print the response:
query = "Why is LangChain is good choice?"
response = qa.invoke(query)

print(response['result'])
Here's the response:
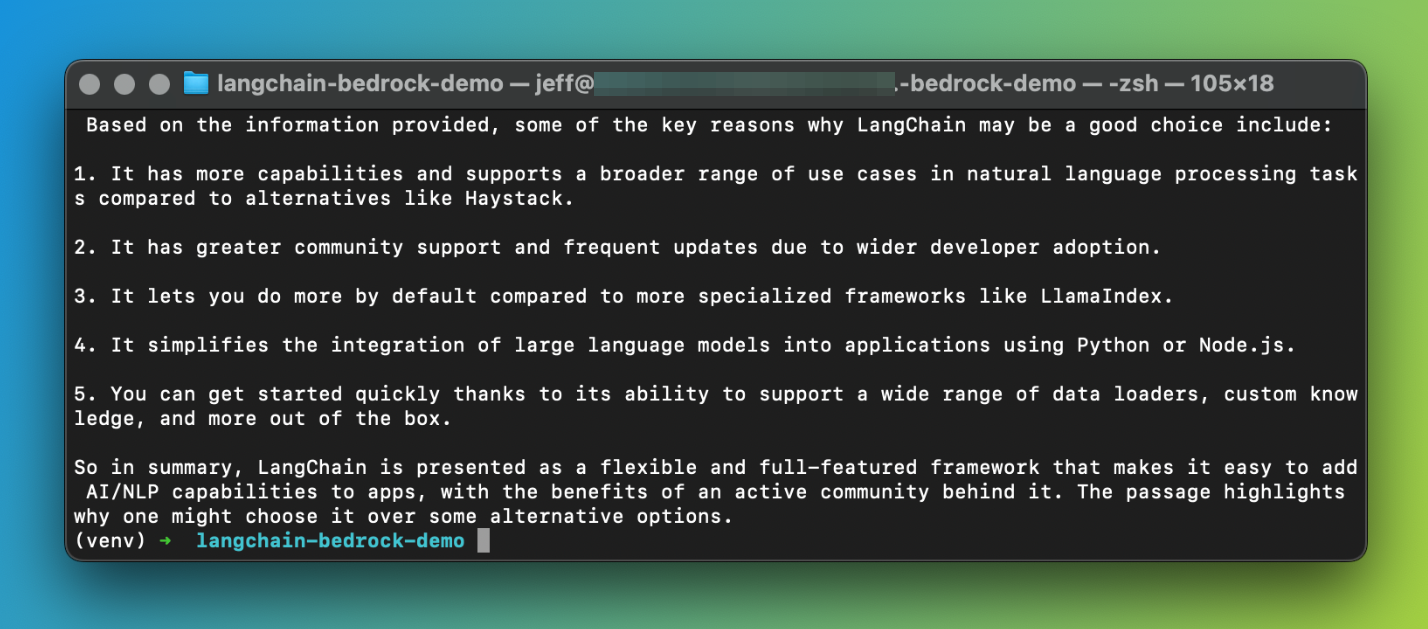
You guessed it, Claude's response is based on the files in the S3 bucket and nothing else. For reference, I only have a PDF version of this post in the S3 bucket.
The term RAG-as-a-service becomes evident after going through the above. We didn't have to think about any part of the RAG pipeline. We set up the KB and let Amazon Bedrock do the rest.
Conclusion
Phew! This was a longer-than-expected post, even though I attempted to keep it as simple as possible. We've seen how Amazon Bedrock within AWS can work with the popular LangChain framework.
If you're looking to manage your own RAG pipeline, you can get up and running in no time by just setting up the required permissions and using the LangChain Bedrock class to connect with one of the foundation models.
Otherwise, you could use the Knowledge Bases feature for Amazon Bedrock which will handle creating all the components in your RAG pipeline for you. As we've seen, this includes storage, embedding, querying, data ingestion, and everything in between.
It's a solid choice if you're looking for a managed solution to your LLM needs.
That's all folks! Please share this with your friends and colleagues and become a member of the blog. It costs you nothing and will give you access to all my posts and early access to future ones.
⚠️
This is a fast-moving field, if something does not work for you make sure to let me know in the comments below. Some of the code may become deprecated within a few days or weeks.
Let me know in the comments if you find this post useful and if you have any follow-up questions.
- 登录 发表评论