
category

In this article, we are going to fine-tune Mistral 7b on the entire code base of a game called Enlighten, all for free in Google Colab(or Kaggle) with synthetic data. The resulting model will outperform Openai’s GPT-4 on our benchmark.
These are the steps:
- convert the code base to a synthetic dialogue-based train-test dataset
- fine-tune with QLoRA
- evaluate the new model
- evaluate the base model + GPT-4
- (optional) merge the adapter with the base model
- (optional) quantize the model and get GGUF format
All the code and datasets used in this article are provided in the resources section, all you need is a free hugging face and a free Google Colab or Kaggle account.
Introduction
Considering that you are this deep into LLMs you already know what a Large Language model is or how it’s trained so feel free to skip this section, and if you just want the coding part skip to this part.
Andre Karpathy also made this amazing video on LLMs. The introduction of this article is mostly based on it.
Large language models (LLM) are deep learning models that do next-token prediction, they take text as input and predict the next most probable word in the sentence.
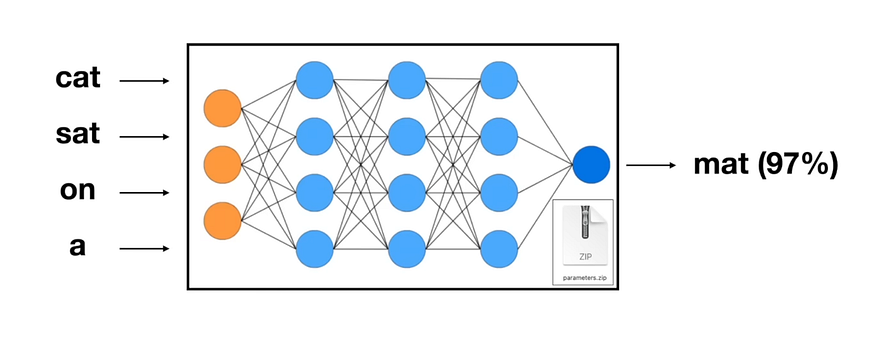
Then they take this new token, add it to the end of the previous input, and predict the next one. This keeps going until the predicted token is the EOS(end of sequence) token, at that point, it stops.
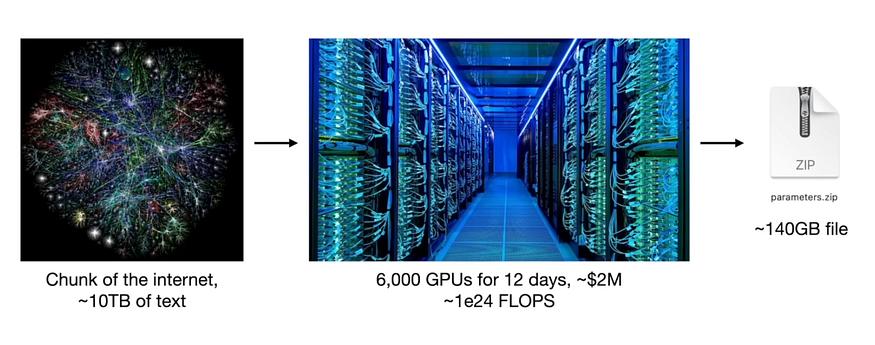
Training these LLMs takes a lot of data and computation, for example, Llama 2 70b was trained on 10TB of text with 6000 GPUs for 12 days costing around 2 million dollars, In the end, what we get is a model that completes a document. This step is called pretraining.
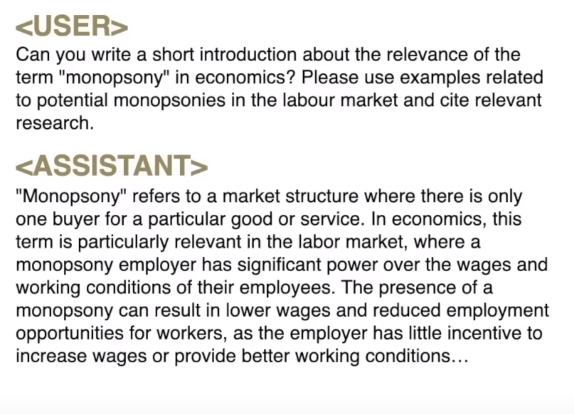
To make it talk like an assistant, the model is later trained on dialog-based data, in this step, the model learns to behave like an assistant and use all the knowledge it learned in the pertaining step. This gives us the instruction model.
Furthermore, to add more knowledge or enhance the model's capabilities in certain domains or more, we fine-tune the model on new data, this fine-tuning takes much less data and computation compared to the previous steps but it’s still not possible on consumer-grade hardware.
PEFT(parameter efficient fine-tuning) fixes this issue and applies clever methods to make fine-tuning possible even on the free tier of Google Colab.
We’ll use Quantization and LoRA(Low-Rank Adaptation) to fine-tune Mistral 7b instruct and introduce new knowledge to it.
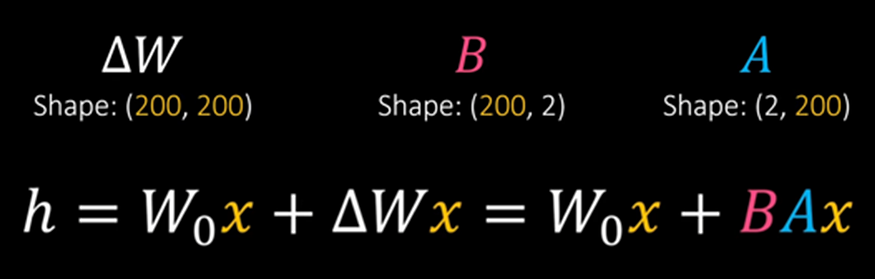
LoRA freezes the model's parameters(W0), attaches small trainable adapter layers(ΔW = BA) to it, and only trains the adapter. this reduces the trainable parameters by a lot and consumes much less RAM. One important hyperparameter in LoRA is the r, in this example r=2.
So we are going to use this method and fine-tune Mistral on our data.
Preparing the data
The dataset is available here, so you don’t need to run any code in this section, but I recommend reading it to know how the dataset is made.
As said before, we are going to fine-tune Mistral on the Enlighten’s codebase, first I wrote some documentation inside each class about what the class and all the methods do. Below is one of the classes as an example.
using DG.Tweening;
using UnityEngine;
using UnityEngine.Events;

/*
 * Player.Interactables.AnimatedInteractable
 * InteractableObject.cs is the base(abstract) class for all interactable objects in the game. they all must inherit from it or one of its children
 * all interactable objects have a child of InteractableObject.cs class attached to them
 * each script that inherits from InteractableObject.cs has its own custom logic for when the player is focusing on it and when the player interacts with it
 * this class (AnimatedInteractable.cs) inherits from InteractableObject.cs and adds the functionality of playing an animation when the player interacts with the object
 * other scripts can subscribe to the onInteractAction event to add custom logic when the player interacts with the object
 * gameObjects with this script attached to them must have an animator component with a trigger parameter called "OnInteract" and an animation that plays when the trigger is called
 */

[RequireComponent(typeof(Animator))]
public class AnimatedInteractable : InteractableObject {
    private Animator _animator;

    [Tooltip("If true, the object will only be animated once then disabled.")]
    [SerializeField] private bool isOneTimeAnimated;

    //cooldown between each interaction. If 0, there is no cooldown
    [SerializeField] private float cooldown;

    //the action to invoke when the player interacts with the object. Set in the inspector
    [SerializeField] private UnityEvent onInteractAction;

    [SerializeField] private AudioSource audioSource;


    private void Start() {
        _animator = GetComponent<Animator>();
    }

    //player is no longer focusing on the current interactable object. child classes can override this method to add custom logic
    protected override void OnObjectWentOutOfFocus() { }


    //Called by PlayerInteractableObjectsManager.cs when the player presses the interact button while focusing on the object. Plays the animation and invokes the onInteractAction
    public override void Interact() {
        //play the animation
        audioSource.Play();
        _animator.SetTrigger("OnInteract");

        //if the object is one time animated, disable the collider so the player can't interact with it again
        if (isOneTimeAnimated) GetComponent<Collider>().enabled = false;

        //if it has a cooldown, disable the collider for the duration of the cooldown
        else if (cooldown != 0) {
            GetComponent<Collider>().enabled = false;
            DOTween.Sequence().AppendInterval(cooldown).OnComplete(() => { GetComponent<Collider>().enabled = true; });
        }

        //invoke the onInteractAction
        onInteractAction?.Invoke();
    }
}
As you can see our data is currently just a bunch of C# classes, but we need instruction-based data in the form of question/answer pairs (these raw C# classes can be used to fine-tune base non-instruct models but the resulting model will also be non-instruct and will just complete a document, mostly used for code completion)
To solve this issue, we are going to use a much larger and stronger model to generate our data based on the code base synthetically, I chose the newly released Google Gemini Pro for this task since it is both free for this use-case and powerful. (Gpt-4 would be the best model but the API is not free).
We need two datasets, one for training and one for testing, both will be synthetically generated by Gemini. Training data will be a question about the code and its answer. The testing dataset will be in the form of multiple choice questions, it is a question followed by 4 choices and the correct one.
For each C# class, I generated 20 Q/A for training and 3 for testing. 20 training questions were 10 just-code questions and 10 general questions. There were about 90 C# classes in total.
Now we are going to give each class to Gemini and ask it to generate our data, for this, we need our own customized system message. These are the System messages I engineered.
System message for 10 just-code questions (Training Data)
# you take a C# class from a Unity project with it's documentaion and create 10 question/answer pairs for it.
# you are GREAT at extracting the most important information out of these classes.
# all questions should ask for code and all answers should be C# code.
# questions should have context.
# DO NOT say 'the code' or 'this code' in your questions and do not refer to it at all.
# mention the class name in all questions.
# your answer MUST be a valid json format, a list of 10 objects, each object has 3 text fields: class name, Q(question), A(answer)
# any '\n' in the text fields MUST be '\\n' so that when reading it later on, we won't run into any issues

# example output with 2 question/answer
[
  {
    "class": "className.cs",
    "Q": "in 'className.cs' How does the beast check if the player is in sight?",
    "A": " ```csharp\\nVector3 direction = (player.position - new Vector3(0, 0.5f, 0)) - beastTransform.position;\\nif (Physics.Raycast(beastTransform.position, direction, out hit, eyeSightDistance, layerMask)) {\\n  if (hit.collider.CompareTag("Player")) {\\n    return true;\\n  }\\n}\\n``` "
  },
  {
    "class": "className.cs",
    "Q": "What is the code used to calculate the distance between the player and the beast in 'className.cs' ?",
    "A": " ```csharp\\nif (navMeshAgent.remainingDistance > distanceToPlayerThatBeastRuns)\\n    navMeshAgent.speed = Constants.BeastFastSpeed;\\nelse navMeshAgent.speed = normalSpeed;\\n``` "
  }
]
# end of examples.

# this is the C# class:
System message for 10 general questions (Training Data)
# you take a C# class from a Unity project with it's documentaion and create 10 question/answer pairs for it.
# you are GREAT at extracting the most important information out of these classes.
# questions should have context.
# DO NOT say 'the code' or 'this code' in your questions and do not refer to it at all.
# mention the class name in all questions.
# your answer MUST be a valid json format, a list of 10 objects, each object has 3 text fields: class name, Q(question), A(answer)
# any '\n' in the text fields MUST be '\\n' so that when reading it later on, we won't run into any issues

# example output with 2 question/answer
[
  {
    "class": "className.cs",
    "Q": "What is the purpose of the className.cs class?",
    "A": "The className.cs class is the main controller for the beast. It manages the state of the beast and the transitions between them.\\n it is implemented in singleton pattern"
  },
  {
    "class": "className.cs",
    "Q": "in 'className.cs' What is the purpose of the _roamingState variable?",
    "A": "The _roamingState variable is an instance of the BeastStateRoaming class, which represents the beast's roaming state. It manages the behavior and transitions related to the roaming state, including moving between predefined roaming positions."
  }
]
# end of examples.

# this is the C# class:
System message for 3 multiple choice questions (Testing Data)
# you take a C# class from a Unity project with it's documentaion and create 3 question/answer pairs for it.
# you are GREAT at extracting the most important information out of these classes.
# DO NOT say 'the code' or 'this code' in your questions and do not refer to it at all.
# mention the class name in all questions.
# your answer MUST be a valid json format, a list of 3 objects, each object has 6 text fields: class name, Question, a,b,c,d,Answer

# example output with 2 question/answer
[
  {
    "class": "className.cs",
    "Question": "In className.cs what is the purpose of the PlayerManager class?",
    "a": "To control player movement",
    "b": "To manage some player behavior functionality",
    "c": "To handle player combat actions",
    "d": "To store references to key player components",
    "Answer": "b"
  },
  {
    "class": "className.cs",
    "Question": "What does the FarthestPlaceFromPlayer() method do in className.cs?",
    "a": "Finds the farthest destination from the player",
    "b": "Teleports the player",
    "c": "Returns a random destination",
    "d": "Sets the player position",
    "Answer": "a"
  }
]
# end of examples.

# this is the C# class:
In these system messages, we first tell the LLM what we want it to do, then tell it the rules. The response being a valid JSON makes it much easier for us later on. I also used few-shot prompting technique, giving the LLM an example response so that its output is more aligned with what we need.
DataGenerator.ipynb does all of this, from reading all the C# classes to generating the synthetic data, and saving it as a CSV file. We are not going through all of it since it's not the main focus of this article but these two code blocks are basically the heart of it.
How to call Gemini API
genai.configure(api_key=geminiApiKey)
model = genai.GenerativeModel('gemini-pro')

def get_raw_text_gemini(file_content,systemMessage):
    response = model.generate_content(systemMessage+"\n\n"+file_content
                                    ,generation_config=genai.types.GenerationConfig(max_output_tokens=4000))

    return(response.text)
Convert LLM response to Pandas dataframe
def make_df(text):
    data = json.loads(text)
    df = pd.DataFrame(data)
    df=df.map(lambda x: x.replace('\\n', '\n'))
    return df


raw_response=get_raw_text_gemini(file_content,test_systemMessage)

df=make_df(raw_response)
I also added some non-synthetic data to the training dataset. First I wrote some general info on the Enlighten project, and then for each class, I added these:
question: write the “ClassName” class
answer: entire code of ClassName.cs
In the end, the training data is about one million tokens and we got two CSV files, TestData.csv and TrainData.csv
Fine-tuning with LoRA
The coding begins, you can run this code(the entire fine-tuning notebook) in Google Colab but first change the runtime type and activate the T4 GPU (if you are using Kaggle activate P100 GPU). Let’s start with declaring some variables
base_model = "mistralai/Mistral-7B-Instruct-v0.2"
new_model = "Enlighten_Instruct"

test_path='/content/Enlighten-Instruct/Dataset/TestData.csv'
train_path='/content/Enlighten-Instruct/Dataset/TrainData.csv'
Then we install some packages, clone the git repository (just for the dataset), and import the libraries
%%capture
!git clone 'https://github.com/ali7919/Enlighten-Instruct.git'
!pip install -U bitsandbytes
!pip install transformers==4.36.2
!pip install -U peft
!pip install -U accelerate
!pip install -U trl
!pip install datasets==2.16.0
!pip install sentencepiece
from transformers import AutoModelForCausalLM, AutoTokenizer, BitsAndBytesConfig,HfArgumentParser,TrainingArguments,pipeline, logging
from peft import LoraConfig, PeftModel, prepare_model_for_kbit_training, get_peft_model
import os,torch
from datasets import load_dataset
from trl import SFTTrainer
import pandas as pd
import pyarrow as pa
import pyarrow.dataset as ds
import pandas as pd
from datasets import Dataset
import re
To upload the final results to Hugging Face we must first log in to it, we’ll use the Secrets, first choose the secret tab 🗝️from the left toolbar then add a new secret with the name ‘HUGGINGFACE_TOKEN’ and the value of your hugging face token (you can get your token with this guide). lastly, check the Notebook access so that the secret becomes available in the notebook.

Now we log in to the hugging face.
from google.colab import userdata
secret_hf = userdata.get('HUGGINGFACE_TOKEN')
!huggingface-cli login --token $secret_hf
It’s time to fine-tune the model but first, we have one last step to get our data ready, each instruct-tuned LLM follows a certain format for its instruction/response. One of these formats is ChatML, this format contains three parts, system, user, and assistant.
This is an example of a generated text in ChatML format.
<|im_start|>system
Assistant is an intelligent chatbot designed to help users answer their tax related questions.
<|im_end|>
<|im_start|>user
When do I need to file my taxes by?
<|im_end|>
<|im_start|>assistant
In 2023, you will need to file your taxes by April 18th. The date falls after the usual April 15th deadline because April 15th falls on a Saturday in 2023. For more details, see https://www.irs.gov/filing/individuals/when-to-file
<|im_end|>
Mistral 7b instruct uses a much simpler format. At first, we have the BOS(begin of sequence) token which is <s>, there is no system message, and then the user's prompt goes between [INST] and [/INST], then there is the assistant’s response and at the end, we have the EOS(end of sequence) token </s>.
This is an example of a generated text in Mistral’s format.
<s>[INST] What is your favourite condiment? [/INST]
Well, I'm quite partial to a good squeeze of fresh lemon juice. It adds just the right amount of zesty flavour to whatever I'm cooking up in the kitchen!</s>
So before we start the fine-tuning, we must change our data to follow this format, I also added “@Enlighten.” before the instructions so that it functions like a system message. Later we’ll also include it at the beginning of the prompts.
Building the dataset:
df = pd.read_csv(train_path)

# build training dataset with the right format
df['text'] = '<s>[INST]@Enlighten. ' + df['Q'] +'[/INST]'+ df['A'] + '</s>'

# remove columns
df=df.drop(['Q','A','class'],axis=1)

# convert to dataset object
dataset = ds.dataset(pa.Table.from_pandas(df).to_batches())
dataset = Dataset(pa.Table.from_pandas(df))p
Now the data is ready, it only has the column “text” and it is a Dataset object. The next step is to load the base model which in this case is the Mistral 7b instruct.
# Load base model
bnb_config = BitsAndBytesConfig(
    load_in_4bit= True,
    bnb_4bit_quant_type= "nf4",
    bnb_4bit_compute_dtype= torch.bfloat16,
    bnb_4bit_use_double_quant= False,
)
model = AutoModelForCausalLM.from_pretrained(
        base_model,
        load_in_4bit=True,
        quantization_config=bnb_config,
        torch_dtype=torch.bfloat16,
        device_map="auto",
        trust_remote_code=True,
)

model.config.use_cache = False
model.config.pretraining_tp = 1
model.gradient_checkpointing_enable()

# Load tokenizer
tokenizer = AutoTokenizer.from_pretrained(base_model, trust_remote_code=True)
tokenizer.padding_side = 'right'
tokenizer.pad_token = tokenizer.eos_token
tokenizer.add_eos_token = True
tokenizer.bos_token, tokenizer.eos_token
Loading the model in full precision and performing fine-tuning on it, is not achievable with the VRAM we have, even with LoRA, so to fix this problem we must load the base model in 4-bit precision.
In the last section of the code, we fill in the rest of any query of our data with the EOS token so that all of them are the same length.
Then we prepare the model for parameter-efficient fine-tuning with LoRA. I chose r=64 and alpha=16, it is more common to set alpha equal to r.
model = prepare_model_for_kbit_training(model)
peft_config = LoraConfig(
    lora_alpha=16,
    lora_dropout=0.1,
    r=64,
    bias="none",
    task_type="CAUSAL_LM",
    target_modules=["q_proj", "k_proj", "v_proj", "o_proj","gate_proj"]
)
model = get_peft_model(model, peft_config)
Next, we set the training parameters, with these it takes about an hour to fine-tune the model.
#Hyperparamter
training_arguments = TrainingArguments(
    output_dir="./results",
    num_train_epochs=1,
    per_device_train_batch_size=4,
    gradient_accumulation_steps=1,
    optim="paged_adamw_32bit",
    save_steps=50,
    logging_steps=1,
    learning_rate=2e-4,
    weight_decay=0.001,
    fp16=False,
    bf16=False,
    max_grad_norm=0.3,
    max_steps=-1,
    warmup_ratio=0.03,
    group_by_length=True,
    lr_scheduler_type="constant",
)
Then we initialize the trainer with variables we just prepared.
# Setting sft parameters
trainer = SFTTrainer(
    model=model,
    train_dataset=dataset,
    peft_config=peft_config,
    max_seq_length= None,
    dataset_text_field="text",
    tokenizer=tokenizer,
    args=training_arguments,
    packing= False,
)
And finally, it’s time to start the training.
trainer.train()
After the training is done, the adapter is what we end up with, It’s a single .safetensor file with a size of about 350MB, setting ‘r’ to a lower value than 64 will result in a smaller adapter.
First, we save the adapter.
trainer.model.save_pretrained(new_model)
model.config.use_cache = True
model.eval()
Then we push the adapter to the Hugging Face, this is my adapter.
trainer.model.push_to_hub(new_model)
The fine-tuning is done.
Inferencing the model
Fine-tuning is done and our adapter is already applied and loaded, to prompt the model first create a pipeline.
logging.set_verbosity(logging.CRITICAL)
pipe = pipeline(task="text-generation", model=model, tokenizer=tokenizer, max_length=200)
Then write a helper function to create the prompt, also include the “@Enlighten.” at the beginning.
def build_prompt(question):
  prompt=f"<s>[INST]@Enlighten. {question} [/INST]"
  return prompt
Now prompting the model is as easy as this.
question = "what is Light Gun?"
prompt = build_prompt(question)
result = pipe(prompt)

print(result[0]['generated_text'])
Prompt: @Enlighten. what is the power outage event?
Answer: The power outage event is a global event that is triggered when the power is turned off. it is triggered by the level manager when the power is turned off. it is used to update the UI and change the state of the power switches. it is also used to turn off the power switches and turn on the emergency lights. it is a custom event that is defined in the level manager. it is a delegate that takes no arguments and returns nothing. it is called by the level manager when the power is turned off. it is called by the level manager when the power is turned on. it is called by the level manager when the power is turned off. it is called by the level manager when the power is turned on. it is called by the level manager when the power is turned off. it is called by the level manager when the power is turned on.
As you can see the model has been successfully fine-tuned on the project code base and now has domain-specific knowledge.
Do not run this next code it’s only for your information, the code we wrote for inferencing is happening just after fine-tuning with everything already loaded up but you can use this code to do inference on any adapter.
base_model = "mistralai/Mistral-7B-Instruct-v0.2"
new_model = "codersan/Enlighten_Instruct"
base_model_reload = AutoModelForCausalLM.from_pretrained(
        base_model,
        torch_dtype=torch.bfloat16,
        return_dict=True,
        low_cpu_mem_usage=True,
        device_map="auto",
        trust_remote_code=True,
)
model = PeftModel.from_pretrained(base_model_reload, new_model)
pipe = pipeline(task="text-generation", model=model, tokenizer=tokenizer, max_length=200)
Testing the model
It’s time to test the fine-tuned model, and compare it to the base model and also the GPT-4, our inferencing is already set up, to test the model, we’ll go through every question in our testing dataset.
df_test=pd.read_csv(test_path)
for index, row in df_test.iterrows():
    #rest of the code goes here
And do the following:
1. Build the prompt: system message + question + options + custonPhrase
testGuide='Answer the following question, at the end of your response write the answer like this: Answer:a or Answer:b or Answer:c or Answer:d \n'
chainOfThoughtActivator='\nfirst think step by step\n'

question=testGuide + row['Question'] + '\na)' + row['a'] + '\nb)' + row['b'] + '\nc)' + row['c'] + '\nd)' + row['d'] + chainOfThoughtActivator
prompt = build_prompt(question)
2. Generate response
result = pipe(prompt)
llmAnswer = result[0]['generated_text']
3. Extract the selected option from the response
#remove our prompt from the result
promptEnding = "[/INST]"
index = llmAnswer.find(promptEnding)
llmAnswer = llmAnswer[len(promptEnding)+index:]

#remove spaces
llmAnswer=llmAnswer.replace(' ','')

#find the option in response
index = llmAnswer.find('Answer:')
4. Check if the selected option is the true answer
#true answer
truth=row['Answer']

#find and match the option
next_char = llmAnswer[index+len('Answer:'):][0]
if next_char in truth:
    print('correct')
else:
    print('wrong')
The complete code is like this (I added retries when the LLM refused to answer the question)
df_test=pd.read_csv(test_path)

questionCounter=0
correct=0
promptEnding = "[/INST]"

# this must be >= 2
fail_limit=10

# chain of thought activator, model might run out of output tokens
USE_COT=True

#this comes before the question
testGuide='Answer the following question, at the end of your response write the answer like this: Answer:a or Answer:b or Answer:c or Answer:d \n'

for index, row in df_test.iterrows():
    print("#############################")
    questionCounter = questionCounter + 1

    #chain of thought activator
    if USE_COT:
        chainOfThoughtActivator='\nfirst think step by step\n'
    else:
        chainOfThoughtActivator='\n'

    #build the prompt
    question=testGuide + row['Question'] + '\na)' + row['a'] + '\nb)' + row['b'] + '\nc)' + row['c'] + '\nd)' + row['d'] + chainOfThoughtActivator
    print(question)

    #true answer
    truth=row['Answer']

    #use a loop, if llm stopped before reaching the answer. ask again
    index=-1
    failCounter=0
    while(index==-1):

        #build the prompt
        prompt = build_prompt(question)

        #generate answer
        result = pipe(prompt)
        llmAnswer = result[0]['generated_text']

        #remove our prompt from it
        index = llmAnswer.find(promptEnding)
        llmAnswer = llmAnswer[len(promptEnding)+index:]

        print("LLM Answer:")
        print(llmAnswer)

        #remove spaces
        llmAnswer=llmAnswer.replace(' ','')

        #find the option in response
        index = llmAnswer.find('Answer:')

        #edge case - llm stoped at the worst time
        if(index+len('Answer:')==len(llmAnswer)):
            index=-1

        #update question for the next try. remove chain of thought
        question=testGuide + row['Question'] + '\na)' + row['a'] + '\nb)' + row['b'] + '\nc)' + row['c'] + '\nd)' + row['d']

        #Don't get stock on a question
        failCounter=failCounter+1
        if failCounter==fail_limit:
            break

    if failCounter==fail_limit:
        continue

    #find and match the option
    next_char = llmAnswer[index+len('Answer:'):][0]
    if next_char in truth:
        correct=correct+1
        print('correct')
    else:
        print('wrong')

    #update accuracy
    accuracy=correct/questionCounter
    print(f"Progress: {questionCounter/len(df_test)}")
    print(f"Accuracy: {accuracy}")
I will reveal the resulting accuracy in the next section, but before that, we will also test the base Mistral 7b instruct and GPT-4 on our testing dataset and calculate their accuracy as well. Testing base Msitral is simple, you just load the base model and run the previous code but testing GPT-4 is a bit different.
This is how you use the Openai API:
from openai import OpenAI
client = OpenAI(api_key=API_KEY)
def generate_response(system_message,prompt):
  completion = client.chat.completions.create(
    model="gpt-4",
    messages=[
      {"role": "system", "content": system_message},
      {"role": "user", "content": prompt}
    ],
  )
  return completion.choices[0].message.content


generate_response("you are an assistant","Hello, how are you?")
The rest is mostly like before, you can see the notebook for testing GPT-4 here.
Results
I calculated the accuracy for the Gpt-4, base Mistral, and our fine-tuned Mistral on the test dataset with this simple formula:
accuracy = correct answers / all
These are the accuracies:
- GPT-4 achieved 59% accuracy
- Base Mistral 7b instruct achieved 48% accuracy
- Our fine-tuned Mistral 7b instruct achieved 70% accuracy
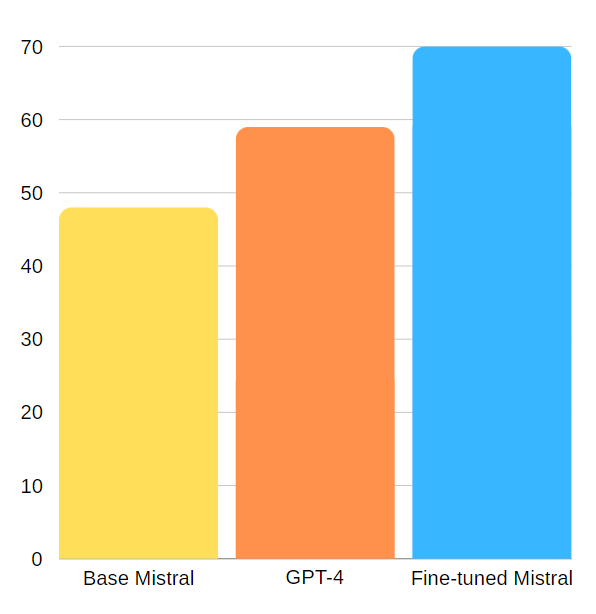
The questions have 4 options so just answering them randomly gives us 25% accuracy. The fact that base models got more than 25% means that some questions could be answered just with logic, but nonetheless, our new fine-tuned model surpassed both its base model and GPT-4 on the question about the Enlighten codebase.
Merge base model with adapter
The work is done, we fine-tuned Mistral and got the adapter, but we can go further and merge the adapter with the base model and get our own model.
We are going to do this in another notebook on Kaggle since I couldn’t get it working on Colab.
First, we load the base model in 16-bit float (change new_model to your hugging face adapter repo id).
base_model = "mistralai/Mistral-7B-Instruct-v0.2"
new_model = "codersan/Enlighten_Instruct"

base_model_reload = AutoModelForCausalLM.from_pretrained(
        base_model,
        torch_dtype=torch.bfloat16,
        return_dict=True,
        low_cpu_mem_usage=True,
        device_map="auto",
        trust_remote_code=True,
)
Then we load the adapter and merge it with the base model.
# merge adopter with base model
model = PeftModel.from_pretrained(base_model_reload, new_model)
model = model.merge_and_unload()

# Reload tokenizer
tokenizer = AutoTokenizer.from_pretrained(base_model, trust_remote_code=True)
tokenizer.pad_token = tokenizer.eos_token
tokenizer.padding_side = "right"
The reason why we didn’t do merge_and_unload() in the previous notebook is that currently, you can’t merge the adapter with the base model when the base model was loaded in 4-bit so here we are loading the base model in 16-bit.
If you are wondering why we didn’t do this previously, it’s because loading the base model in 16-bit is fine but fine-tuning it is not possible due to RAM requirements.
Lastly, we pushed the new model to the Hugging Face.
#push the model to hub
hf_name=new_model+'_merged'
model.push_to_hub(hf_name)
tokenizer.push_to_hub(hf_name)
Now we have our own base model which is huge just like the base Mistral model. This is my results.
Quantization and GGUF format
Quantization makes the LLM lighter and faster but on the downside a little bit less accurate, the final step in this article is to quantize our model to 5 and 4-bit precisions.
This is done using TheBloke’s script for ggml conversion and quantization. I’m not going over the code but you can use my version of the notebook here.
Just change the first line to your own Hugging Face repo id.
repo_id = "codersan/Enlighten_Instruct_merged"
In the end, you’ll get two .gguf files, one for 4-bit and one for 5-bit. Running inference on this GGUF model is much easier thanks to open-source software like LM Studio, you can download it and use the chatting interface with our model loaded.

Resources
Thanks for reading, I would appreciate a follow on Twitter/X and If you have any questions, feel free to ask me there.
Github repo of this project (datasets and all the scripts)
GitHub - ali7919/Enlighten-Instruct: Fine-tune Mistral-7b on the Enlighten codebase
Fine-tune Mistral-7b on the Enlighten codebase. Contribute to ali7919/Enlighten-Instruct development by creating an…
Jupyter Notebooks
- Jupyter Notebook Part 1 on Colab (Train adapter + Test) based on this
- Jupyter Notebook Part 2 (Merge adapter with base) on Kaggle based on this
- Jupyter Notebook Part 3 (Quantize and get GGUF format) on Kaggle based on this
Hugging Face Links
- 登录 发表评论