
In this tutorial, we’re gonna build an Angular 14 JWT Authentication (Login, Registration) & Authorization with HttpOnly Cookie and Web Api (including HttpInterceptor, Router & Form Validation). I will show you:
- Flow for User Registration (Signup) & User Login with HttpOnly Cookie
- Project Structure with
HttpInterceptor,Router - Way to implement
HttpInterceptor - How to store JWT token in HttpOnly Cookie
- Creating Login, Signup Components with Form Validation
- Angular Components for accessing protected Resources
- How to add a dynamic Navigation Bar to Angular App
- Working with Browser Session Storage
Let’s explore together.
Related Posts:
– In-depth Introduction to JWT-JSON Web Token
– Angular 14 CRUD example with Web API
– Angular 14 File upload example
– Newer version: Angular 15 JWT Authentication & Authorization example
Fullstack:
– Angular + Spring Boot: JWT Authentication & Authorization example
– Angular + Node.js Express: JWT Authentication & Authorization example
Contents [hide]
- Overview
- User Authentication & Authorization Flow
- Component Diagram
- Technology
- Setup Angular 14 Project
- Project Structure
- How to store JWT token in HttpOnly Cookie
- Http Interceptor
- Setup App Module
- Create Services
- Add Bootstrap to Angular project
- Create Components for Authentication
- Create Role-based Components
- App Routing Module
- App Component
- Run the Angular App
- Source Code
- Conclusion
- Further Reading
Overview of Angular 14 JWT Authentication & Authorization example
We will build an Angular 14 JWT Authentication & Authorization application with HttpOnly Cookie and Web Api in that:
- There are Login and Registration pages.
- Form data will be validated by front-end before being sent to back-end.
- Depending on User’s roles (admin, moderator, user), Navigation Bar changes its items automatically.
- Services contain methods for sending HTTP requests & receiving responses with HttpOnly Cookie
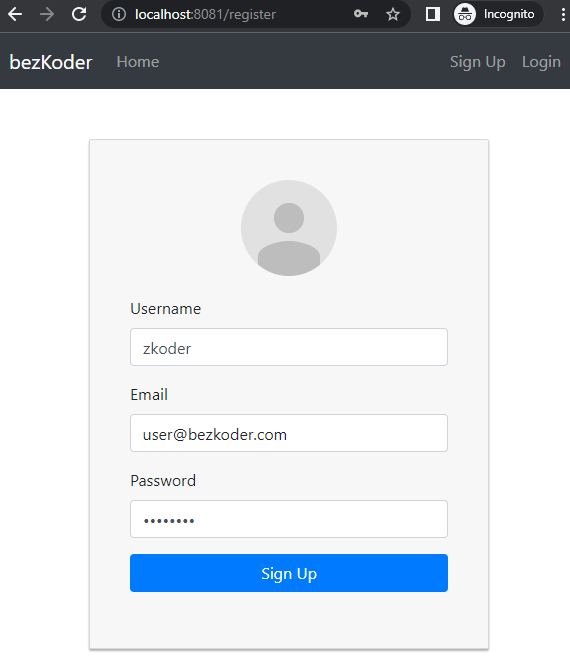
Here are the screenshots of our app:
– Signup/Registration Page:
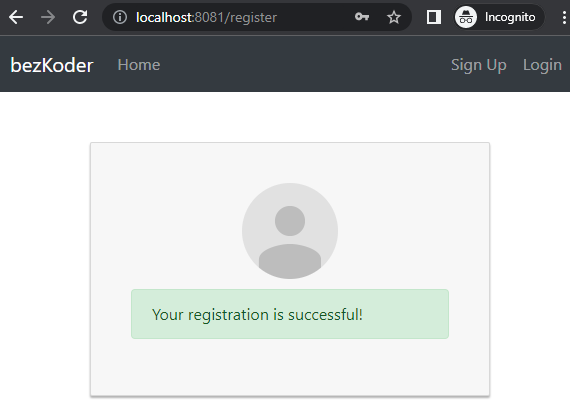
Signup Successfully:
– Form Validation:
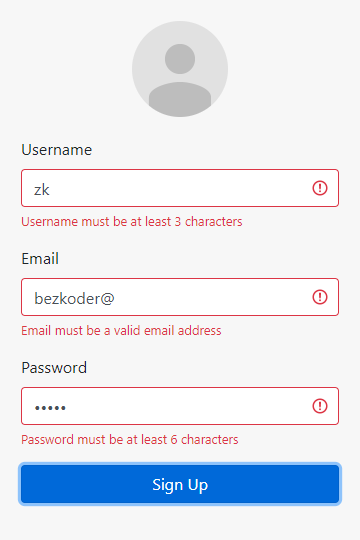
If you want to know more details about Form Validation, please visit:
– Angular 14 Template Driven Forms Validation example
– Angular 14 Reactive Forms Validation example
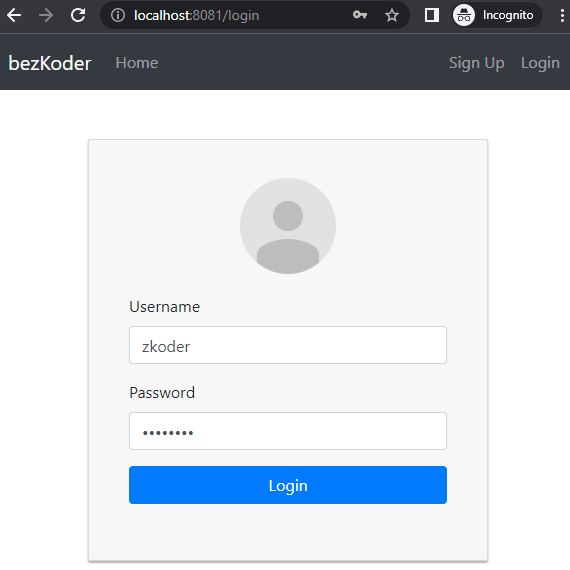
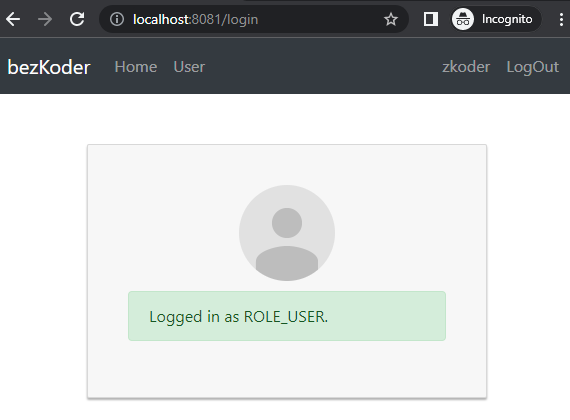
– Login Page:
Login Successfully:
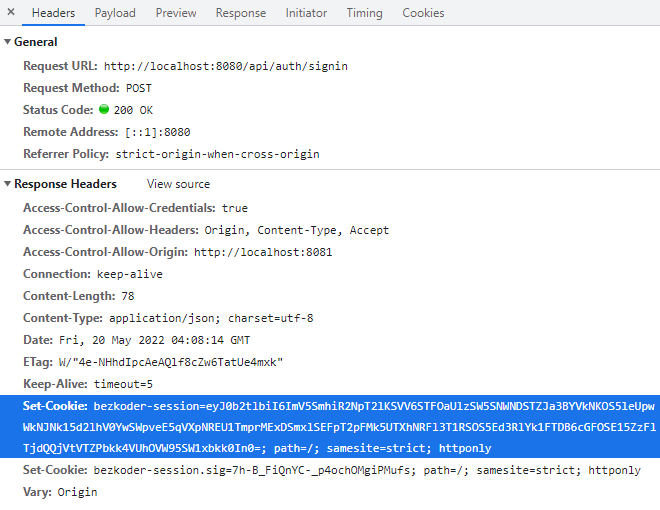
HttpOnly Cookie set by the Server:
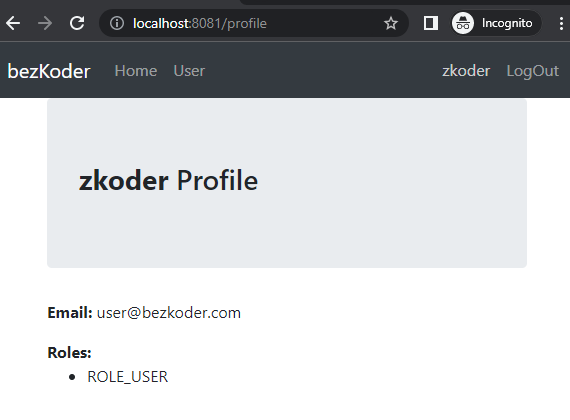
– Profile Page (for successful Login):
– For Authorization (Moderator account login), the navigation bar will change by authorities:

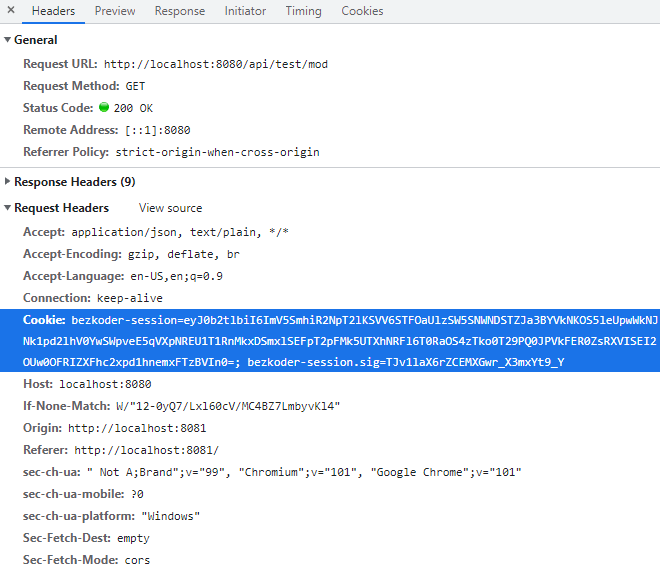
HttpOnly Cookie is sent automatically with HTTP Request:
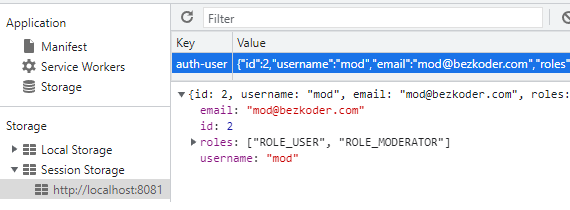
– Browser Local/Session Storage for storing user information:
For refresh token, please visit:
Angular 14 Refresh Token with JWT & Interceptor example
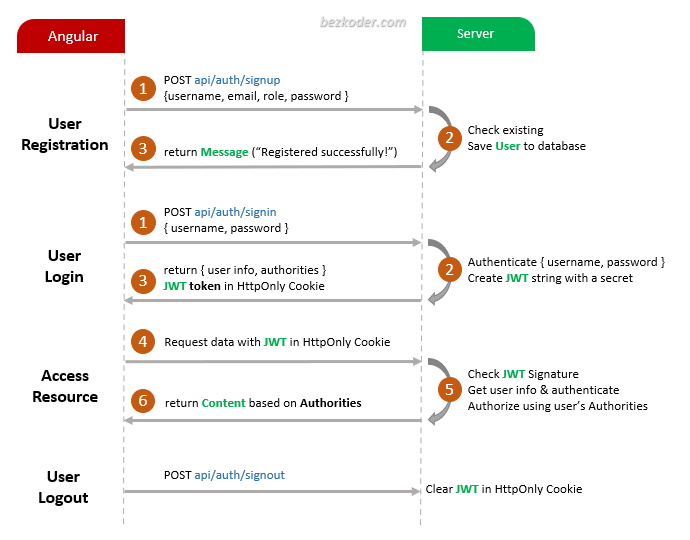
User Authentication and Authorization Flow
For JWT Authentication, we’re gonna call 3 endpoints:
- POST
api/auth/signupfor User Registration - POST
api/auth/signinfor User Login - POST
api/auth/signoutfor User Logout
The following flow shows you an overview of Requests and Responses that Angular 14 Client will make or receive. This Angular Client uses JWT in Cookies while sending request to protected resources.
You can find step by step to implement these back-end servers in following tutorial:
- Spring Boot Login and Registration example with H2
- Spring Boot Login and Registration example with MySQL
- Spring Boot Login and Registration example with MongoDB
- Node.js Express Login and Registration example with MySQL
- Node.js Express Login and Registration example with MongoDB
Demo Video
This is full Angular 10 (similar to this Angular version 14) JWT Authentication App (including form validation, check signup username/email duplicates, test authorization for 3 roles: Admin, Moderator, User) with Spring Boot Server:
https://youtu.be/QdXHkybzrUU
Angular + Node Express:
https://youtu.be/TZP0jMugC3k
The Angular project in video uses Session Storage instead of HttpOnly Cookie for storing JWT, but the flow or structure is the same.
Component Diagram with Router and HttpInterceptor
Now look at the diagram below.
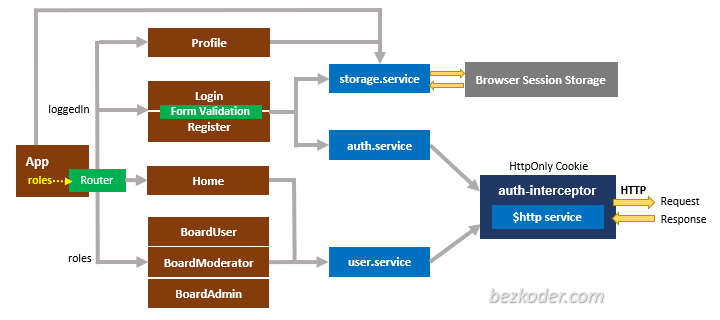
– The App component is a container using Router. It gets user user information from Browser Session Storage via storage.service. Then the navbar now can display based on the user login state & roles.
– Login & Register components have form for submission data (with support of Form Validation). They use storage.service for checking state and auth.service for sending signin/signup requests.
– auth.service uses Angular HttpClient ($http service) to make authentication requests.
– every HTTP request by $http service will be inspected and transformed before being sent by auth-interceptor.
– Home component is public for all visitor.
– Profile component get user data from Session Storage.
– BoardUser, BoardModerator, BoardAdmin components will be displayed depending on roles from Session Storage. In these components, we use user.service to get protected resources from API (with JWT in HttpOnly Cookie).
Technology
– Angular 14
– RxJS 7
– Angular CLI 14
– Bootstrap 4
Setup Angular 14 Jwt Authentication Project
Let’s open cmd and use Angular CLI to create a new Angular 14 Project as following command:
ng new angular-14-jwt-auth
? Would you like to add Angular routing? Yes
? Which stylesheet format would you like to use? CSS
We also need to generate some Components and Services:
ng g s _services/auth
ng g s _services/storage
ng g s _services/user

ng g c login
ng g c register
ng g c home
ng g c profile
ng g c board-admin
ng g c board-moderator
ng g c board-user
After the previous process is done, under src folder, let’s create _helpers folder and http.interceptor.ts file inside.
Now you can see that our project directory structure looks like this.
Project Structure
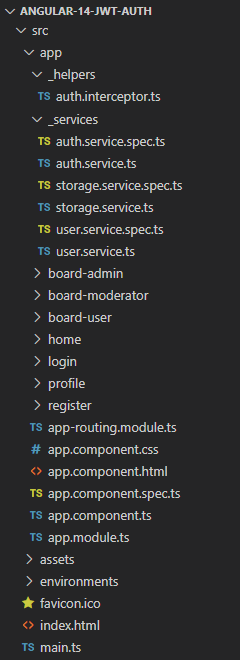
With the explanation in Component Diagram above, you can easily understand this project structure.
How to store JWT token in HttpOnly Cookie with Angular 14
After receiving /login request, the server sends one or more Set-Cookie headers with the HTTP response.
The browser stores the Cookie and sends it with HTTP requests inside a Cookie HTTP header.
So how to tell browser that?
We will use withCredentials: true to attach the cookie to API calls for cross-site requests. It is because our Rest API and angular domains (ports) are different.
For example:
http.post('/auth/login', user, { withCredentials: true });
http.get('/test/user', { withCredentials: true });
http.get('/test/mod', { withCredentials: true });
http.get('/test/admin', { withCredentials: true });
We can also use Angular Http Interceptor to do this. So we don’t need to attach { withCredentials: true } on every request.
http.post('/auth/login', user);
http.get('/test/user');
http.get('/test/mod');
http.get('/test/admin');

// HttpRequestInterceptor implements HttpInterceptor
// automatically add { withCredentials: true }
Angular 14 Http Interceptor
HttpInterceptor has intercept() method to inspect and transform HTTP requests before they are sent to server.
HttpRequestInterceptor implements HttpInterceptor. We’re gonna add withCredentials: true to make browser include Cookie on the Request header (HttpOnly Cookie).
_helpers/http.interceptor.ts
import { Injectable } from '@angular/core';
import { HttpEvent, HttpInterceptor, HttpHandler, HttpRequest, HTTP_INTERCEPTORS } from '@angular/common/http';
import { Observable } from 'rxjs';

@Injectable()
export class HttpRequestInterceptor implements HttpInterceptor {
  intercept(req: HttpRequest<any>, next: HttpHandler): Observable<HttpEvent<any>> {
    req = req.clone({
      withCredentials: true,
    });

    return next.handle(req);
  }
}

export const httpInterceptorProviders = [
  { provide: HTTP_INTERCEPTORS, useClass: HttpRequestInterceptor, multi: true },
];
intercept() gets HTTPRequest object, change it and forward to HttpHandler object’s handle() method. It transforms HTTPRequest object into an Observable<HttpEvents>.
next: HttpHandler object represents the next interceptor in the chain of interceptors. The final ‘next’ in the chain is the Angular HttpClient.
Setup App Module
Open app.module.ts, then import FormsModule & HttpClientModule.
We also need to add authInterceptorProviders in providers.
import { NgModule } from '@angular/core';
import { BrowserModule } from '@angular/platform-browser';
import { FormsModule } from '@angular/forms';
import { HttpClientModule } from '@angular/common/http';

import { AppRoutingModule } from './app-routing.module';
import { AppComponent } from './app.component';
import { LoginComponent } from './login/login.component';
import { RegisterComponent } from './register/register.component';
import { HomeComponent } from './home/home.component';
import { ProfileComponent } from './profile/profile.component';
import { BoardAdminComponent } from './board-admin/board-admin.component';
import { BoardModeratorComponent } from './board-moderator/board-moderator.component';
import { BoardUserComponent } from './board-user/board-user.component';

import { httpInterceptorProviders } from './_helpers/http.interceptor';

@NgModule({
  declarations: [
    AppComponent,
    LoginComponent,
    RegisterComponent,
    HomeComponent,
    ProfileComponent,
    BoardAdminComponent,
    BoardModeratorComponent,
    BoardUserComponent
  ],
  imports: [
    BrowserModule,
    AppRoutingModule,
    FormsModule,
    HttpClientModule
  ],
  providers: [httpInterceptorProviders],
  bootstrap: [AppComponent]
})
export class AppModule { }
Create Services
Authentication Service
This service sends registration, login, logout HTTP POST requests to back-end.
It provides following important functions:
login(): POST {username, password}register(): POST {username, email, password}logout(): POST logout request
_services/auth.service.ts
import { Injectable } from '@angular/core';
import { HttpClient, HttpHeaders } from '@angular/common/http';
import { Observable } from 'rxjs';

const AUTH_API = 'http://localhost:8080/api/auth/';

const httpOptions = {
  headers: new HttpHeaders({ 'Content-Type': 'application/json' })
};

@Injectable({
  providedIn: 'root',
})
export class AuthService {
  constructor(private http: HttpClient) {}

  login(username: string, password: string): Observable<any> {
    return this.http.post(
      AUTH_API + 'signin',
      {
        username,
        password,
      },
      httpOptions
    );
  }

  register(username: string, email: string, password: string): Observable<any> {
    return this.http.post(
      AUTH_API + 'signup',
      {
        username,
        email,
        password,
      },
      httpOptions
    );
  }

  logout(): Observable<any> {
    return this.http.post(AUTH_API + 'signout', { }, httpOptions);
  }
}
Storage Service
StorageService manages user information (username, email, roles) inside Browser’s Session Storage. For Logout, we will clear this Session Storage.
_services/storage.service.ts
import { Injectable } from '@angular/core';

const USER_KEY = 'auth-user';

@Injectable({
  providedIn: 'root'
})
export class StorageService {
  constructor() {}

  clean(): void {
    window.sessionStorage.clear();
  }

  public saveUser(user: any): void {
    window.sessionStorage.removeItem(USER_KEY);
    window.sessionStorage.setItem(USER_KEY, JSON.stringify(user));
  }

  public getUser(): any {
    const user = window.sessionStorage.getItem(USER_KEY);
    if (user) {
      return JSON.parse(user);
    }

    return {};
  }

  public isLoggedIn(): boolean {
    const user = window.sessionStorage.getItem(USER_KEY);
    if (user) {
      return true;
    }

    return false;
  }
}
Data Service
This service provides methods to access public and protected resources. Because HttpOnly Cookies will be automatically sent along with HTTP requests (via Http Interceptor), so we just simply use Http module without caring about JWT.
_services/user.service.ts
import { Injectable } from '@angular/core';
import { HttpClient } from '@angular/common/http';
import { Observable } from 'rxjs';

const API_URL = 'http://localhost:8080/api/test/';

@Injectable({
  providedIn: 'root',
})
export class UserService {
  constructor(private http: HttpClient) {}

  getPublicContent(): Observable<any> {
    return this.http.get(API_URL + 'all', { responseType: 'text' });
  }

  getUserBoard(): Observable<any> {
    return this.http.get(API_URL + 'user', { responseType: 'text' });
  }

  getModeratorBoard(): Observable<any> {
    return this.http.get(API_URL + 'mod', { responseType: 'text' });
  }

  getAdminBoard(): Observable<any> {
    return this.http.get(API_URL + 'admin', { responseType: 'text' });
  }
}
Add Bootstrap to Angular 14 project
Open index.html and add following line into <head> tag:
<!DOCTYPE html>
<html lang="en">
  <head>
    ...
    <link rel="stylesheet" href="https://unpkg.com/bootstrap@4.6.0/dist/css/bootstrap.min.css" />
  </head>
  ...
</html>
Another way is installing Bootstrap module with command: npm install bootstrap@4.6.1.
Then add following code into src/style.css:
@import "~bootstrap/dist/css/bootstrap.css";
Create Components for Authentication
Register Component
This component binds form data (username, email, password) from template to AuthService.register() method that returns an Observable object.
register/register.component.ts
import { Component, OnInit } from '@angular/core';
import { AuthService } from '../_services/auth.service';

@Component({
  selector: 'app-register',
  templateUrl: './register.component.html',
  styleUrls: ['./register.component.css']
})
export class RegisterComponent implements OnInit {
  form: any = {
    username: null,
    email: null,
    password: null
  };
  isSuccessful = false;
  isSignUpFailed = false;
  errorMessage = '';

  constructor(private authService: AuthService) { }

  ngOnInit(): void {
  }

  onSubmit(): void {
    const { username, email, password } = this.form;

    this.authService.register(username, email, password).subscribe({
      next: data => {
        console.log(data);
        this.isSuccessful = true;
        this.isSignUpFailed = false;
      },
      error: err => {
        this.errorMessage = err.error.message;
        this.isSignUpFailed = true;
      }
    });
  }
}
We use Form Validation in the template:
username: required, minLength=3, maxLength=20email: required, email format- password: required, minLength=6
register/register.component.html
<div class="col-md-12">
  <div class="card card-container">
    <img
      id="profile-img"
      src="//ssl.gstatic.com/accounts/ui/avatar_2x.png"
      class="profile-img-card"
    />
    <form
      *ngIf="!isSuccessful"
      name="form"
      (ngSubmit)="f.form.valid && onSubmit()"
      #f="ngForm"
      novalidate
    >
      <div class="form-group">
        <label for="username">Username</label>
        <input
          type="text"
          class="form-control"
          name="username"
          [(ngModel)]="form.username"
          required
          minlength="3"
          maxlength="20"
          #username="ngModel"
          [ngClass]="{ 'is-invalid': f.submitted && username.errors }"
        />
        <div class="invalid-feedback" *ngIf="username.errors && f.submitted">
          <div *ngIf="username.errors['required']">Username is required</div>
          <div *ngIf="username.errors['minlength']">
            Username must be at least 3 characters
          </div>
          <div *ngIf="username.errors['maxlength']">
            Username must be at most 20 characters
          </div>
        </div>
      </div>
      <div class="form-group">
        <label for="email">Email</label>
        <input
          type="email"
          class="form-control"
          name="email"
          [(ngModel)]="form.email"
          required
          email
          #email="ngModel"
          [ngClass]="{ 'is-invalid': f.submitted && email.errors }"
        />
        <div class="invalid-feedback" *ngIf="email.errors && f.submitted">
          <div *ngIf="email.errors['required']">Email is required</div>
          <div *ngIf="email.errors['email']">
            Email must be a valid email address
          </div>
        </div>
      </div>
      <div class="form-group">
        <label for="password">Password</label>
        <input
          type="password"
          class="form-control"
          name="password"
          [(ngModel)]="form.password"
          required
          minlength="6"
          #password="ngModel"
          [ngClass]="{ 'is-invalid': f.submitted && password.errors }"
        />
        <div class="invalid-feedback" *ngIf="password.errors && f.submitted">
          <div *ngIf="password.errors['required']">Password is required</div>
          <div *ngIf="password.errors['minlength']">
            Password must be at least 6 characters
          </div>
        </div>
      </div>
      <div class="form-group">
        <button class="btn btn-primary btn-block">Sign Up</button>
      </div>

      <div class="alert alert-warning" *ngIf="f.submitted && isSignUpFailed">
        Signup failed!<br />{{ errorMessage }}
      </div>
    </form>

    <div class="alert alert-success" *ngIf="isSuccessful">
      Your registration is successful!
    </div>
  </div>
</div>
In the code above, we use Template Driven Form, for more details please visit:
Angular 14 Template Driven Forms Validation example
Login Component
Login Component also uses AuthService to work with Observable object. Besides that, it calls StorageService methods to check loggedIn status and save User info to Session Storage.
login/login.component.ts
import { Component, OnInit } from '@angular/core';
import { AuthService } from '../_services/auth.service';
import { StorageService } from '../_services/storage.service';

@Component({
  selector: 'app-login',
  templateUrl: './login.component.html',
  styleUrls: ['./login.component.css']
})
export class LoginComponent implements OnInit {
  form: any = {
    username: null,
    password: null
  };
  isLoggedIn = false;
  isLoginFailed = false;
  errorMessage = '';
  roles: string[] = [];

  constructor(private authService: AuthService, private storageService: StorageService) { }

  ngOnInit(): void {
    if (this.storageService.isLoggedIn()) {
      this.isLoggedIn = true;
      this.roles = this.storageService.getUser().roles;
    }
  }

  onSubmit(): void {
    const { username, password } = this.form;

    this.authService.login(username, password).subscribe({
      next: data => {
        this.storageService.saveUser(data);

        this.isLoginFailed = false;
        this.isLoggedIn = true;
        this.roles = this.storageService.getUser().roles;
        this.reloadPage();
      },
      error: err => {
        this.errorMessage = err.error.message;
        this.isLoginFailed = true;
      }
    });
  }

  reloadPage(): void {
    window.location.reload();
  }
}
Here are what we validate in the form:
username: required- password: required, minLength=6
login/login.component.html
<div class="col-md-12">
  <div class="card card-container">
    <img
      id="profile-img"
      src="//ssl.gstatic.com/accounts/ui/avatar_2x.png"
      class="profile-img-card"
    />
    <form
      *ngIf="!isLoggedIn"
      name="form"
      (ngSubmit)="f.form.valid && onSubmit()"
      #f="ngForm"
      novalidate
    >
      <div class="form-group">
        <label for="username">Username</label>
        <input
          type="text"
          class="form-control"
          name="username"
          [(ngModel)]="form.username"
          required
          #username="ngModel"
          [ngClass]="{ 'is-invalid': f.submitted && username.errors }"
        />
        <div *ngIf="username.errors && f.submitted" class="invalid-feedback">
          Username is required!
        </div>
      </div>
      <div class="form-group">
        <label for="password">Password</label>
        <input
          type="password"
          class="form-control"
          name="password"
          [(ngModel)]="form.password"
          required
          minlength="6"
          #password="ngModel"
          [ngClass]="{ 'is-invalid': f.submitted && password.errors }"
        />
        <div *ngIf="password.errors && f.submitted" class="invalid-feedback">
          <div *ngIf="password.errors['required']">Password is required</div>
          <div *ngIf="password.errors['minlength']">
            Password must be at least 6 characters
          </div>
        </div>
      </div>
      <div class="form-group">
        <button class="btn btn-primary btn-block">
          Login
        </button>
      </div>
      <div class="form-group">
        <div *ngIf="f.submitted && isLoginFailed" class="alert alert-danger" role="alert">
          Login failed: {{ errorMessage }}
        </div>
      </div>
    </form>

    <div class="alert alert-success" *ngIf="isLoggedIn">
      Logged in as {{ roles }}.
    </div>
  </div>
</div>
Profile Component
This Component gets current User from Storage using StorageService and show information (username, token, email, roles).
profile/profile.component.ts
import { Component, OnInit } from '@angular/core';
import { StorageService } from '../_services/storage.service';

@Component({
  selector: 'app-profile',
  templateUrl: './profile.component.html',
  styleUrls: ['./profile.component.css']
})
export class ProfileComponent implements OnInit {
  currentUser: any;

  constructor(private storageService: StorageService) { }

  ngOnInit(): void {
    this.currentUser = this.storageService.getUser();
  }
}
profile/profile.component.html
<div class="container" *ngIf="currentUser; else loggedOut">
  <header class="jumbotron">
    <h3>
      <strong>{{ currentUser.username }}</strong> Profile
    </h3>
  </header>
  <p>
    <strong>Email:</strong>
    {{ currentUser.email }}
  </p>
  <strong>Roles:</strong>
  <ul>
    <li *ngFor="let role of currentUser.roles">
      {{ role }}
    </li>
  </ul>
</div>

<ng-template #loggedOut>
  Please login.
</ng-template>
Create Role-based Components
Public Component
Our Home Component will use UserService to get public resources from back-end.
home/home.component.ts
import { Component, OnInit } from '@angular/core';
import { UserService } from '../_services/user.service';

@Component({
  selector: 'app-home',
  templateUrl: './home.component.html',
  styleUrls: ['./home.component.css']
})
export class HomeComponent implements OnInit {
  content?: string;

  constructor(private userService: UserService) { }

  ngOnInit(): void {
    this.userService.getPublicContent().subscribe({
      next: data => {
        this.content = data;
      },
      error: err => {console.log(err)
        if (err.error) {
          this.content = JSON.parse(err.error).message;
        } else {
          this.content = "Error with status: " + err.status;
        }
      }
    });
  }
}
home/home.component.html
<div class="container">
  <header class="jumbotron">
    <p>{{ content }}</p>
  </header>
</div>
Protected Components
These Components are role-based. But authorization will be processed by back-end.
We only need to call UserService methods:
- getUserBoard()
- getModeratorBoard()
- getAdminBoard()
Here is an example for BoardAdminComponent.
BoardModeratorComponent & BoardUserComponent are similar.
board-admin/board-admin.component.ts
import { Component, OnInit } from '@angular/core';
import { UserService } from '../_services/user.service';

@Component({
  selector: 'app-board-admin',
  templateUrl: './board-admin.component.html',
  styleUrls: ['./board-admin.component.css']
})
export class BoardAdminComponent implements OnInit {
  content?: string;

  constructor(private userService: UserService) { }

  ngOnInit(): void {
    this.userService.getAdminBoard().subscribe({
      next: data => {
        this.content = data;
      },
      error: err => {console.log(err)
        if (err.error) {
          this.content = JSON.parse(err.error).message;
        } else {
          this.content = "Error with status: " + err.status;
        }
      }
    });
  }
}
board-admin/board-admin.component.html
<div class="container">
  <header class="jumbotron">
    <p>{{ content }}</p>
  </header>
</div>
App Routing Module
We configure the Routing for our Angular app in app-routing.module.ts.
import { NgModule } from '@angular/core';
import { RouterModule, Routes } from '@angular/router';

import { RegisterComponent } from './register/register.component';
import { LoginComponent } from './login/login.component';
import { HomeComponent } from './home/home.component';
import { ProfileComponent } from './profile/profile.component';
import { BoardUserComponent } from './board-user/board-user.component';
import { BoardModeratorComponent } from './board-moderator/board-moderator.component';
import { BoardAdminComponent } from './board-admin/board-admin.component';

const routes: Routes = [
  { path: 'home', component: HomeComponent },
  { path: 'login', component: LoginComponent },
  { path: 'register', component: RegisterComponent },
  { path: 'profile', component: ProfileComponent },
  { path: 'user', component: BoardUserComponent },
  { path: 'mod', component: BoardModeratorComponent },
  { path: 'admin', component: BoardAdminComponent },
  { path: '', redirectTo: 'home', pathMatch: 'full' }
];

@NgModule({
  imports: [RouterModule.forRoot(routes)],
  exports: [RouterModule]
})
export class AppRoutingModule { }
Routes array is passed to the RouterModule.forRoot() method.
We’re gonna use <router-outlet></router-outlet> directive in the App Component where contains navbar and display Components (corresponding to routes) content.
App Component
This component is the root Component of our Angular 14 application, it defines the root tag: <app-root></app-root> that we use in index.html.
app.component.ts
import { Component } from '@angular/core';
import { StorageService } from './_services/storage.service';
import { AuthService } from './_services/auth.service';

@Component({
  selector: 'app-root',
  templateUrl: './app.component.html',
  styleUrls: ['./app.component.css']
})
export class AppComponent {
  private roles: string[] = [];
  isLoggedIn = false;
  showAdminBoard = false;
  showModeratorBoard = false;
  username?: string;

  constructor(private storageService: StorageService, private authService: AuthService) { }

  ngOnInit(): void {
    this.isLoggedIn = this.storageService.isLoggedIn();

    if (this.isLoggedIn) {
      const user = this.storageService.getUser();
      this.roles = user.roles;

      this.showAdminBoard = this.roles.includes('ROLE_ADMIN');
      this.showModeratorBoard = this.roles.includes('ROLE_MODERATOR');

      this.username = user.username;
    }
  }

  logout(): void {
    this.authService.logout().subscribe({
      next: res => {
        console.log(res);
        this.storageService.clean();

        window.location.reload();
      },
      error: err => {
        console.log(err);
      }
    });
  }
}
First, we check isLoggedIn status using StorageService, if it is true, we get user’s roles and set value for showAdminBoard & showModeratorBoard flag. They will control how template navbar displays its items.
The App Component template also has a Logout button link that call logout() method and reload the window.
app.component.html
<div id="app">
  <nav class="navbar navbar-expand navbar-dark bg-dark">
    <a href="#" class="navbar-brand">bezKoder</a>
    <ul class="navbar-nav mr-auto" routerLinkActive="active">
      <li class="nav-item">
        <a href="/home" class="nav-link" routerLink="home">Home </a>
      </li>
      <li class="nav-item" *ngIf="showAdminBoard">
        <a href="/admin" class="nav-link" routerLink="admin">Admin Board</a>
      </li>
      <li class="nav-item" *ngIf="showModeratorBoard">
        <a href="/mod" class="nav-link" routerLink="mod">Moderator Board</a>
      </li>
      <li class="nav-item">
        <a href="/user" class="nav-link" *ngIf="isLoggedIn" routerLink="user">User</a>
      </li>
    </ul>

    <ul class="navbar-nav ml-auto" *ngIf="!isLoggedIn">
      <li class="nav-item">
        <a href="/register" class="nav-link" routerLink="register">Sign Up</a>
      </li>
      <li class="nav-item">
        <a href="/login" class="nav-link" routerLink="login">Login</a>
      </li>
    </ul>

    <ul class="navbar-nav ml-auto" *ngIf="isLoggedIn">
      <li class="nav-item">
        <a href="/profile" class="nav-link" routerLink="profile">{{ username }}</a>
      </li>
      <li class="nav-item">
        <a href class="nav-link" (click)="logout()">LogOut</a>
      </li>
    </ul>
  </nav>

  <div class="container">
    <router-outlet></router-outlet>
  </div>
</div>
Run the Angular 14 JWT Authentication and Authorization project
You can run this App with command: ng serve.
This client will work well with the back-end in following posts:
- Spring Boot Login and Registration example with H2
- Spring Boot Login and Registration example with MySQL
- Spring Boot Login and Registration example with MongoDB
- Node.js Express Login and Registration example with MySQL
- Node.js Express Login and Registration example with MongoDB
Before running the backend server, you need to add minor configuration:
– Spring Boot:
/* In AuthController.java */
// @CrossOrigin(origins = "*", maxAge = 3600)
@CrossOrigin(origins = "http://localhost:8081", maxAge = 3600, allowCredentials="true")

/* In TestController.java */
// @CrossOrigin(origins = "*", maxAge = 3600)
@CrossOrigin(origins = "http://localhost:8081", maxAge = 3600, allowCredentials="true")
– Node.js Express:
/* In server.js */
// app.use(cors());
app.use(
  cors({
    credentials: true,
    origin: ["http://localhost:8081"],
  })
);
They configure CORS for port 8081, so you have to run Angular Client command instead:
ng serve --port 8081
Conclusion
Today we’ve done so many things from setup Angular 14 Token based Authentication and Authorization Project to write Login and Registration example with JWT, HttpOnly Cookie and Web Api. I hope you understand the overall layers of our Angular application, and apply it in your project at ease. Now you can build a front-end app that supports JWT Authentication & Authorization with Angular 14, HttpInterceptor and Router.
More Practice: Angular 14 – Logout when Token is expired
You will need to implement refresh token:
Angular 14 Refresh Token with JWT & Interceptor example
Happy learning, see you again!
Further Reading
- Angular Form Validation example (Reactive Forms)
- Angular CRUD Application example with Web API
- Angular File upload example with Progress bar
- Angular Pagination example | ngx-pagination
Fullstack:
– Angular + Spring Boot: JWT Authentication & Authorization example
– Angular + Node.js Express: JWT Authentication & Authorization example
Source Code
You can find the complete source code for this tutorial on Github.
More Practice: Angular 14 – Logout when Token is expired
Newer version: Angular 15 JWT Authentication & Authorization example
- 登录 发表评论